background image

 
1700-1800° Tube 


Insulation Replacement 


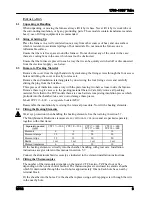
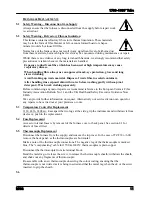
After any replacement of insulation material, run the furnace at 1500°C to burn off volatile matter. 
Do this is a well ventilated area, without the work tube in place. 

5.7 

Element Installation & Replacement 

Safety Warning – Molybdenum Disilicide elements.  

The elements form a glazed surface when heated. Internal stresses can form 
through heating and cooling which render the glaze fragile. The glaze can 
sometimes splinter into a shower of sharp particles when handled. Always wear eye 
protection when handling the elements.


Handle the heating elements with extreme care as they are very fragile. Also, avoid touching the 
heating surface (the thin part of the element). 


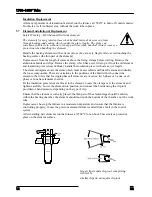
Replacement:

 Note the length of element above the fixing clamps before starting. Remove the 

aluminium braids and clips. Remove the clamp, which has a screw fixing. Lift out the old element 
and insulation piece (element block): handle the insulation piece with care as it is fragile. 


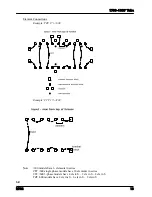
The element diagram shows the items which must be assembled and fitted. Examine and identify 
the loose components. There are variations in the positions of the braids which connect the 
elements: the rule is that for single phase all elements are in series; for 3-phase or 3-zone, each 
phase or zone has elements in series. 


Fit the insulation piece (element block) to the element. Locate the clamps over the element, and 
tighten carefully. Lower the element into position, and connect the braids using the clip tool 
provided or hand pressure, depending on the type of clip. 


Ensure that the element is correctly placed: the thin part of the element legs should be entirely 
within the heating chamber; the element should not touch the bottom of the chamber, nor the work 
tube. 


Replacement:

 heat up the furnace to a moderate temperature and ensure that the furnace is 

controlling properly, in case the previous element failure resulted from a fault in the control 
system. 


After installing new elements run the furnace at 1500°C for an hour. This creates a protective 
glaze on the element surface. 


12 

MF32 

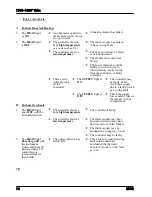
larger clips require clip tool, comprising 
two levers 

smaller clips do no require clip tool 

Summary of Contents for CTF

Page 1: ...d to the electricity supply CONTENTS page section 1 0 Symbols Warnings 1 2 0 Installation 3 3 0 Operation 6 4 0 Maintenance 10 5 0 Repairs Replacements 11 6 0 Fault Analysis 14 7 0 Circuit Diagram 14 8 0 Fuses Power Control 16 9 0 Specifications 17 Manuals for the furnace controller and overtemperature controller are supplied separately Please read the controller manuals before operating the furna...

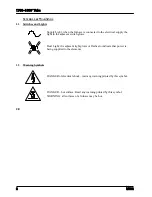
Page 2: ... in the adjacent switch glows Heat Light the adjacent light glows or flashes to indicate that power is being supplied to the elements 1 2 Warning Symbols DANGER of electrical shock read any warning printed by this symbol DANGER hot surface Read any warning printed by this symbol WARNING all surfaces of a furnace may be hot 2 0 2 MF32 ...

Page 3: ... material therein Carefully remove all packing material Note that in the TZF models there are zone barriers comprising insulation pieces which protrude into the chamber take care not to damage these pieces Model TZF 18 600 see separate booklet MS12 Reassemble the insulation by reversing the removal procedure Now fit the heating elements 2 4 Fitting the Heating Elements Wear eye protection when han...

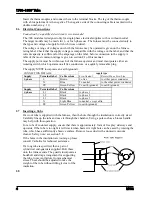
Page 4: ...l label Cable colour Live Neutral Reversible or Live Live 1 phase L Brown To live to either power conductor N Blue To neutral to the other power conductor PE Green Yellow To earth ground to earth ground Supply Terminal label Cable colour 3 phase L1 Black to phase 1 L2 Black to phase 2 L3 Black to phase 3 N Light Blue to neutral except delta PE Green Yellow to earth ground 2 7 Inserting a Tube If a...

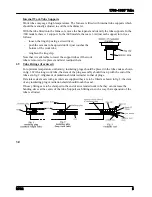
Page 5: ...er the support tubes if the work tube is removed or replaced and later readjust them 2 9 Tube Fittings if ordered For optimum temperature uniformity insulating plugs should be placed in the tube ends as shown in fig 1 With a long work tube the stem of the plug assembly should line up with the end of the tube as in fig 2 Alignment of radiation shields is similar to that of plugs If stainless steel ...

Page 6: ...eft off isolate it from the electrical supply 3 2 Operating Cycle TZF See section 3 3 for a description of the control methods A B C The furnace is fitted with a combined Supply light and Instrument switch The light is on whenever the furnace is connected to the supply The switch cuts off power to the controllers and contactor Connect the furnace to the electrical supply The Supply light should gl...

Page 7: ... this type of control does not cool down the end controllers try to remain at the central temperature Should this occur contact Carbolite s technical department 2132 Slave Controller Navigation Diagram Home List Access List C F k ACCS C F k codE 4 Zone temperature difference home list 0 0 Used in factory configuration not accessible to the operator B Retransmission of Setpoint In this system the c...

Page 8: ...ot arise Poor thermal contact should be encouraged between the workpiece and the tube crucibles or boats should be of low thermal mass and should have feet to reduce the contact with the tube fig 4 Avoid metal directly touching the work tube see the safety warning above Do not set too high a heating rate Large diameter tubes are more susceptible to thermal shock than smaller A general rule for max...

Page 9: ...1700 1800 Tube 4 0 MF32 9 ...

Page 10: ...he serial number and model type are also given on the front of this booklet when supplied with a furnace To contact Thermal Engineering Services or Carbolite see the back page of this manual 4 4 Recommended Spares Kits Carbolite can supply individual spares or a kit of the items most likely to be required Ordering a kit in advance can save time in the event of a breakdown Each kit comprises one th...

Page 11: ... repairs we recommend reference to the European Ceramic Fibre Industry Association Bulletin No 11 and the UK Health and Safety Executive Guidance Note EH46 We can provide further information on request Alternatively our service division can quote for any repairs to be carried out at your premises or ours 5 3 Temperature Controller Replacement 2132 2416 2408 etc Ease apart the two lugs at the side ...

Page 12: ...he element diagram shows the items which must be assembled and fitted Examine and identify the loose components There are variations in the positions of the braids which connect the elements the rule is that for single phase all elements are in series for 3 phase or 3 zone each phase or zone has elements in series Fit the insulation piece element block to the element Locate the clamps over the ele...

Page 13: ...17 600 Example CTF 17 300 Note 300 models have 6 elements in series CTF 600 single phase models have 10 elements in series CTF 600 3 phase models have 4 els in S 2 els in S 4 els in S TZF 600 models have 2 els ins S 6 els in S 2 els in S 6 0 MF32 13 ...

Page 14: ...e controller may be faulty or not receiving a supply due to a faulty switch or a wiring fault Æ The SUPPLY light is OFF Æ Check the supply fuses and any fuses in the furnace control compartment B Furnace Overheats 1 The HEAT light goes OFF with the instrument switch Æ The controller shows a very high temperature Æ The controller is faulty Æ The controller shows a low temperature Æ The thermocouple...

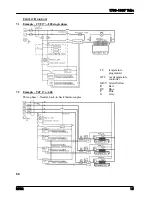
Page 15: ...AGRAM 7 1 Example CTF 17 300 single phase 7 2 Example TZF 17 600 Three phase Neutral back to back thermocouples TC temperature programmer OTC overtemperature controller GR Y Green Yellow R Red BU Blue P Pink G Grey 8 0 MF32 15 ...

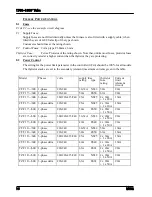
Page 16: ...Model Phases volts supply fuse rating type thyristor fuse rating Current limit element circuit CTF 17 300 1 phase 220 240 30 32A NS32 50A 90A CTF 17 600 1 phase 220 240 50A ES50 63A 90A CTF 17 600 3 phase 380 220 415 240 25A NS25 2 x 30A 1 x 20A 134A CTF 17 600 3 phase delta 220 240 25A NS25 2 x 30A 1 x 20A 134A TZF 17 600 1 phase 220 240 50A ES50 2 x 20A 1 x 50A 90A TZF 17 600 3 phase 380 220 415...

Page 17: ...ng the details below UK Office Keison Products P O Box 2124 Chelmsford Essex CM1 3UP England Tel 44 0 330 088 0560 Fax 44 0 1245 808399 Email sales keison co uk Please note Product designs and specifications are subject to change without notice The user is responsible for determining the suitability of this product ...

Reviews: