B-6 OPERATION B-6
4-Step Sequence
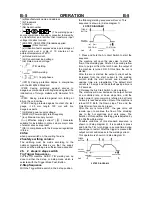
With the 4-step Selected, the following welding
sequence will occur.
1. Press and hold the Arc Start Switch to start the
sequence.
The machine will open the gas valve to start the
flow of the shielding gas. After a 0.5 second preflow
time, to purge air from the torch hose, the output of
the machine is turned ON. At this time the arc is
started.
After the arc is started the output current will be at
the Start current. This condition can be maintained
as long or as short as necessary.
If the Start current is not necessary, do not hold the
TIG torch trigger as described at the beginning of
this step. Instead, quickly press and release the
trigger. In this condition, the machine will
automatically pass from Step 1 to Step 2 when the
arc is started.
2. Release the TIG torch trigger to start the main
part of the weld.
The output current will be increased from the start
current to the welding current. Both the start current
and increase, or upslope time are presettable. The
default start current is 15 amps and the default
upslope time is 0.2 seconds.
3. Press and hold the TIG torch trigger when the
main part of the weld is complete.
The machine will now decrease the output current
at a controlled rate, or down slope time, until the
Finish current is reached. Both the Down slope
Time and the Finish Current are presettable. This
Finish current can be maintained as long or as short
as necessary.
4. Release the TIG torch trigger.
The output current of the machine will turn OFF and
the gas valve will remain open to continue the flow
of the shielding gas. The duration of this postflow
time is adjusted by the Postflow parameter. This
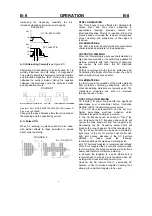
operation is shown in (4 step diagram 1).
4 STEP DIAGRAM 1
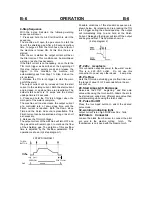
Possible variations of this standard sequence are
shown below. By releasing and re-pressing the TIG
torch trigger during the downslope step, the output
will immediately drop to and hold at the Finish
Current. Releasing the trigger will turn off the output
and begin postflow. This operation shown in
(4 step diagram 2)
`
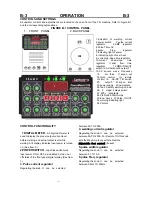
27. 220v receptacle
This connection supplies power to the water cooler.
This is a 220 VAC outlet. Do not use this
connection to power any other device. 4 amp max.
28. PreFlow
Sets the TIG mode shielding gas pre flow time over
the range of about 0 to 10 seconds before the arc
will shut on.
29. Start Amps &30. End Amps
Serves as the 2T/4T beginning and final amp
value while using the torch switch. Allows the arc to
be started and ended at a different amp value than
normal welding while using the torch switch.
31. Pulse On/Off.
Press the touch-pad button to select the desired
pulse mode.
32. warning indicating light
output current is too high or the machine fails.
34.Pilotarc Connector
Loosen the black thumb screw to connect the pilot
arc wire to the plasma cutting torch. The
thumbscrew is only used with the plasma torch.
TORCH
BUTTON
OUTPUT
CURRENT
GAS
PRE-FLOW
GAS ON
POST-FLOW
Summary of Contents for PowerMaster256
Page 28: ...B 13 OPERATION B 13 ...
Page 29: ...B 14 OPERATION B 14 ...
Page 30: ...B 15 OPERATION B 15 ...
Page 34: ...B 19 OPERATION B 19 ...
Page 35: ...B 20 OPERATION B 20 ...
Page 36: ...B 21 OPERATION B 21 ...
Page 37: ...B 22 OPERATION B 22 ...

