Page 20
T
O
S
ET
U
P
A
DVANCED
S
ETTINGS
:
<
Menu
a
A
DD BEAM BREAK
*
2
*Beam break is an optional accessory.
Operator is in normal operating mode.
1.
Press
%
for 10 seconds until LED
X
flashes rapidly and all others are illuminated.
2.
Release
%
where after LED
S
blinks and all others are illuminated.
3.
A. Press
&
if a beam break is to be installed (LED
W
illuminated)
B. Press
/
if no beam break is to be installed (LED
X
blinks rapid)
4.
Press
%
to store settings and to go to Menu
b
.
<
Menu
b
S
ET MAXIMUM OPENING FORCE
2
AND
6
!
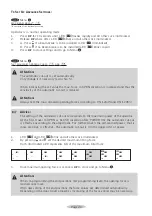
Attention:
When re-programming the end positions (1st programming level) the opening force is
learned once more.
With new setting of the end positions the force values are determined automatically.
Depending on the door travel properties increasing of the force values may be necessary.
!
Attention:
The automatic cut-out is set automatically.
Only change it if necessary (error No. 5).
When increasing the set value the max. force in OPEN direction is increased and thus the
sensitivity of the automatic cut-out is reduced.
!
Attention:
Always test the max. allowed operating forces according to EN 12445 and EN 12453!
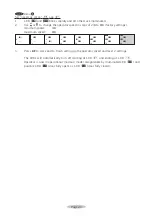
1.
LED
S
and LED
H
blink and all others are illuminated.
2.
By pressing
&
and
/
set the desired maximum lifting force.
Each illuminated LED represents 1/8 of the maximum total force.
3.
Once maximum opening force is set press
%
to store and go to Menu
c
.
I
Q
U
W
Z
E
T
R
8/8
K
Q
U
W
Z
E
T
R
7/8
8
Q
7
W
Z
E
T
R
6/8
8
Q
7
W
H
E
T
R
5/8
8
Q
7
W
6
E
5
R
4/8
8
Q
7
W
6
E
5
F
3/8
8
Q
7
W
6
3
5
4
2/8
8
Q
7
S
6
3
5
4
1/8
☞
Advice:
The setting of the automatic cut-out corresponds to the maximum power of the operator.
At the first travel to OPEN or CLOSE direction after 'POWER ON' the automatic cut-out
is effective according to the adjustment. For further travels the self-learned power, that is
more sensitive, is effective. The automatic cut-out is still the upper limit of power.


