22
Motor Installation
23
Motor Installation
While you are still applying tension to the V belt use a screwdriver to scribe
a mark on the motor mounting plate.
The V belt does not need to be under too much tension. When you have
scribed the mark on the mounting plate, remove the V belt from the pullies
and carefully slide the motor 3 to 5mm past the mark that you have scribed
with your screwdriver on the mounting plate. This will then give you the
correct belt tension to safely operate the motor without causing too much
stress on the resilient mounts. Once you have correct belt tension, tilt up the
motor slightly as you are doing up the first mounting bolt. Make sure you can
get all of your spanners onto each nut and bolt when you are tightening them
up. The reason for the slight tilt is that the motor is rubber mounted and it will
not sit perpendicular to the bracket under even the slightest bit of tension that
you apply from the belt. This is a way of lining up the fan and motor pullies
effectively without too much bother.
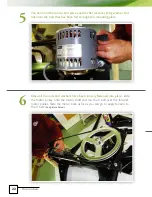
You can hold the motor and place another flat washer, spring washer and
nut onto the bolt that has been fed through the mounting plate.
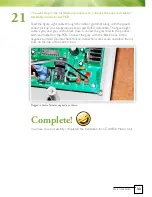
Once all the nuts and washers have been loosely fastened into place,
slide
the motor pulley onto the motor shaft and run the V belt over the fan and
motor pullies. Slide the motor back as far as you can go to apply tension to
the V belt.
(See picture below).
Once the first mounting bolt
has been tightened into place
get your straight edge and level
and place it across both the fan
and motor pullies.
This ensures
that the V belt sits nicely into the
grooves of the pullies and does
not over-stress the motor. To
adjust the height of the belt you
can move the motor pulley up
and down to obtain the correct
level.
Pictured Right >>.
7
5
6
8


