User Manual: xr100+_eng
13
Cardioline S.p.A.
Via Linz,151
38121 Trento (TN)
info@cardioline.it
www.cardioline.com
Sales office:
Via F.lli Bronzetti, 8 20129 Milano (MI) Italy tel.+39 02 94750470
fax +39 02 94750471
xr100+
4.7 Connecting the Blood Pressure Cuff
• Connect the microphone cable for blood pressure mea-
surement to the intended port (2) so that it clicks into
place.
• Slip the cuff tubing onto the fitting (3) and engage.
To disconnect, push back the connector‘s knurled
sleeve.
Artifacts that may be caused by patient movements during
the exercise test, must be avoided, while the blood pressure
is being taken.
Therefore, do not forget to attach the cuff tubing to the
handlebar with the supplied Velcro tape:
• Open the large Velcro tape and wrap it around the
handle bar.
• Secure the cuff tubing with the small Velcro tape, but
do not exert pressure on the tubing.
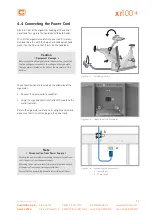
2
3
Figure 4 – 9: Blood pressure cuff connections
2 Microphone connection
3 Fitting for connection of cuff tubing
Figure 4 – 10: Velcro tape to secure the cuff tubing
4.8 Connecting the SpO2 Sensor
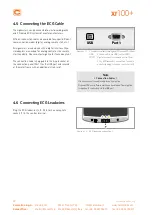
Connect the sensor cable to the corresponding socket (4)
on the underside of the control terminal.
4
Figure 4 – 11: SpO2 sensor connection
4 SpO2 connection
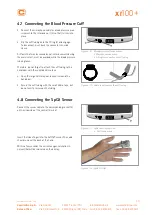
Insert the index finger into the SoftTip® sensor. The cable
should run over the back of the hand.
Within a few seconds the current oxygen saturation in
percent (%) will be indicated on the display.
Figure 4 – 12: SpO2 SoftTip®


