33
5
TROUBLESHOOTING, CARE AND MAINTENANCE
5.1
General Instructions
⚠
WARNING
+
Do not make any improper changes to the equipment.
⚠
CAUTION
+
Damaged or worn components may affect your safety and the life of the equipment.
Therefore, immediately replace damaged or worn components. In such a case, contact the
contract partner. The equipment must not be used until it has been repaired. If necessary, use
only original spare parts.
࣑
ATTENTION
+
In addition to the instructions and recommendations for maintenance and care given here,
additional service and/or repair work may be necessary; this must only be carried out by
authorised service technicians.
5.2
Faults and Fault Diagnosis
The equipment undergoes regular quality controls during production. Nevertheless, faults or
malfunctions may occur. Frequently, individual parts are responsible for these disturbances, an
exchange is usually sufficient. Please refer to the following overview for the most common errors and
how to correct them. If the equipment still does not function properly, contact your contract partner.
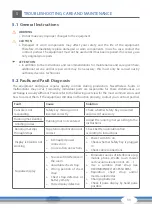
Fault
Cause
Solution
Console is not
responding
Safety key missing or not
inserted correctly
Check whether Safety Key is inserted
and insert if necessary
Running mat slanting
Running mat not centered
Adjust the running mat according to the
instructions
Grinding noises
Running mat slips
through/stops
Tape tension/lubrication not
correct
Check belt tension/lubrication
according to instructions
Display is blank/is not
working
+
Interrupted power
connection
+
Loose cabel connections
+
Power switch to on
+
Check whether Safety Key is plugged
in
+
Check cable connections
No pulse display
+
Sources of interference in
the room
+
unsuitable chest strap
+
Wrong position of chest
strap
+
Chest strap defective or
battery empty
+
Pulse display defective
+
Eliminate sources of interference (e.g.
mobile phone, WLAN, lawn mower
and vacuum cleaner robot, etc. ...)
+
Use a suitable chest strap (see
RECOMMENDED ACCESSORIES).
+
Reposition chest strap and/or
moisten electrodes
+
Changing batteries
+
Check if pulse display by hand pulse
possible
Summary of Contents for CST-TX90-2-HD
Page 2: ...2 TX90...
Page 44: ...44 TX90 8 3 Exploded Drawing...
Page 49: ...49 Notes...
Page 50: ...50 TX90 Notes...
Page 51: ...51...
Page 52: ...Treadmill TX90...


