background image

TX

50


14

2.3 

Assembly

Before assembly, take a close look at the individual assembly steps shown and carry out the assembly 

in the order given.


L

NOTICE

First loosely screw all parts together and check that they fit properly. Then tighten the screws 

using the tool only when you are instructed to do so.

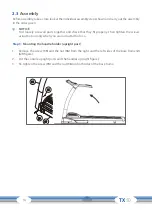
Step 1:

 Mounting the handle holder (upright post)

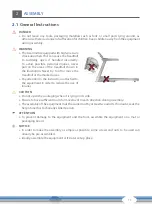
1.  Remove the screw (

15

) and the nut (

16

) from the right and the left sides of the base frame (

2

(left figure). 

2.  Put the console upright posts and the handles up (right figure). 
3.  Re-tighten the screw (

15

) and the nut (

16

) on both sides of the base frame.

Summary of Contents for TX-50

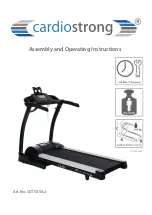
Page 1: ...CSTTX50 02 02 Art No CST TX50 2 Assembly and Operating Instructions...

Page 2: ...TX50 2...

Page 3: ...irtual simulations 29 3 3 5 HRC programmes pulse control 30 3 4 User setting 31 4 STORAGE AND TRANSPORT 32 4 1 General Instructions 32 4 2 Transportation Wheels 32 4 3 Folding Mechanism 32 4 3 1 Foldi...

Page 4: ...TX50 4 7 RECOMMENDED ACCESSORIES 39 8 ORDERING SPARE PARTS 40 8 1 Serial Number and Model Name 40 8 2 Parts List 41 8 3 Exploded Drawing 46 9 WARRANTY 47 10 CONTACT 49...

Page 5: ...1 for home fitness International Headquarters Flensburger Stra e 55 24837 Schleswig Germany Management Christian Grau Sebastian Campmann Dr Bernhard Schenkel No HRB 1000 SL Local Court Flensburg Europ...

Page 6: ...ect any mistakes Please pay close attention to the safety and maintenance instructions given here The contract partner cannot be held liable for damage to health accidents or damage to the equipment w...

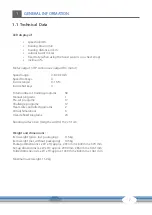
Page 7: ...number of training programs 58 Manual programs 1 Pre set programs 17 Challenge programs 12 Heart rate controlled programs 2 Virtual Simulations 6 User defined programs 20 Running surface size length...

Page 8: ...to the equipment Persons with disabilities must have a medical license and must be under strict observation when using the equipment The equipment is strictly for use by one person at a time If your...

Page 9: ...r defective contact your contract partner In the meantime the equipment must not be used ATTENTION The equipment requires a mains connection of 220 230V with 50 Hertz mains voltage The equipment may o...

Page 10: ...sides of the equipment The set up and mounting surface of the equipment should be flat loadable and solid ATTENTION The device may only be used in one building in sufficiently tempered and dry rooms a...

Page 11: ...treadmill at the marked areas Pay attention to the instructions attached to the equipment in order to reduce the risk of injuries CAUTION Do not open the packaging when it is lying on its side Ensure...

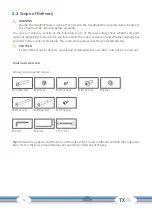
Page 12: ...inning check whether all parts and tools belonging to the device are included in the scope of delivery and whether damage has occurred In the event of complaints the contractual partner must be contac...

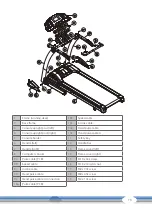
Page 13: ...e cable A 5 Console holder 11 Safety key 6 Handle left 12 Handle bar 7 Handle right 13 Frame cover left 8 Computer console 14 Frame cover right 9a Pulse cable PCB 15 M10 x 60L screw 9b Speed cable 16...

Page 14: ...check that they fit properly Then tighten the screws using the tool only when you are instructed to do so Step 1 Mounting the handle holder upright post 1 Remove the screw 15 and the nut 16 from the...

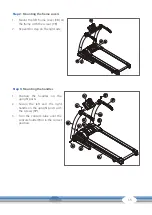
Page 15: ...th the screws 19 2 Repeat this step on the right side Step 3 Mounting the handles 1 Position the handles on the upright posts 2 Secure the left and the right handle on the upright posts with the screw...

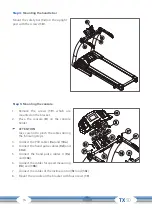
Page 16: ...the console D on the console holder ATTENTION Take care not to pinch the cables during the following steps 3 Connect the PCB cables 9a and 10a 4 Connect the hand pulse cables 9d and 10d 5 Connect the...

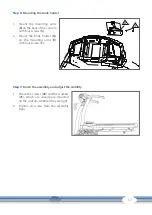
Page 17: ...ith four screws S 2 Mount the book holder Q on the mounting arms R with four screws T Step 7 Finish the assembly and adjust the stability 1 Check the screws 20 and the washers 21 which are already pre...

Page 18: ...the desired side and rotate the setting screws under the main frame 2 Rotate the screws clockwise in order to remove them and to raise the running surface 3 Rotate them counterclockwise in order to lo...

Page 19: ...nt of the cockpit If the safety key is no longer on the contact point the equipment automatically stops Therefore the Safety Key cord with the clip must be attached to your clothing before every train...

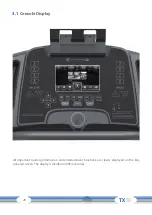
Page 20: ...TX50 20 3 1 Console Display All important training information and entertainment functions are clearly displayed on the big coloured screen The display is divided in different zones...

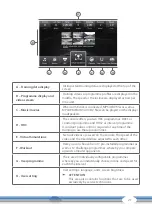
Page 21: ...2 as interval programme A constant pulse control is required at any time of the training to use these programmes E Virtual Simulations Six track videos are saved on the console The speed of the video...

Page 22: ...ogrammes set target values E Menu Back to the main menu F Pause Pause the training G Back Back to the last page H Start Start the training I Vol Increase or reduce the volume J Stop Stop the training...

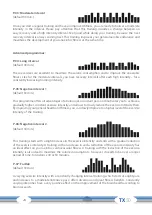
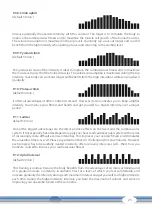
Page 23: ...the arrow buttons or hot keys you can individually choose the exercise parameters and change these at any time 3 3 1 Pre Set Programmes There are 17 pre defined programmes that differ in time intensi...

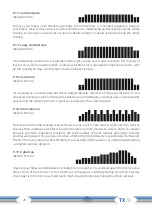
Page 24: ...pace and motivates you to achieve a gradually higher constant exercise intensity and allows to slowly reduce the exercise intensity then By improving your general health and fitness you can slowly im...

Page 25: ...health and get yourself to a higher intensity over a longer period P 11 Ladder default 30 min One of the biggest advantages are the direct positive effects on the heart and the cardiovascular system...

Page 26: ...to achieve a more challenging constant pace and to keep this pace during the whole training It is great as a preparation for a certain event P 16 Short interval default 20 min Studies prove that this...

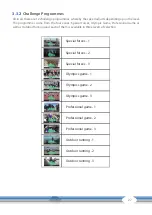
Page 27: ...e 3 Outdoor running 1 Outdoor running 2 Outdoor running 3 27 3 3 2 Challenge Programmes All in all there are 12 challenge programmes whereby the speed adjusts depending upon the level The programmes c...

Page 28: ...u determine the desired speed and incline for each of these 20 time sequences In contrast to the pre set profile programmes you can change speed AND incline at any time when using these programmes Hen...

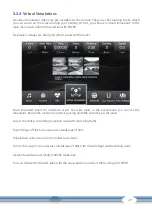
Page 29: ...interstate across the wide plain in the background you can see the mountains Beside the road some cattle is grazing and little streams pass the plain Across the Valley A winding mountain road with on...

Page 30: ...ss STOP the treadmill stops and an overview of the training data is displayed Press BACK to return to the main menu 3 3 5 HRC Programmes pulse control WARNING Your training equipment is not a medical...

Page 31: ...lection and press ENTER Symbols are displayed at the top right of the screen When a USB stick is plugged in the USB symbol is displayed here in addition the maintenance symbol is displayed here every...

Page 32: ...laminate lay out the transport route with cardboard or similar to avoid possible floor damage 1 Standbehindtheequipmentandliftituntiltheweightistransferredtothetransportationwheels After that you easi...

Page 33: ...of the running mat so that you have a stable lifting point 3 Make sure that the hydraulic brake is correctly locked and tilt the treadmill forward 4 Make sure that you are standing safely and make sur...

Page 34: ...ease refer to the following overview for the most common errors and how to correct them If the equipment still does not function properly contact your contract partner Fault Cause Solution Console onl...

Page 35: ...ntact your contract partner ERR 4 ERR 9 1 Error of the incline motor Check all cable connections of the incline motor for correct assembly 2 Turn off the power supply for a couple of seconds Should th...

Page 36: ...as centrally and straight as possible The alignment of the running mat can change depending on the stress and load Another reason can be the positioning of the equipment on an uneven surface CAUTION...

Page 37: ...running mat is not sufficiently lubricated friction increases significantly and this leads to heavy wear of the endless belt running plate motor and circuit board If you feel an increased friction of...

Page 38: ...e running mat I Plastic covers C I Screws and cable connections I Legend C clean I inspect 6 DISPOSAL At the end of its operational life this equipment cannot be disposed of in normal household waste...

Page 39: ...e a compatible chest strap as this ensures optimum transmission of the heart rate You may want to buy additional grips or weights for multi gyms Our range of accessories offers the highest quality and...

Page 40: ...list ready The corresponding contact options can be found in chapter 10 of this operating manual L L NOTICE The serial number of your equipment is unique It s located on a white sticker The exact posi...

Page 41: ...incline bracket 15 6 205112081806001 Sleeve 16 1 8000001762 Incline base 17 2 331410002003301 Pulley 18 1 8000001752 Support post L 19 1 8000001753 Support post R 20 1 8000001754 Handlebar L 21 1 8000...

Page 42: ...d sensor bracket 48 1 405503470210001 Sensor 49 1 401240101204401 Incline motor 220v 50 1 4000000721 MCB 220v 51 1 407101250120001 Overload switch 52 1 407302250160001 Switch AC power 53 1 40720225015...

Page 43: ...87 1 311TA2110100006 Upper safety piece 88 1 311TA2110110006 Lower safety piece 79 1 598107010010012 Magnet 89 1 204TA2110070005 Shrapnel 90 1 592100000000001 Nylon string 91 2 204TB2100200B06 Cord br...

Page 44: ...5 Hexagonal socket screw 123 2 544182016200115 Spring washer 124 1 512607913000111 Screw 125 1 532207900800111 Nylon nut 126 1 511610004500114 Hexagonal cap screw 127 1 511610006200114 Hexagonal cap s...

Page 45: ...150 2 6341TW001002 Label 152 8 592100000000002 Lock ties 153 1 8000002875 AC power cord 154 1 2000002771 Tablet holder 155 1 2000002772 Tablet holder bracket 156 1 2000002773 Tablet fixed hook 157 1 5...

Page 46: ...TX50 TX50 46 8 3 Exploded Drawing...

Page 47: ...affected Warrantee The warrantee is the first original buyer and or any person who received a newly purchased product as a gift from the original buyer Warranty periods The following warranty periods...

Page 48: ...lease make sure that you are able to provide the appropriate receipt when claiming on your warranty So that we can clearly identify the model of your equipment and for the purposes of our quality cont...

Page 49: ...fr Mo Fr 08 00 18 00 Sa 09 00 18 00 PL BE TECHNICAL SUPPORT SERVICE TECHNICAL SUPPORT SERVICE 22 307 43 21 49 4621 42 10 948 info fitshop pl Mo Fr 08 00 18 00 Sa 09 00 18 00 02 732 46 77 49 4621 42 1...

Page 50: ...companies and physio practices with professional equipment for endurance and strength training Sport Tiedje offers a wide range of fitness equipment from renowned manufacturers high quality in house d...

Page 51: ...51...

Page 52: ......

Reviews: