background image

3. Adjust the Helmet Clamp’s location on the Helmet so that the 

microphone is located opposite your mouth. 

You may need to reposition the Clamp 

repeatedly until you identify the best spot. The 

microphone must be positioned vertically and 

not horizontally (Be sure to clean the selected area prior to the 

gluing process).

4. Use the pre-moistened Towelette to clean the helmet area where 

you want to install the Glue Plate. Allow to dry thoroughly.

5. Peel the foil cover from the Glue Plates’ adhesive pad.
6. Place the Glue Plate into position according to #3. Press firmly 15 

seconds on all 3 parts of the Glue Plate.

7. The adhesive pad bonds to full strength over the next 24 hours. 

Therefore it is recommended to not use the headset during this 24 

hour period.

8. Fasten the Clamp to the Glue Plate using the Allen screws that were 

previously removed.

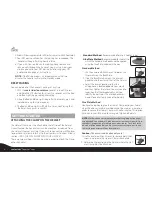
 POSITIONING THE SPEAKERS

Speaker A

Speaker B

Attach the speakers to the Velcro inside 

your helmet opposite your ears (short 

speaker cord for the left ear [A] and the 

long speaker cord [B] for the right ear). 

You may want to use the supplied Velcro 

pad.

Speaker A

Speaker B

Speaker B

Cable

Using two speakers inside the helmet may be prohibited in certain 

jurisdictions. If this is the case, you 

should tuck away the long corded 

speaker underneath the helmet 

padding as follows: 
Lead the speaker cord [B] along-

side the rim of the padding to 

the right side and then back to 

the left side, near speaker [A]. 

Then place the speaker [B] under-

neath the padding. 

ATTACHING AND REMOVING THE 

HEADSET FROM THE HELMET CLAMP

ATTACHING:

Slide the headset downwards along the 

sliding panel until a clicking sound indi-

cates that the headset is locked in place.

REMOVING:

Press here 

to remove

Your headset can be removed for charg-

ing and storage by pressing your finger 

gently against the tab and sliding the 

headset up with the other hand.
We recommend that you remove the 

headset from the helmet when not in use.

En

glis

h

7

scala rider

®


TeamSet

™ 

PRO

Summary of Contents for SCALA RIDER TEAMSET PRO

Page 1: ...Gebrauchsanleitung Guide d Utilisation Guida di Avvio Guia de Usario User Guide communication in motion TeamSet PRO...

Page 2: ...Bluetooth word mark and logos are owned by the Bluetooth SIG Inc Any use of such marks by Cardo Systems Inc is under license Other trademarks and trade names are those of their respective owners 2 sc...

Page 3: ...ith one Bluetooth device at a time Read the section Using the Headset on how to switch the audio connection between the paired devices We wish you a great scala rider experience and remain available f...

Page 4: ...the two Volume Buttons 2 While charging the Red Light turns on it may take up to 15 seconds until the Red Light turns on When charging is complete the Red Light will turn off SET UP AND CONFIGURATION...

Page 5: ...alternating 3 Search for Bluetooth devices on your phone by following the phone s instructions Please consult your phone s User Manual for more information 4 After a few seconds the phone will list t...

Page 6: ...ed in order to attach the Clamp onto the helmet Standard Method Recommended for most helmet types Glue Plate Method Recommended for helmets to which the standard method cannot be applied using the Glu...

Page 7: ...aker B Attach the speakers to the Velcro inside your helmet opposite your ears short speaker cord for the left ear A and the long speaker cord B for the right ear You may want to use the supplied Velc...

Page 8: ...RCOM Making Intercom calls To start an Intercom call with your Buddy while the headset is on Standby you can either VOICE CONNECT Start talking A Buddy Intercom call will be established and stay on un...

Page 9: ...the CTRL Button or speak loudly any word of your choice during an incoming call Reject a call Tap the Intercom Button or remain silent for 15 seconds during an incoming call PHONE FUNCTIONS Terminate...

Page 10: ...to your MP3 player device s jack and the other side to the helmet Clamp s jack inserting the cable through the MP3 cable holder Make sure that the cable plug clicks into place 7 Tuck the MP3 cable int...

Page 11: ...o correct the interference by one or more of the following measures Reorient or relocate the receiving antenna Increase the separation between the equipment and receiver Connect the equipment into an...

Page 12: ...have been advised of the risks associated with the use of the Device You further confirm that you will not consume any alcohol that may affect your alertness or any mind altering substance and will no...

Reviews: