background image

DRAFT 


  Page 6 of 19 

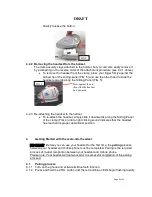
Quickly release the button. 


4.2.2  Removing the headset from the helmet. 

The clamp usually stays attached to the helmet, but you can also easily remove it 
by proceeding in the reverse order of the attachment procedure (see 4.2.1 above). 

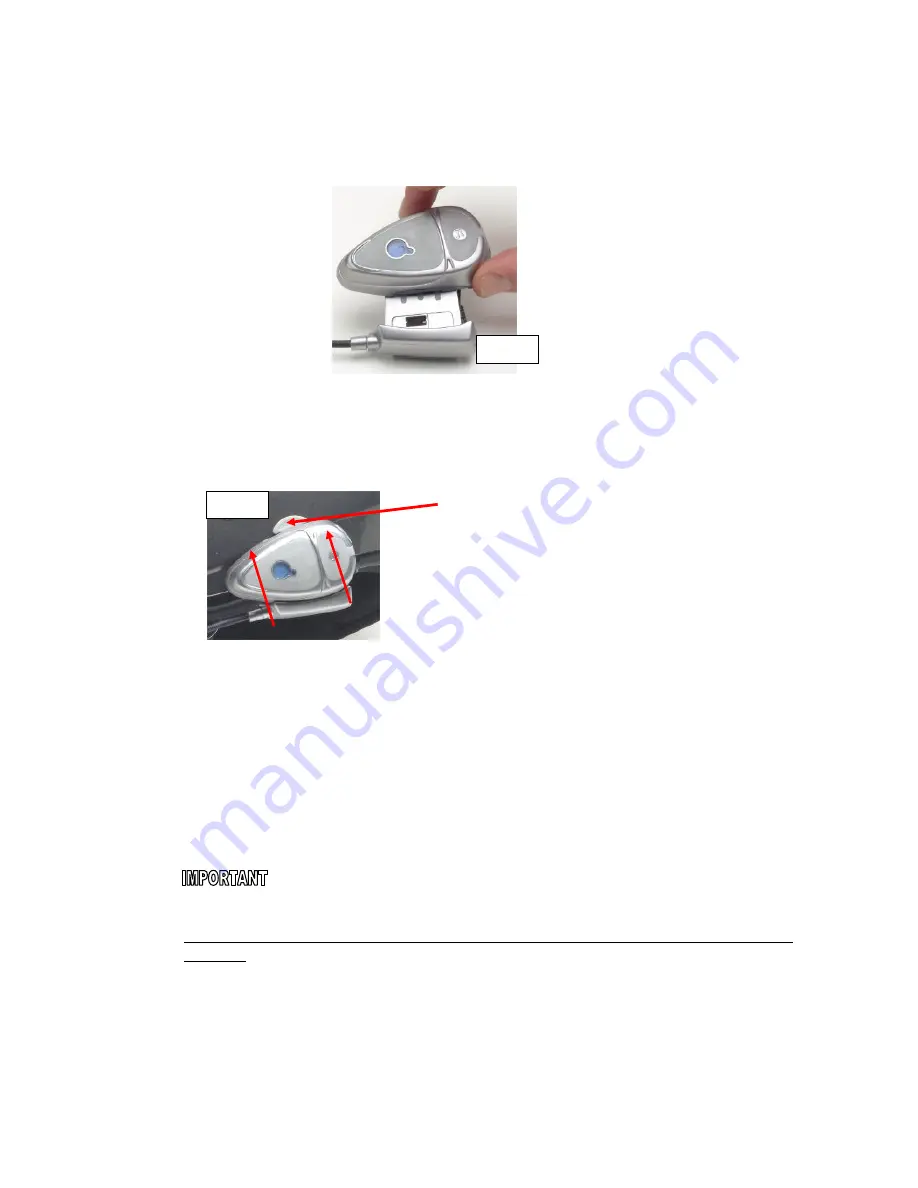
  To remove the headset from the clamp, press your finger firmly against the 

arched tip of the sliding-panel (FIG. 5) and use the other hand to slide the 
headset upwards along the Sliding-Panel (FIG. 5). 


4.2.3  Re-attaching the headset to the helmet.  

  To re-attach the headset, simply slide it downwards along the Sliding-Panel 

of the clamp (FIG. 4) until a light clicking sound indicates that the headset 
has reached its proper operational position. 


Getting Started with the scala-rider headset 


Before you can use your headset for the first time, the 

pairing


process 

between your headset and mobile phone must be completed. Pairing is the required 
process of mutual recognition between your headset and mobile phone.  
Please note: Your headset will not work prior to successful completion of the pairing 
process!  


4.1 

Pairing process 

4.1.1  Turn on the phone and activate its Bluetooth function. 
4.1.2  Press and hold the CTRL button until the red and blue LEDs begin flashing rapidly 

FIG 4 

Press against the arc, 
then slide the headset 
unit upwards. 

FIG 5 

Summary of Contents for ScalaRider

Page 1: ...DRAFT Page 1 of 19 scala rider User Manual...

Page 2: ...ala rider headset If you are using a standard non Bluetooth mobile phone you can still enjoy the headset s advantages by connecting our optional BT Adapter to your mobile phone purchased separately Th...

Page 3: ...or the helmet unit Allen wrench Wall Charger universal travel version CD Manual Quick Start Guide Warranty Registration Card Velcro for speaker needed only for certain helmet types Headset Allen wrenc...

Page 4: ...tructions components and controls of your scala rider headset prior to first use Regarding call terminations see NOTE in section 6 4 Sliding Plate of the clamp Charging socket Volume down button Press...

Page 5: ...the headset Use the enclosed Allen Wrench to loosen the two screws of the clamp FIG 1 Then slide the back plate of the clamp between the internal padding and the external shell of the helmet FIG 2 In...

Page 6: ...along the Sliding Panel of the clamp FIG 4 until a light clicking sound indicates that the headset has reached its proper operational position 4 Getting Started with the scala rider headset Before you...

Page 7: ...t you will no longer need to pair the headset to the phone The two devices will remain paired until you delete that pairing from the phone 4 2 Power On Off To turn ON press and hold the CTRL button fo...

Page 8: ...Talk or Send on your phone to dial the number 5 2 Voice Dialing a Make sure your phone is ON but no call is in progress b Tap the CTRL button and listen for a tone c Now pronounce the name of the par...

Page 9: ...ly measure the ambient noise and driving speed to make manual adjustment of the volume buttons virtually unnecessary Irrespective of this feature you can adjust the volume anytime by pressing the volu...

Page 10: ...simultaneously for 3 seconds to enable disable the VR feature You will hear an ascending descending tone confirming the change each time you switch this feature ON or OFF respectively 7 2 Answering ca...

Page 11: ...y red turns off Fully Charged Audio Feedback Status Ascending tone low high Headset being turned on Descending tone high low Headset being turned Off Low Bat beep Low Battery While in Standby Low bat...

Page 12: ...ur headset Is the battery removable The battery is not removable and you should never try to open the headset Let only Authorized Service Centers maintain or service your device Please refer to our we...

Page 13: ...ed ON and in standby mode while the blue light indicator flashes slowly 2 Verify that the Bluetooth function on your phone is set to ON 3 Verify that the scala rider headset is the correctly paired He...

Page 14: ...1 Make sure the call list on your mobile is not empty 2 The Redial feature works only with mobile phones that support the Bluetooth hands free profile Make sure your mobile phone support this profile...

Page 15: ...bigger microphone sponge 3 Make sure the microphone is not in front of your mouth the microphone should be opposite the corner of your mouth see page 7 Federal Communications Commission FCC Statement...

Page 16: ...3 1 b and 3 2 The Product is manufactured in accordance with Annex II of the above directive Declaration of Conformity DOC The scala rider headset is compliant with and adopts the Bluetooth Specificat...

Page 17: ...ral state or national laws or regulations and that any use of the Device is entirely at your sole risk and responsibility 1 You your heirs legal representatives successors or assigns hereby voluntaril...

Page 18: ...ITHOUT WARRANTY OF ANY KIND BEYOND THOSE ASSUMED IN THE ENCLOSED MANUAL Limitation of Liability IN NO EVENT SHALL CARDO BE LIABLE FOR ANY SPECIAL INDIRECT PUNITIVE INCIDENTAL EXEMPLARY OR CONSEQUENTIA...

Page 19: ...DRAFT Page 19 of 19 BT Bluetooth LED Light Indicator on the headset CTRL Control Button on the headset VR Voice Recognition AGC Automatic Gain Control Need more help Please visit www cardowireless com...

Reviews: