TRITON SYSTEMS, INC.
4-7
O
PERATION
M
ANUAL
- M
ODEL
97XX-Series
SECTION 4 - CURRENCY HANDLING
4.
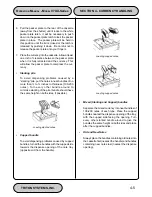
To gain access to the cassettes, rotate the
mechanism mounting platform to the service
position. To do this, locate the spring-loaded
locking pin on the underside of the slide tray. This
pin lets you lock the dispenser’s swivel mounting
platform into various quarter and half-turn access
positions.
Pull the pin down to release the swivel mounting
platform. Slowly turn the tray so that the note and
reject cassettes can be accessed from the side.
Release the locking pin and move the mounting
platform back and forth slightly to ensure the pin
snaps back into place, locking the mounting
platform into the service position.
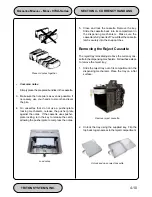
Removing the Currency Cassette
1.
Ensure the terminal is not in use before
removing the note cassette! Removing the note
cassette while the machine is in operation
(processing customer transactions, performing
close operations, etc.) can cause the terminal to
enter an “Out of Service” condition!
2.
Open the outer fascia panel to gain access to the
security container door, using the key lock on the
front of the panel. Open the combination lock on
the security container door and open the door to
gain access to the dispensing mechanism.
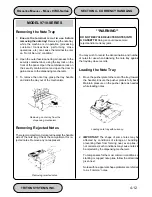
3.
Some cabinets employ a slide-rail mounting
system. On these cabinets, two levers are used
to release the slide-tray lock, allowing the slide
tray to be pulled out. Lift up on the locking levers
that are on either side of the front edge of the
dispenser slide tray and carefully slide the tray
out to the access position.
Other cabinets may use a fixed-tray mounting
system. In these cases the dispensing mechanism
mounting tray does not slide out of the cabinet.
You will simply rotate the mechanism to the service
position (as described in the next step) in order to
access the currency and reject cassettes.
Slide dispenser out to access position.
Lift up on slide tray locking levers.
Pull release pin for swivel platform.
MODEL 9705-SERIES
Summary of Contents for Triton 9700
Page 1: ...Owner s manual Triton Owner s Manual 9700...
Page 12: ...SECTION 1 INTRODUCTION...
Page 22: ...SECTION 2 BASIC OPERATION...
Page 28: ...SECTION 3 INITIAL SETUP...
Page 36: ...SECTION 4 CURRENCY HANDLING...
Page 55: ......
Page 56: ...SECTION 5 MANAGEMENT FUNCTIONS...
Page 213: ......
Page 214: ...SECTION 6 MAINTENANCE...
Page 220: ...SECTION 7 JOURNAL ENTRIES...
Page 223: ......
Page 224: ...SECTION 8 ERROR RECOVERY...
Page 246: ...SECTION 9 CUSTOMER TRANSACTIONS...
Page 251: ......
Page 252: ...APPENDIX A MECHANICAL LOCK...
Page 255: ......
Page 256: ...APPENDIX B ELECTRONIC LOCK...
Page 259: ......
Page 260: ...APPENDIX C WARRANTY POLICY...


