background image

8

2. IMPORTANT PRECAUTIONS

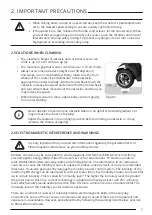
2.7 SAFETY WARNING AND INSTRUCTION LABELS

Warning Sticker

1.  Please read the instruction booklet carefully before using your scooter.

2.  Do not drive the scooter on slippery surfaces or on slopes over 6~10 

degrees limit.

3.  Do not drive on highway, crowded roads, or unfamiliar areas.

4.  Do not turn at high speed in either forward or reverse.

5.  Do no wash with water or leave scooter in humid environment since 

water can damage the electronic parts.

1

Do not hang baggage or other 

objects on the tiller / tiller  

adjustment lever.

The scooter is not intended to 

be used as a seat in a motor 

vehicle.

Tie-down points of the scooter. 

Do not sit or stay on the  

scooter during transporting.

N-D Lever Adjustment label 

which instructs free wheel 

mode operation. (see section 

5-1 for operation)

2

3

4

5

European representative label.

Information Sticker states the 

date of manufacture and serial 

number of the scooter. 

This product has been supplied 

from an environmentally aware 

manufacturer. It may contain 

substances that could be 

harmful to the environment. 

Recycling must be carried 

out in accordance with the 

respective national legal 

provisions.

Tie-down points of the scooter. 

Do not sit or stay on the 

scooter during transporting.

6

7

8

Figure 2

Summary of Contents for Corvus Rapide

Page 1: ...P R O D U C T C O D E MS03083 U S E R M A N U A L Hubert Road Brentwood Essex CM14 4JE S E R I A L N U M B E R ...

Page 2: ...NS 4 3 IDENTIFICATION OF PARTS 9 4 OPERATION OF CONTROL PANEL 10 5 OPERATING YOUR SCOOTER 16 6 CHARGING THE BATTERIES 20 7 CARE AND MAINTENANCE 22 8 OTHER INFORMATION 25 9 TROUBLE SHOOTING 26 10 OPTIONS 27 11 TECHNICAL SPECIFICATIONS 28 12 WARRANTY 29 ...

Page 3: ...r goal is to ensure your complete satisfaction We sincerely hope you enjoy your Corvus Rapide mobility scooter Please read and observe all warnings and instructions provided in owner s manual before you operate the various functions of this scooter Also please retain this booklet for future reference If you have any questions please contact 1 INTRODUCTION Careco UK Limited Hubert Road Brentwood Es...

Page 4: ... Please observe all relevant rules and regulations pertaining to pedestrians and road users at all times when you are driving the scooter Do not turn the power on before you get in and sit securely on the seat Be certain that the power is turned off when get in get out This will eliminate the possibility of accidentally activating the wigwag controls and causing injury Keep your weight toward the ...

Page 5: ...ained continuous operation may damage the scooter Always follow the local pedestrian traffic rules when riding outside When turning reduce your speed and maintain a stable centre of gravity This greatly reduces the possibility of a tip or fall Do not turn off the power while driving Do not stretch your body out on the scooter For maximum stability lean forward in your body while proceeding up ramp...

Page 6: ...and electrical system Do not remove the anti tip wheels or modify your scooter in any way that is not authorized Only use the chargers accessories or components supplied as original equipment with your scooter supplier Immediately stop using the scooter if you encounter a problem with scooter Turn off the power and contact dealer for further checking Please pay more attention when driving the scoo...

Page 7: ...ing an obstacle or it may increase the chance of tipping 2 6 ELECTROMAGNETIC INTERFERENCE AND WARNINGS It is very important that you read this information regarding the possible effects of Electromagnetic Interference on your mobility scooter Mobility scooters may be susceptible to electromagnetic interference EMI which is interfering electromagnetic energy EM emitted from sources such a radio sta...

Page 8: ...er adjustment lever The scooter is not intended to be used as a seat in a motor vehicle Tie down points of the scooter Do not sit or stay on the scooter during transporting N D Lever Adjustment label which instructs free wheel mode operation see section 5 1 for operation 2 3 4 5 European representative label Information Sticker states the date of manufacture and serial number of the scooter This p...

Page 9: ...Lever 09 Seat Swivel Lever 10 Width adjustable armrests 11 Seat Back Angle Adjustment Lever 12 Luxury Seat 13 Throttle Level 14 Control Panel 15 Front Turn Signal 16 Charging Port 17 Key Switch 18 Tie down Hooks 19 Anti Tipper 20 Rear Reflector 21 N D Lever 22 Brake Light 23 Tail Light Rear Turn Signal 24 Armrest Width Adjustment Thumbscrews 25 Rear Pocket Above is only for reference Figure 3 Figu...

Page 10: ...seconds Right Turn Signal Press the turn signal button once to switch on press again to switch off switches itself off automatically after 30 seconds Deceleration Press low speed button once to decrease speed the minimum speed is 1 Acceleration Press acceleration button once to increase speed the maximum speed is 8 Horn Press horn button once to sound warning tone when necessary Headlight Switch P...

Page 11: ...mable time is 30 mins When scooter is in Sleep Mode the LCD display will be off automatically and the scooter will not respond to commands To wake up the scooter turn the power key off and then on again Speed H L switch Press H L Speed button once the High Low Speed Indicator will light on means driving in high speed mode Press again the indicator will extinguish means driving in low speed mode Hi...

Page 12: ...ve light will be on again if user turns off the headlight Please refer to section 4 4 for other three modes Turning light and Parking Light To activate the hazard lights left and right turning lights blink simultaneously press the Hazard light key Pressing this key again will turn off the light To activate the left turn light press the Left Turn key Pressing this key again will turn off the light ...

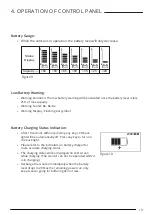
Page 13: ...tatus The charging status will be displayed on LCD screen while charging The scooter can not be operated while it is in charging Recharge the scooter immediately when the battery level drops to 20 as the remaining power can only keep scooter going for buffering 3km or less Figure 10 Capacity 80 80 65 50 35 25 20 Status Display F E F E F E F E F E F E F E Figure 9 Low Battery Warning Warning Condit...

Page 14: ...ght turn and scooter will save the setting and return to operation mode User can also press any buttons except left turn right turn to save the setting automatically and return to operation mode TEMP Temperature mode Figure 12 Press Centigrade Range 20 C 50 C Press Fahrenheit Range 4 F 122 F ODO Odometer mode Figure 13 Range 0 99999 The odometer will be reset automatically to zero after the total ...

Page 15: ...atically on when scooter turns on OFF In this mode the decorative light is primarily off and the head light will be on only if the headlight button is pressed Head Light In this mode the head light and decorative light will be on only if the headlight button is pressed 3 Stage In this mode lights can be displayed in 3 stages by pressing button Press to turn on the decorative light The icon will be...

Page 16: ... you go Subject to the position of speed control Releasing both left right throttles automatically operates the brakes to slow down and stop Figure 20 Figure 21 Tiller angle adjustment Pull the tiller adjustment downwards to adjust tiller s angle and release to lock at a desired comfortable position Figure 22 Do not pull both right and left throttle at the same time you might not able to control t...

Page 17: ... width tighten again to lock at a desired position Figure 27 Angle Adjust the attached screw height to control armrest s angle Pull the armrest up when getting on or off the scooter Figure 26 When driving the scooter set the seat at foremost position to prevent tip over Do not hang heavy goods on the armrests Figure 24 Figure 25 5 2 FREE WHEELING N D LEVER When lever is in Neutral N position scoot...

Page 18: ...o remove seat upwards Figure 30 Rear Compartment cover Open the compartment cover upwards according to the example Figure 31 Disassembling front basket Lift the front basket upwards Figure 32 Figure 30 Figure 31 Figure 32 Free wheel operation is only recommended on flat surfaces Never leave your scooter on gradient with its motors disengaged When adjusting N D lever do not sit on the scooter It s ...

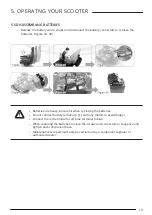
Page 19: ...teries are heavy be careful when removing the batteries Do not connect battery terminal with any metals to avoid danger Connect the red terminal to red blue terminal to blue When replacing the batteries remove the screws and connectors in sequence and tighten each component back Maintenance repair must only be carried out by a competent engineer or authorized dealer ...

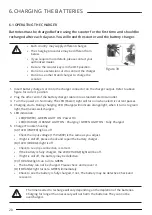
Page 20: ...harging starts During charging LED Charge will indicate orange light when it turns to green light that means well charged 5 LED indication LED POWER GREEN LIGHT ON Power On LED CHARGE ORANGE LIGHT ON Charging GREEN LIGHT ON Fully Charged 6 Charger Trouble Shooting A If LED POWER light is off Check the input voltage 115V 230V is the same as you adjust If light is still off please check and repair t...

Page 21: ...g will be detrimental to battery life Please charge the scooter in 0 c 40 c out of this range might affect the performance of the charger and battery For longest life your batteries should be recharged regularly Please recharge the batteries before they run down to 20 Charger Do not leave charger plugged into your scooter with charger switched off as this may discharge your batteries Inspect the b...

Page 22: ...parts are clean and firmly tighten to the scooter and do not wobble P 8 Clean up the dirt by damp cloth Tighten the screw or clamping stem that holds the mirror s Lighting Check if all lights such as head lights rear lights and turn signal are functioning correctly P 10 Contact your dealer 7 2 WEEKLY CHECK Check point Inspection Ref What to do if the inspection is failed Speed Dial Knob Check for ...

Page 23: ...le soap to wipe the seat Do not use abrasive cleaners as this will damage the seat Frame Shroud The frame and shroud of the scooter can be wiped with lightly damp cloth Do not use abrasive cleaners as this will damage the coating Car polish can be used to keep the paint and frame in pristine condition Storage Please store the scooter in a dry location If store the scooter in long time please disco...

Page 24: ...intenance is due at set distance The flashing light will be off automatically after a minute The scooter control panel can still be operating when the maintenance warning light is flashing Please contact the authorized dealer for routine maintenance when the maintenance warning light is flashing Setting Please reset for next maintenance distance when the maintenance is performed 1 Turn the power k...

Page 25: ... city or district council for details of the local waste management companies 8 2 SERVICE LIFE We estimate a service life of five years for this product provided it is used in strict accordance with the intended use as set out in this document and all maintenance and service requirements are met The estimated service can be exceeded if the product is carefully used and properly maintained and prov...

Page 26: ...controller overheat The motor has been exceeding its maximum current rating for too long The scooter may have stalled Turn the controller off leave for a few minutes and turn back on again The motor may be faulty Check the motor and associated connections and wiring E05 Park Brake Either a park brake release switch is active or the park brake is faulty Check the park brake and associated connectio...

Page 27: ...Charger Safety Turning Speed Reduction Gyro Meter Power on On off LED Green light flashing Charge on Charge LED Orange light Flashing Pre charge Orange light on Normal charging Green Orange light flashing 80 fully charged Green light on Fully charged Red light flashing Faulty When turning left and right scooter will reduce the speed itself according turning space to ensure safety ...

Page 28: ... 10 degree Curb Climbable 50 mm 2 Turning Radius 1660 mm 65 4 Suspension Front Rear Brake Hand Brake Electro Mechanical Seat Type Swivel Captain Seat With Seat Sliding Mechanism Back Angle Adjustment Seat Width 515 mm 20 3 Motor Size 850W 5000 r p m Battery Size 2 12V 75Ah Battery Weight 52 kg 115 lbs Travel Range 48 km 30 Miles without load Battery Charger 8A Off Board Electronics On Off Key Swit...

Page 29: ...cement clearly as a direct result of a manufacturing or material defect Such items include among others upholstery tyres and batteries The above warranty conditions apply to brand new scooters purchased at the full retail price If you are unsure whether your scooter is covered check with the authorised dealer Under normal circumstances no responsibility will be accepted where the scooter has faile...

Page 30: ...30 NOTES ...

Page 31: ...NOTES ...

Page 32: ...U S E R M A N U A L Hubert Road Brentwood Essex CM14 4JE ...

Reviews: