UI HydroFlex. iss4 01/11
UI HydroFlex. iss4 01/11
4d. AutoTilt in Use
AutoTilt chairs are
fi
tted with an eight button handset.
For Pro-Control versions, the buttons indicating Back
Angle Recline adjustment (3rd row) do not function.
By depressing the bottom left button the one hour
AutoTilt cycle will begin. Pressing the bottom right button
activates the eight hour cycle. If the chair is fully upright
it will begin to tilt backwards at the intervals described
above.
Pressing any of the function buttons on the handset will
interrupt and stop the AutoTilt cycle.
The HydroFlex AutoTilt control box is charged directly
from the supplied 24V charger. There is a small jack
socket on the back edge of the control box where the
supplied 24V charger needs to be
fi
tted.
The control box has a safety cut out to stop the batteries
being fully discharged. Once the working load voltage
drops below 21V the unit will not work. Put the chair
on charge for twelve hours and do not operate the chair
when it is on charge.
The TiS motor makes a small beeping noise when it
moves. This is a harmonic resonance caused by the soft
start program used to reduce the amount of ‘bounce’ in
the movement of the AutoTilt.
The control box has been programmed to ‘back off’ at
the minimum and maximum strokes of the motors and
if the motors sense an overload, e.g. if the legrest was
elevated against a wall. If the motors automatically ‘back
off’, release the button being depressed on the handset
and press the opposing button to re-set the unit.
4e. AutoTilt Battery Charging
Connect the charger to the socket on the back
edge of the AutoTilt control box.
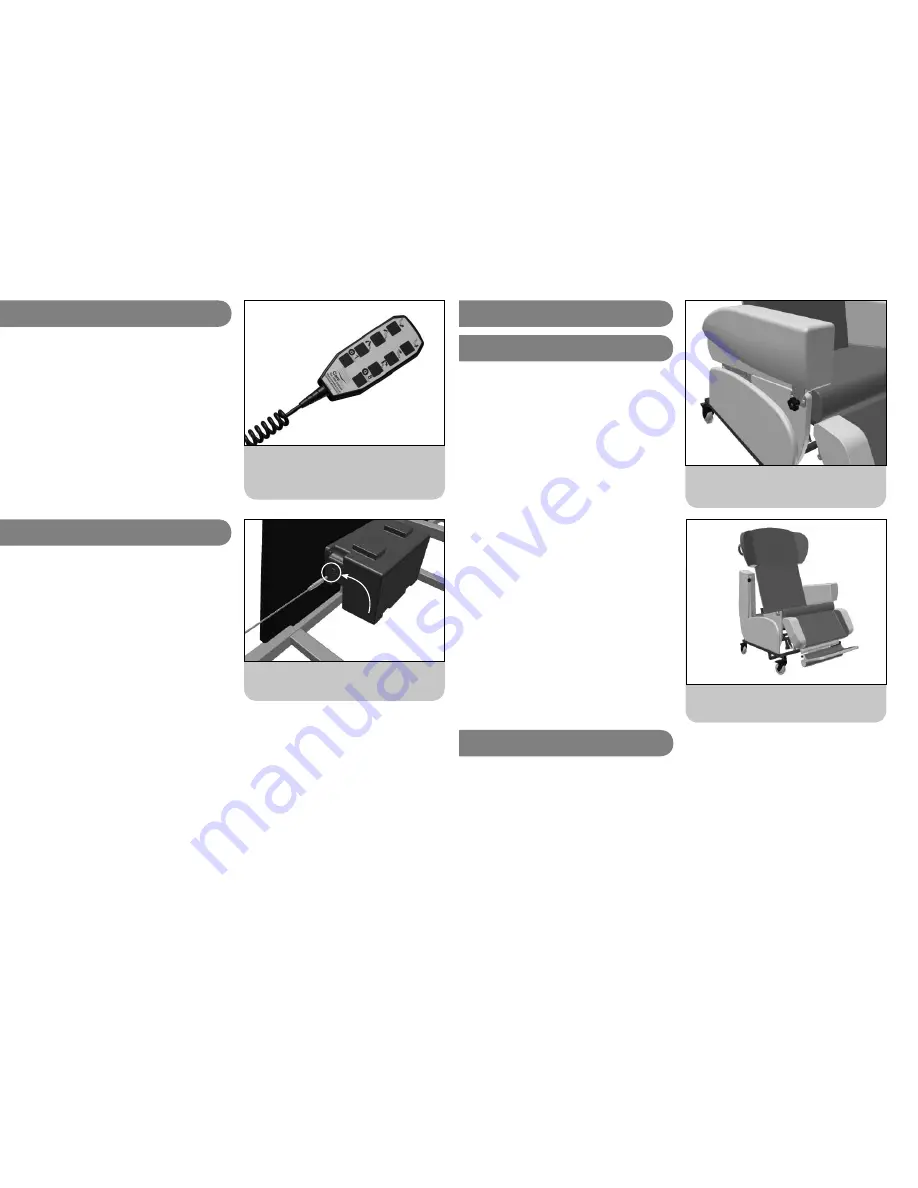
8 button handset for all HydroFlex AutoTilt chairs.
NB: 3rd row of buttons are not used on Pro-
Control chairs.
15
Transfer arm tilted back to give access for side
transfer.
Undo the locking wheel to release the transfer arm.
5. Options and Accessories
5a. Transfer Arm
The transfer arm option makes side transfer easier, either
from a bed or wheelchair. The arm can be tilted up and
back to give clear access to the seat.
The transfer arm should only be used when the seat is
fully upright. A locking wheel beneath the front outside
edge of the arm cushion locks the transfer arm in place.
Undo the wheel by a couple of turns and lift the arm up
from the front. As soon as the front of the arm lifts up
it can be slid back and pivoted so that it hangs down
at the back of the chair.
Once the client has transferred to or from the chair, the
arm can be tilted and pushed forward so that it re-
engages with the lock at the front of the chair.
Tighten the locking wheel to lock the arm in position.
Do not grab or attempt to support
weight on the transfer arm once
it has been put into the transfer
position.
16
5b. Pelvic Straps
Please note, pelvic straps :
• Are an aid to maintaining a good posture and client safety.
• Must not be used as restraints.
• Must be adjusted to comfortably support the user and not restrict body function or cause discomfort.
• A client must be supervised by suitably trained personnel at all times if
they are using a pelvic strap.


