background image

UI SmartSeat iss01, 03/2013

Index

4

 ..................................................

Who is the SmartSeat for?

7

 ...........................................................................................

Chair Set-up

7

 ...............................................................................................

Seat Depth

8

 ................................................................................................

Seat Width

11

 ..........................................................................................

Seat Height

12

 ........

The SmartSeat Chair in Day to Day Use

12

 .........................................................................................................

Brakes

12

 .........................................................................................

Tilt in Space

14

 ......................................................................................................

Legrest

15

 ................................................................................................

Footplate

18

 ..............................................................................................................

Arms

20

 .....................................................................................................

Options

20

 .............................................................................

Contoured Back

22

 .........................................................................................

Accessories

22

 ...................................................................

Adjustable Laterals

24

 .................................................................................................

Headrest

25

 .....................................................................................................

Pommel

27

 ................................................................

Belts and Harnesses

34

 .................................................................................................................

Tray

36

 ............................................................

Motorised SmartSeat

38

 .................................................................

Care & Maintenance

40

 .........................................................

Dimensions & Weights

3

Summary of Contents for SmartSeat

Page 1: ...at t t at at t t at at at at t t at t at a at at a a at a at t t a a at a at a at i i i i i i i i i i i i i i i i i i i i i i i i i i i i i i i i i i i i i iss ss ss ss ss ss ss ss ss s ss ss ss ss ss ss ss ss s s ss ss ss ss ss ss ss s ss ss s s ss s ss s ss ss s ss ss s s ss ss ss s s ss s ss s s s ss s s01 01 01 01 01 01 0 01 01 01 01 1 01 1 01 1 1 01 01 1 01 01 01 0 0 01 1 1 1 01 01 01 0 01 0 ...

Page 2: ...ctions include details of the performance of the chair If the chair should start behaving outside of its intended performance show signs of damage or excessive wear or otherwise feel unsuitable please take it out of service and contact CareFlex or your CareFlex Distributor immediately If you are in any doubt about the safe operation of the SmartSeat contact CareFlex or your local CareFlex distribu...

Page 3: ... 11 Seat Height 12 The SmartSeat Chair in Day to Day Use 12 Brakes 12 Tilt in Space 14 Legrest 15 Footplate 18 Arms 20 Options 20 Contoured Back 22 Accessories 22 Adjustable Laterals 24 Headrest 25 Pommel 27 Belts and Harnesses 34 Tray 36 Motorised SmartSeat 38 Care Maintenance 40 Dimensions Weights 3 ...

Page 4: ...ake them sensitive to discomfort or affect muscle tone so that support is required to combat fatigue For whom seat height for transfer is critical When posture pressure and comfort are important in equal measure Who require a wide range of positions for different activities through the day The SmartSeat chair should also be considered For multi user environments such as stroke wards Where infectio...

Page 5: ...urface area as possible The high elastic foam prevents the memory foam bottoming out and makes the cushion responsive to client movement The WaterCell Technology moves with the client to ensure that the cushion remains in contact with the client as they move and alter their weight distribution These pressure relief features make the SmartSeat chair suitable for those clients at medium to high risk...

Page 6: ...olstery of the chair making cleaning easier and addressing the majority of infection control issues Each SmartSeat chair has a unique chair number which must be quoted during any correspondence with CareFlex or your local CareFlex Distributor This number is on a silver foil label on the right hand side plate at the bottom of the back frame above the seat depth adjustment rail at the back of the ch...

Page 7: ...t chair will have been factory assembled to these measurements but can be adjusted by a technician in the field Seat Depth It is important to set seat depth correctly in order to prevent sacral sitting and to achieve the best distribution of weight between the client and the chair Sacral sitting occurs when the pelvis tilts backwards so that the lower back sacrum as well as the bottom is resting o...

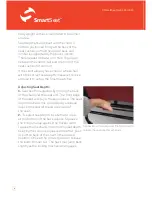
Page 8: ...t Depth 1 Seat depth is adjusted by moving the back of the chair over the seat unit The front edge of the seat will stay in the same place The seat depth mechanism is controlled by a release lever on the rear left hand underside of the seat 2 To adjust seat depth locate the two rails at the bottom of the back valance Squeeze the thinner rail up against the thicker rail to release the mechanism con...

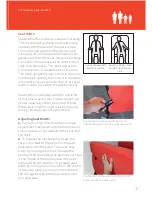
Page 9: ...ts throughout the day If the client is held in a rigid position they will quickly tire and experience discomfort Adjusting Seat Width 1 Each arm of the SmartSeat has a unique adjustment mechanism which allows the arm to be moved in or out relative to the centre of the chair 2 To release the mechanisms locate the tabs on the back of the arms Pull the tabs backwards until they stop To reduce seat wi...

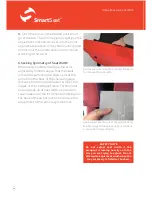
Page 10: ...f the chair and judge distance from the inside face of arms to the edges of the chair back frame For the most accurate set up of seat width use a rule or tape measure or the incremental markings on the back of these instructions to ensure the adjustment of the arms is symmetrical 10 SAFETY NOTE Do not adjust seat width if the occupant is leaning heavily onto the arm you are trying to adjust Do not...

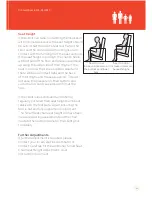
Page 11: ...hion This will increase the pressure on their bottom and sacrum and could cause discomfort at the hips If the client is less ambulant and is being regularly portered then seat height can be set relative to the footplate Again ensuring the foot is flat and fully supported is important The SmartSeat chair seat height will have been measured during assessment and the chair made to these dimensions fo...

Page 12: ... with your foot The lever will angle down and click into the locked position Releasing the Brakes To release the brakes gently kick the end of the lever which is pointing upwards The lever will snap down and the castors will roll freely Tilt in Space The SmartSeat chair has a Tilt in Space facility which allows the client to be reclined without adjusting the angle at the hips This helps the client...

Page 13: ...the push handle To adjust the Tilt in Space squeeze the lever and tilt the chair to the desired angle Release the lever to hold the chair at the desired angle 2 Motorised Format On motorised chairs the second row of buttons on the handset control the Tilt in Space movement SAFETY NOTE It is essential to regularly check the adjustment of the seat to footplate height to ensure it does not hit the gr...

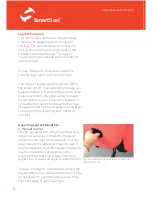
Page 14: ...es in the knees and close attention needs to be paid to the angle of elevation and for how long legs are elevated to ensure good positioning and continued comfort Adjusting Legrest Elevation 1 Manual Format On the manual option of the SmartSeat chair legrest elevation is controlled by the lever located on the right hand side panel Pull this lever out and the legrest will begin to raise It may be n...

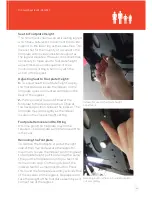
Page 15: ...te is used it will be easier to position the chair like this so that familiarity with the process can be easily developed Deploying the Footplate 1 To deploy the footplate look for the front edge of the footplate sticking out from the bottom of the legrest Locate the release handle centrally located at the back of the footplate Twist the handle out and the footplate will drop forward Grip the rece...

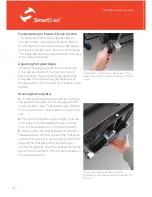
Page 16: ... To fold the footplate up and store it behind the legrest the legrest must be set at its 90 angle position See Footplate Angle Plantar Flexion Control for instructions on how to do this 2 Once the footplate angle is at 90 give the front edge of the footplate a sharp tap and push the footplate in to its minimum depth 3 Reach under the footplate and locate the release handle Pull this out and the fo...

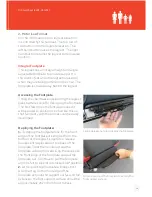
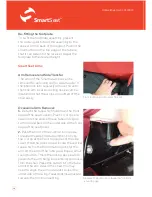
Page 17: ...e to the desired position Once at the desired position release the indexer The footplate may drop slightly as the indexer locates in the closest height setting Footplate Removal and Re fitting At some point the footplate may not be required The footplate can be removed if this is the case Removing the Footplate To remove the footplate stand at the right side of the chair and elevate the legrest to...

Page 18: ... down the front edge of the seat cushion Plastic J strips are sewn onto the ends of these tabs and clip on to thin round bars on the underside of the front edge of the seat board 2 Push the front of the cushion to one side to reveal the side cover attachment Unclip the J strip at the front top corner of the side cover Hold the cover up and locate the vertical tube which is the front location point...

Page 19: ...arm off the chair depress the small round button of the locking device into the front arm mounting peg Take a pair of long nosed pliers and whilst holding the small button down push the pliers up into the bottom end of the tube This will push the small button past its locating hole and prevent it popping out and disabling the locking device 3 To reinstate the locking device use long nosed pliers t...

Page 20: ... retro fit contoured back consists of the profiled foam and an appropriately shaped cover Fitting Instructions 1 To fit a contoured back you will need a 13mm spanner or socket wrench Begin by unclipping the sides of the chair back valance There are plastic J strips sewn to the edges of the valance These clip over thin bars which make up part of the structure of the chair back Starting at the lower...

Page 21: ...ll The Christmas Tree shaped profiles need to point up as the top edges of the contours angle down Put one side into the cover first pulling the frame over the threaded studs which are used to bolt the frame in place The cover can then be pulled over the opposite side Pull the cover straight so that the corners of the cover sit neatly around the four studs on the frame Keep on manipulating the foa...

Page 22: ...y that the occupant will end up leaning over the top edge of the lateral The adjustable laterals should be adjusted so that there is a two finger gap between the top edge of the lateral and the occupant s axilla arm pit Height The Adjustable Laterals have a 15cm range of height adjustment The height of the laterals is set with a clamping lever Adjusting the Height 1 To adjust the height of the lat...

Page 23: ...des of the chair back valance There are plastic J strips sewn to the edges of the valance These clip over thin bars which make up part of the structure of the chair back Starting at the lower sides unclip the valance until it can be folded over the top of the chair back 2 The fastening which hold the wings in place on the chair back need to be partially undone There are two lower fastenings behind...

Page 24: ... fastenings and clip the back valance back in place For ease clip the bottom of the valance in place before the sides Headrests The complete range of CareFlex headrests are available for the SmartSeat chair These are attached to the thin round bar between the push handles on the back of the chair Each headrest has a strap attached to its top edge The straps have short strips of plastic hook profil...

Page 25: ...mel Fitting the Pommel 1 Fit the pommel with the legrest angled down as this will give the best access to the receiving bracket 2 To fit the pommel locate the square hole in the loose flap of fabric between the top edge of the legrest and the underside of the seat cushion The receiving bracket for the pommel is located under the front edge of the seat cushion behind the square hole 3 Fit the metal...

Page 26: ...ut of the chair 3 Use a 4mm allan key to undo the four fixings which hold the seat board in place Put the fixings in a safe place ready for re positioning the board 4 Locate the two holes drilled horizontally through the front cross tube of the seat frame Position the pommel receiving bracket against these holes Ensure the nut welded to the underside of the tube is facing down 5 Fit the two bolts ...

Page 27: ...d is not allowed to work loose over time as this will allow the client s pelvis to tilt backwards encouraging them to slide down and forward in the chair CareFlex pelvic belts are intended to pull back over the hips at an angle between 45 and 60 This angle helps to maintain a vertical pelvis by simultaneously pulling the hip joint down and back Fitting Pelvic Belts The pelvic belts are attached to...

Page 28: ... glide buckles on the rear bottom edge of the back frame The belt should be sufficiently tight to support and control the pelvis without being painful 2 In day to day use clip the two halves of the side release buckle together once the occupant is sat in the chair Additional tension can be applied to the belt by pulling the D rings which will draw the webbing through the buckle 3 To open the belt ...

Page 29: ...have been pulled as far forward as possible re adjust the length of the belt through the tri glide buckles on the rear bottom edge of the back frame 3 To open the belt press the tabs on the sides of the buckle so the two halves spring apart 4 Point Pelvic Belt The 4 Point Padded Pelvic belt has centre pull adjustment The main 40mm strap is mounted so that it sits at between 45 and 60 across the hi...

Page 30: ...elt press the tabs on the sides of the buckle so the two halves spring apart 4 Point Pelvic Belt Secondary Straps 1 With the main strap correctly adjusted for tension and position pull the secondary straps over the sides of the clients thighs and down towards the seat board The secondary straps should be at right angles to the sides of the seat board 2 Make a note of the position of the straps rel...

Page 31: ...e body of the harness to the chair The lower straps have multi direction buckles which swivel to follow the direction of pull to the mounting point to avoid twisting and provide comfort The Dynamic Chest Harness is designed to be used in conjunction with a pelvic belt Dynamic Sternum Harness The Dynamic Sternum Harness has the same features as the Dynamic Chest Harness but has a more incised profi...

Page 32: ...g and adjusting the Straps of Chest Harnesses The shoulder straps need to be fitted through the gap between the top and middle back cushions 1 Unclip the rear valance There are plastic J strips sewn to the edges of the valance These clip over thin bars which make up part of the structure of the chair back Starting at the lower sides unclip the valance until it can be folded over the top of the cha...

Page 33: ...Fitting the Groin Harness The groin harness is fitted by positioning the harness on the seat with the buckles facing down The straight edge onto which the webbing straps have been attached needs to line up with the bottom edge of the back cushion 1 Push the webbing straps though the gap between the seat and back cushions Pull the straps under the mounting bars on the rear bottom edge of the back e...

Page 34: ...Tray 1 Once the occupant is sat in the chair rest the tray across the arms so that the tray fits suggly against the client but does not press in to their abdomen 2 The buckles on the tray straps mate with the buckles on top edge of the chair sides Clip the two halves of the buckles together on all four straps 3 Adjust the tension in the tray straps to secure the position of the tray The tension ca...

Page 35: ...care not to drop or loose the screws and keeping the side covers around the mounting points in place 3 Lift off the plates and position the webbing straps over the front screw holes so that the straps will hang over the sides of the base panels 4 Re position the plates and screw them down fully so that the screws pass through the plates and webbing captivating the straps in place 5 Re fit the arms...

Page 36: ...rging Charging the chair regularly overnight is recommended The battery unit will make a buzzing sound when the battery is nearing its minimum recommended charge level Charge as soon as is practicable once this signal is heard Avoid operating the chair when it is on charge especially at the beginning of a charging cycle as this can damage the control box Chargers 1 Only chargers supplied by CareFl...

Page 37: ...gs straight out of the socket Do not pull the wire as this may damage the cable and the socket DO NOT Leave the chair connected to the mains with the mains power switched off Move the chair when it is connected to the mains Charge the batteries when there is a client in the chair If after charging the motor actuators do not work take the chair out of service immediately and contact CareFlex or you...

Page 38: ...erials may fade or degrade if subjected to excessive heat or sunlight Refer to the CareFlex fabric guide for upholstery cleaning details Wipe up spills and contamination as soon as they are noticed Stains and soiling can lead to staining and more severe infection control issues if not addressed immediately For cleaning and decontamination procedures refer to the appropriate section of the Fabric a...

Page 39: ...eps or overcome thresholds especially if a client is sat in the chair Always ensure that the client s feet do not drag on the ground when the chair is moved by elevating the legrest to lift their feet off the floor Always ensure that there are no obstructions under the chair and that there is plenty of space around the chair before using the Tilt in Space facility Always apply at least two brakes ...

Page 40: ... k L e n g t h 7 0 c m L a t e r a l H e ig h t 2 8 4 4 c m A r m H e ig h t 1 5 c m R a n g e o f T i S 8 3 0 Ankle Angle 90 120 Seat to Footplate 44 51 Max Length 164cm TiS clearance 21cm K n e e A n g l e 9 0 1 7 0 Max User Weight Product Weight 100kg 60kg Seat Width 38 50cm Lateral Width 23 33cm Seat Height 49 52 55cm Max Width 72cm B a c k L e n g t h 8 6 c m L a t e r a l H e ig h t 3 5 5 1 ...

Reviews: