052806-003r2
Printed in USA
November, 2008
C
AREFREE
A
UTOMATIC
A
WNING
S
UPPORT
RV Accessory
¾
Provides support and eliminates the weight and natural sag in the
middle of the roller.
¾
The cradle automatically pivots out of the way when the roller is
extended.
¾
The cradle support automatically captures the roller when the
awning is retracted.
¾
Works with all awning brands.
¾
Does not work with curved arm applications.
I
NSTALLATION
1. If open, close the awning.
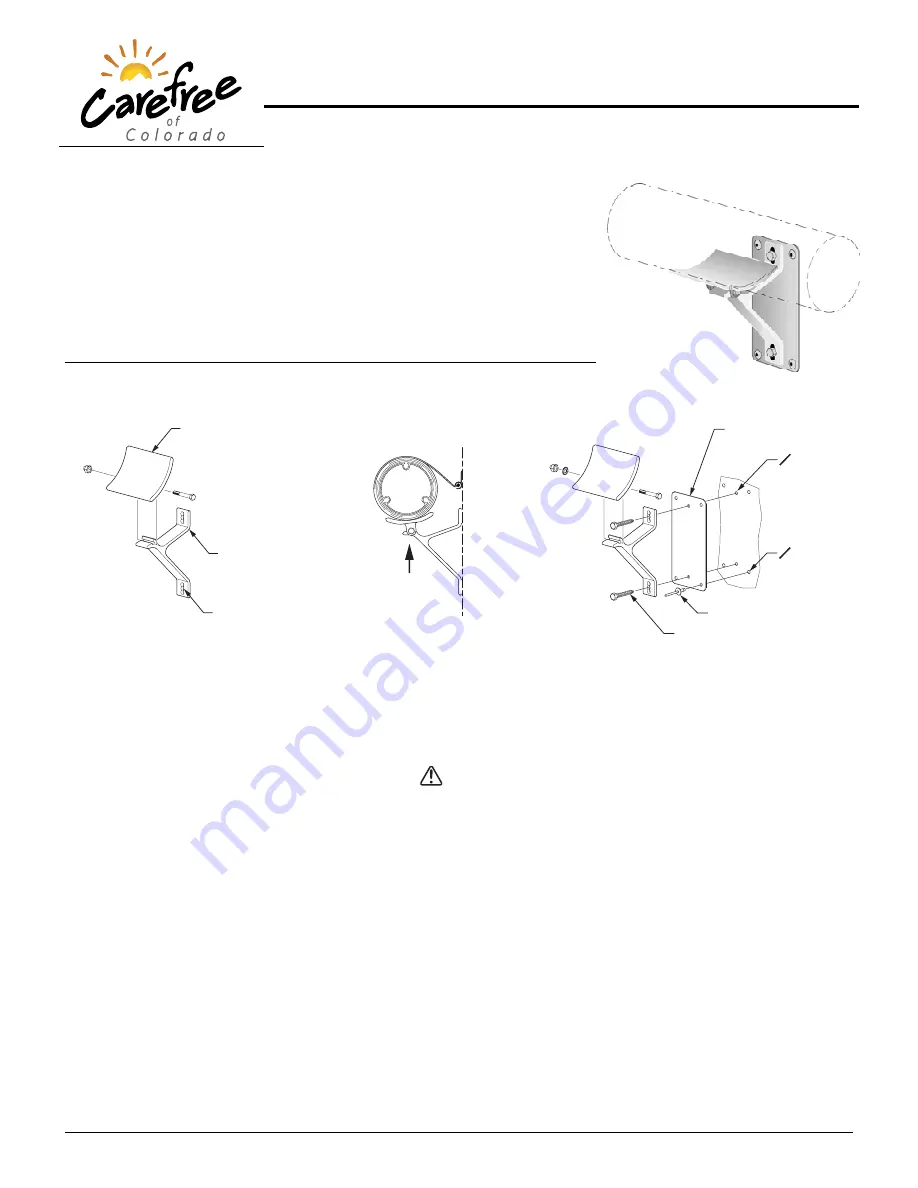
Cradle
Support Bracket
Moly Rivets
1/4 x 1 1/2 Screws
Backing Plate
O 7/32”
(4 plcs)
O 3/16”
(2 plcs)
Support001
Lower Center
Mounting Hole
2. Temporarily attach the cradle to the support bracket using the supplied screw and acorn nut.
3. Position cradle and bracket beneath the roller as shown.
•
For vinyl awnings: Press the cradle and bracket upward until the cradle is seated against the fabric.
•
For awnings with alumaguard: Press the cradle and bracket upward until the slack in the metal slats of the
alumaguard is removed.
CAUTION
DO
NOT
LIFT THE SUPPORT SO THAT THE ROLLER TUBE IS IN TENSION
.
D
OING SO CAN CAUSE THE SUPPORT TO INTERFER WITH
PROPER OPERATION OF THE AWNING AND CAUSE DAMAGE TO THE SUPPORT AND
/
OR ALUMAGUARD METAL WRAP IF INSTALLED
.
4. Mark the position of the lower center mounting hole of the support bracket. Set the cradle and bracket aside.
5. Open the awning and raise it to the highest pitch. This is to provide access clearance to attach the components.
6. Align the backing plate with the mark made previously. Ensure that the plate is perpendicular to the awning rail.
7. Using the backing plate as a template, drill 4 7/32" holes through the corners and into the coach wall.
8. Attach the plate using 4 moly rivets.
9. Through the two center holes of the plate, drill two 3/16" pilot holes.
10. Remove the cradle from the support.
11. Attach the support bracket to the backing plate and coach wall using two 1/4 x 1 1/2 screws.
12. Attach the cradle to the support bracket using the supplied screw, lock washer and cap nut. Tighten the nut fully.
Tip:
Lightly spray the mounting holes of the cradle and the shaft of the screw with a dry silicone lubricant before
assembling.


