052522-104 1 August,
2008
I
NSTALLATION
A
PEX
B
LANK
RV Kits
The Apex Blank is a non-functioning awning shell mounted in line with the Apex
Awning to provide a continuous contour for the length of the coach.
C
OMPONENT
C
HECK
L
IST
RTA049
4
1
2
3
6
7
5
C
OMPONENT
Q
TY
C
OMPONENT
Q
TY
1
Lead Rail
1
5
Screw, Machine
4.22mm x 25mm
4
2
End Plate, LH
1
6
Screw, Lag
3/8 x 2
2**
3
End Plate, RH
1
7
Screw, Self Drilling
#12 x 1/2
2**
4
Mounting Bracket
*
* For units under 16' quantity of brackets (item 4) is three (3). For units greater than or equal to 16',
quantity of brackets is four (4).
** Quantity for screws (items 6 & 7) are per bracket.
A
SSEMBLE AND
A
TTACH THE
U
NIT
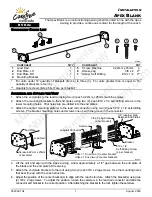
1. Attach the end plates to the lead rail using two (2) each 4.22mm x 25mm machine screws.
2. Attach the mounting brackets to the end plates using two (2) each #12 x 1/2 self-drilling screws in the
lower mounting holes. Pilot holes are pre-drilled into the end plates.
3. Attach the center mounting plate(s) to the lead rail connector using two (2) each #12 x 1/2 self-drilling
screws. The bracket mounting holes and screws line up with the groove in the connector.
Lead Rail
End Plate
Screw, 4.22mm x 25mm
(2 per plate)
Leadrail Connector
Setscrew
#12 x 1/2
Self-Drilling Screw
(2 per bracket)
3/8 x 2 Lag Screw
(2 per bracket)
Units < 16’ use one (1) center bracket
Units ≥ 16’ use two (2) center brackets
RTA051
Bracket
1/4” (approx) Gap
Between End Plates
Groove
4. Lift the unit and align with the Apex awning. Allow approximately a 1/4" gap between the end plate of
the blank and the end plate of the awning.
5. Attach the end plate brackets to the roof using two (2) each 3/8 x 2 lag screws. Use the mounting holes
that best line up with the coach structure.
6. Adjust the position of the center bracket(s) to align with the coach structure. Attach the bracket(s) using two
(2) 3/8 x 2 lag screws. To adjust the position, loosen the setscrew in the lead rail connector and slide the
connector and bracket to the correct position. After attaching the bracket to the roof, tighten the setscrew.
Manual
Compliments
of
Northwest
RV
Supply
Printed
From
http://www.nwrvsupply.com


