Carefree of Colorado
Freedom OtD Slider Awning
3
052896-003r1
I
NSTALLATION
I
NSTALLING THE
S
LIDER
CAUTION
T
HE SLIDER AND AWNING HAVE APPRECIABLE WEIGHT
.
I
T WILL BE NECESSARY TO HAVE AT LEAST TWO PEOPLE
FOR THIS INSTALLATION
.
T
HE SLIDER
MUST
MOUNT INTO THE STRUCTURE OF THE COACH
.
M
ETAL OR
FIBERGLASS WALL IS NOT ADEQUATE TO SUPPORT THE WEIGHT OF THE ASSEMBLY
.
1. Position the slider mounting plate (and spacer if required) using the marks made previously.
2. 4 access holes are provided through the slide plate. Through the access holes, attach the mounting
plate to the coach using 1/4 x 2/12 screws.
NOTE: It will be necessary attach 4 screws then move the slide plate to align with next
mounting holes in the mounting plate. There are 10 mounting holes in total.
3. Lock the slide plate in the forward or rear position.
M
OUNTING THE
A
WNING
1. Set the awning into the hooks of the slide plate.
2. Horizontally center the awning on the slide plate.
3. Drill two 1/8" pilot holes through the bottom hook of the slide plate and awning case. Attach the slide
plate and awning case using two (2) self-tapping #8 x 3/8 screws.
4. Open the awning using the hand crank.
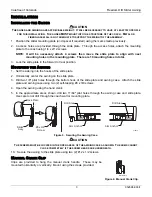
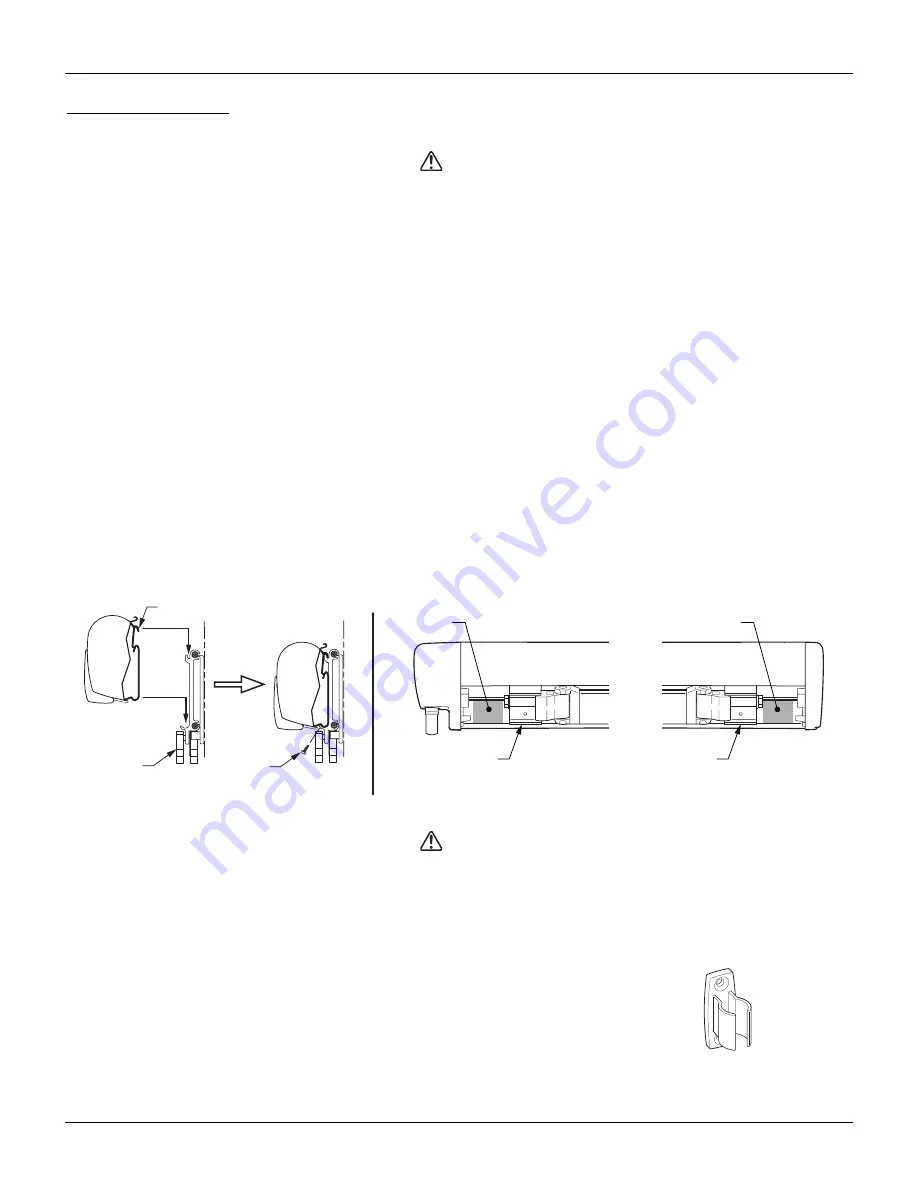
5. In the approximate areas shown, drill two 11/64" pilot holes through the awning case and slide plate.
Use care to not drill through the coach wall or mounting plate.
Back Plate
Slider
Assy
#8 x 3/8
Screw
Arm Anchor
FIII012
Arm Anchor
Drill Area
Drill Area
Figure 3. Securing the Awning Case.
CAUTION
T
HE SCREWS MUST BE LOCATED IN THE OPEN AREAS OF THE AWNING CASE AS SHOWN
.
T
HE ARMS CANNOT
CLOSE COMPLETELY IF THE SCREW HEADS ARE UNDERNEATH
.
10. Secure the awning to the slide plate using two (2) #12 x 1/2 screws.
M
ANUAL
C
RANK
C
LIP
Clips are provided to hang the manual crank handle. These may be
mounted horizontally or vertically. Mount using the screws provided.
Mariner016
Figure 4. Manual Crank Clip.

