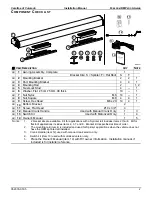
Carefree of Colorado Installation
Manual
F
REEDOM
RM
P
ATIO
A
WNING
052978-051r5
4
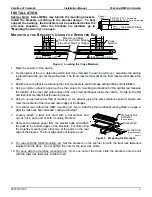
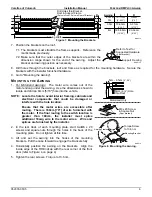
8mm [5/16”] Hole
(2 plcs per Bracket)
Awning Width
RMF011
Awning L
R
2.5m & 10-11cm
5-8cm
3m
[4”-4.25”] [2”-3”]
3.5m 10-33cm 5-31cm
[4”-13”] [2”-12”]
4m 30.5-58cm 23-56cm
[12”-23”] [9”-22”]
L
R
Rear Corner of Front Door
Align Inside Edge of Endcap with
Corner of Front Door
2.5cm
[1”]
Figure 4. Securing the Brackets.
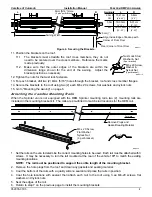
11. Position the brackets on the roof.
11.1. The brackets must straddle the roof cross members, they do not
need to be centered over the cross members. Reference the marks
made previously.
RMF011a
M6 x 20 Screw,
Washer &
Nylock Nut
(2 per bracket)
Twist Lock Stud,
Washer & Nut
(2 per bracket)
11.2. Make sure that the outer edges of the brackets are within the
dimension range shown for the end of the awning. Adjust the
bracket position as necessary.
12. Tighten the nuts for the twist lock fasteners.
13. For each bracket, drill two (2) 8mm (5/16") holes through the bracket, roof and cross member flanges.
14. Secure the brackets to the roof using two (2) each M6 x 20 screws, flat washers and nylock nuts.
15. Go to "Mounting the Awning" on page 6.
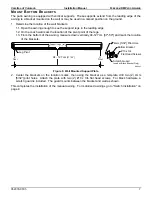
Attaching the Carefree Mounting Rails
When the Sprinter van is not equipped with the OEM Sprinter mounting rails, two (2) mounting rails are
included in the mounting bracket kit. The rails are pre-drilled to match stud locations for the OEM rail.
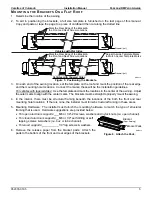
M6 x 20 Screw
Flat Washer
Nylock Nut
(3 per bracket)
Forward
Remove Plugs and
Gasket/Sealing Material
RMF022
1. Set the rails on the van to determine the correct mounting holes to be used. Each rail must be attached with 3
screws. It may be necessary to turn the rail mounted at the rear of the vehicle 180º to match the existing
mounting locations.
NOTE: The rail must be positioned to support the entire length of the mounting bracket.
2. Remove the hole plugs from the roof and clean any gaskets and sealing material.
3. Coat the bottom of the rails with a quality silicone sealant and place the rails in position.
4. Coat the hole locations with sealant then attach each rail to the roof using 3 ea M6-20 screws, flat
washers and nylock nuts.
5. Seal the edges of the rail.
6. Return to step 7 on the previous page to install the mounting brackets.


