Carefree of Colorado Installation
Manual
F
REEDOM
RM
P
ATIO
A
WNING
M
OUNTING THE
B
RACKETS
O
N A
F
LAT
R
OOF
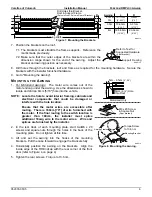
1. Determine the location of the awning.
2. To aid in positioning the brackets, a full size template is furnished on the last page of this manual.
Copy and paste or tape the page to a piece of cardboard then cut along the dotted line.
.7
5
”
2
.7
5
”
.7
5
”
C
le
a
ra
n
c
e
S
c
re
w
L
o
c
a
tio
n
S
c
re
w
L
o
ca
tio
n
2
.8
8
”
.7
5”
2
.75
”
.7
5
”
C
leara
n
c
e
S
cr
e
w
L
oc
a
tio
n
S
cr
e
w
L
o
ca
tio
n
2
.8
8
”
Sidewall (ref)
.7
5”
2
.7
5
”
.7
5
”
C
le
a
ra
n
c
e
S
c
re
w
L
o
c
a
tio
n
S
c
re
w
L
o
ca
tio
n
2
.8
8”
.7
5”
2
.75
”
.7
5”
C
lea
ra
n
ce
S
c
re
w
L
oca
tio
n
S
cr
e
w
L
o
c
a
tio
n
2
.8
8
”
Sidewall (ref)
.7
5
”
2
.7
5
”
.7
5
”
C
lea
ra
n
c
e
S
c
re
w
L
o
c
a
tio
n
S
cr
e
w
L
o
c
a
tio
n
2
.8
8
”
Vehicles with Flat Sides
Vehicles with Tapered Sides
Adjust Outside Template Marks
to Match Center Template Marks
RMF015
Mark the Rear Edge of the Bracket &
the Front and Rear Screw Locations
Mark the Rear Edge of the Bracket &
the Front and Rear Screw Locations
Figure 5. Positioning the Brackets.
3. On each end of the awning location, set the template on the roof and mark the position of the rear edge
and the mounting hole locations. Connect the marks; these will be the installation guidelines.
For vehicles with tapered sides:
Use the template and mark the locations in the center of the awning. Adjust
the outer marks to align with the center marks. The brackets must be straight to properly mount the awning.
4. In the interior, there must be structural framing beneath the locations of the both the front and rear
mounting hole locations. If there is none, the installer must furnish structural framing in these areas.
5. Mounting Hardware: The installer must furnish the mounting hardware to match the type of structural
framing that is used. Hardware suggestions are provided below:
For open aluminum supports:
M6 or 1/4"-20 screws, washers and nylock nuts
(i.e. open channel)
.
For closed aluminum supports:
M6 or 1/4" self drilling or self
tapping screws & washers
(i.e. box or tube channel).
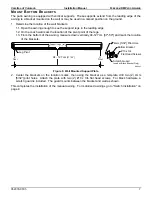
Bracket Pads
Bracket
(2 per Awning)
RMS014
Figure 6. Attach the Pads.
For wood supports:
1/4" lag screws & washers.
6. Remove the release paper from the bracket pads. Attach the
pads to the bottom of the front and rear edges of the brackets.
052978-051r5
5


