background image

Carefree of Colorado


U

SING THE 

V

ERTICAL 

S

UPPORT 

L

EGS


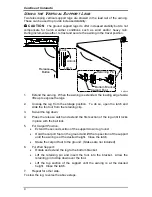
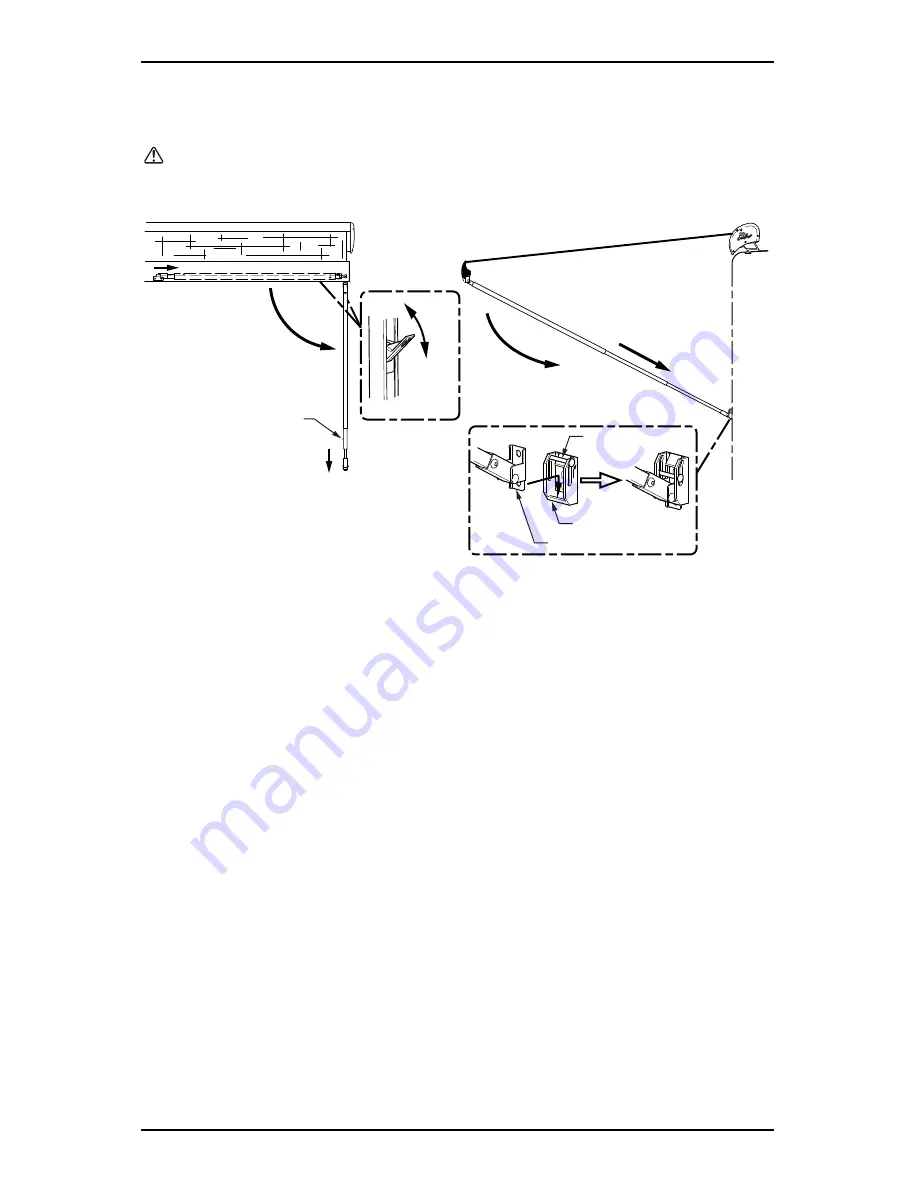
Two telescoping vertical support legs are stowed in the lead rail of the awning.  
These can be used to provide increased stability. 


CAUTION

  The ground support legs do offer increased stability but do not 

compensate for harsh weather conditions such as wind and/or heavy rain.  
During inclement weather, retract and secure the awning in the travel position. 

RMF006

Release

Button

Carport Foot

Bottom Bracket

Retaining Pin

Unlock

Lock

Latch


1. 

Extend the awning.  When the awning is extended, the leading edge fascia 
lifts up to expose the legs. 

2. 

Unsnap the leg from the storage position.  To do so, open the latch and 
slide the foot out from the retaining clip. 

3. 

Swivel the leg down. 

4. 

Press the release catch and extend the first section of the leg until it locks 
in place with the ball lock. 

5. 

For Carport Position:


Extend the second section of the support down to ground. 


Hold the carport foot on the ground and lift the top section of the support 
until the awning is at the desired height.  Close the latch. 


Stake the carport foot to the ground.  (Stakes are not included) 

6. 

For Wall Support:


Rotate and extend the leg to the bottom bracket. 


Lift the retaining pin and insert the foot into the bracket.  Allow the 
retaining pin to drop down over the foot. 


Lift the top section of the support until the awning is at the desired 
height.  Close the latch. 

7. 

Repeat for other side. 

To stow the leg, reverse the above steps. 

Summary of Contents for FREEDOM RM

Page 1: ...trols provided by Carefree of Colorado Some Original Equipment Manufacturers OEM s may alter or change the placement style and or functional configuration of the switches If your controls do not match...

Page 2: ...ined styling blends in with the RV sidewall and is a perfect complement to other Carefree products The awnings are made with heavy duty construction including an all metal chassis Operation 2 Manually...

Page 3: ...gear loop located on the left side of the awning Turn the handle counterclockwise to extend the awning Turn the handle clockwise to retract the awning The crank handle may be extended or shortened by...

Page 4: ...position To do so open the latch and slide the foot out from the retaining clip 3 Swivel the leg down 4 Press the release catch and extend the first section of the leg until it locks in place with the...

Page 5: ...that looks like dirt Vinyl coated polyester fabrics are mildew resistant because of a chemical biocide in the vinyl coating Under ordinary conditions mildew will not appear However in areas where high...

Page 6: ...ocated on the idler right end of the case NOTE This procedure cannot be used to extend the awning Remove Plug 3 8 Socket Drive Extension RMF019 1 Remove the plug from the right endcap and save 2 Inser...

Page 7: ...RRANTY CLAIMS THIS WARRANTY IS NOT TRANSFERABLE For Warranty Duration Warranty Coverage and Exclusions Warranty Terms of Coverage and Warranty Claim Procedures Refer to publication 052580 111 Carefree...

Page 8: ...052978 251r3 Printed in USA July 2010...

Reviews: