Carefree of Colorado
Side-Out Canopy Replacement
052950-001r1 2
June,
2005
S
UMMIT
C
ANOPY
R
EPLACEMENT
R
EMOVING THE
O
LD
F
ABRIC
1. Open the slide out room 10"-12".
2. Remove the fabric retaining screws from the awning rail. Do not
discard.
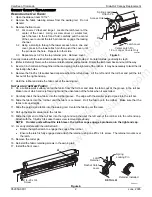
3. Remove the front cover.
3.1
For covers 14 feet and longer
: Locate the latch lever at the
center of the cover. Using a screw driver or similar tool,
push the lever to the left and hold; carefully pull the center
of the cover out until the latch pin cannot engage the locking
channel.
3.2 Using a small pin through the lower access hole in one end
cover, press in the lower attach pin then pivot the cover until
the pin clears the hole. Repeat for other side.
3.3 Repeat steps 3.2 for the top retainer pins. Remove cover.
For early models with the ratchet latch inside the right end cap, go to step 4. For later models, go directly to step 5.
4.
(Refer to Detail A)
Remove the screw and latch retainer and set aside. Rotate the latch lever back and out of the way.
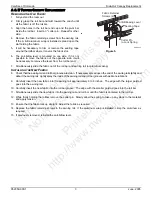
5. Insert a 3 inch cotter pin through the roll bar and spring on the right end of the roll bar. It may be necessary to twist the roll
bar to align the holes.
6. Remove the 1/4-20 x 3/4 socket head cap screw from the left end cap. Lift the left end of the roll bar and pull the roll
bar out of the right end cap.
7. Hold the rollbar and slide the fabric out of the awning rail.
I
NSTALLING THE
N
EW
F
ABRIC
8. On a suitable work surface, unroll the fabric from the roll bar and slide the fabric out of the groove in the roll bar.
Make note of which end is left and right and the orientation of the fabric when it was rolled.
9. Carefully insert the new fabric into the roll bar groove. The edge with the smaller polyrod goes into the roll bar.
10. Slide the fabric into the roll bar until the fabric is centered. Roll the fabric onto the rollbar. Make sure that the
fabric rolls up straight.
11. Slide the polyrod and fabric into the awning rail. Center the fabric over the room.
12. Roll up the slack material onto the roll bar.
13. Slide the right end of the roll bar into the right end cap then set the left end of the roll bar into the left end cap.
Attach with the 1/4-20 x 3/4 socket head screw removed previously.
NOTE: On later units without the latch lever, the roll bar cogs engage a protrusion in the right end cap.
14. For early models with the ratchet latch:
•
Rotate the ratchet latch to engage the cogs of the roll bar.
•
Ensure the latch is fully engaged and attach the retainer using one #10 x 3/4 screw. The retainer mounts over
the latch.
15. Remove the cotter pin.
16. Reinstall the fabric retaining screws in the awning rail.
17. Install the front cover.
1/4-20 x 3/4
Screw
SOK3011c
A
DETAIL
A
Latch
Retainer
Spring
Locking Pin
Retainer Installed
Rachet Catch
Lever
Figure 4.
Access Holes
Spring Loaded
Attach Pin
SOK3005
Pin
Center Latch Pin
14’ or Longer Covers Only
Latch Lever
Figure 3.
Manual
Compliments
of
Northwest
RV
Supply
Printed
From
http://www.nwrvsupply.com


