background image

Carefree of Colorado


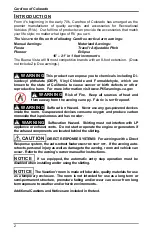
10 

A

TTACHING THE 

S

KIRT


The skirt panels attach to the vehicle using the skirt clips.  The clips can be attached to 
the vehicle wall by two different methods. 

NOTE:

  Some vehicles may be equipped with an awning rail mounted for the skirting.  

Simply slide the fabric with the polyrod at top into the rail and proceed to “Crossing the 
Entry Step” on page 10. 


1. 

For first time installations, thoroughly clean the vehicle wall where the panels are to 
be placed.  Remove all grease, dirt and wax from the area

2

2. 

Using a non-permanent marker, mark the desired height of the skirt. 

3. 

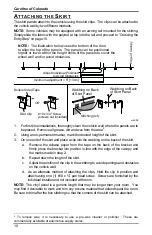
On one end of the skirt and place a clip into the webbing on the back of the skirt. 

a.  Remove the release paper from the tape on the back of the bracket and 

firmly press the bracket into position in-line with the edge of the canopy and 
the marks made in step 2. 

b. 

Repeat down the length of the skirt. 

c. 

Adjust the position of the clip in the webbing to avoid openings and obstacles 
on the vehicle wall. 

d.  As an alternate method of attaching the clips, Hold the clip in position and 

attach using one (1) #10 x ¾” pan head screw.  Screws are furnished by the 
individual installer and not included with room. 

NOTE:  

The vinyl panel is a generic length that may be longer than your room.  You 

may find it desirable to mark and trim any excess material that extends past the room.  
Be sure to trim after the box stitching so that the corners of the skirt can be attached. 


2

 To remove wax, it is necessary to use a pre-wax cleaner or polisher.  These are 

commercially available at automotive supply stores. 

Webbing on Back
of Skirt Panel

Webbing on Back
of Skirt Panel

Adjust Individual Positions

to Avoid Obstacles

minimum adjustment = 5" [13cm]

Double Sided Tape

OR

#10 x 3/4" Screw
(screws not included)

Edge of Canopy

we028

Skirt Clip

NOTE:

  The illustration below uses the bottom of the door

to align the top of the panels.  The panels can be positioned
higher or lower within the height limits of the panels to cover the
wheel well and/or avoid obstacles.

Stitching (ref)

Summary of Contents for VACATION'R

Page 1: ...l used for tents No drilling required No rafters to install TABLE OF CONTENTS Introduction 2 Installing the Rail Brackets 4 Room Setup 5 The Front Panels 5 Manual Awnings Start Here 5 Motorized Awning...

Page 2: ...m the awning canopy Fabric is NOT fireproof WARNING Suffocation Hazard Never use any gas powered devices inside the room Gas powered devices consume oxygen and produce carbon monoxide that is poisonou...

Page 3: ...VACATION R 3 COMPONENT IDENTIFICATION Wall Seal Skirt Clip Room Bag vac018 Stakes LH Side Panel Front Panel RH Side Panel Door Extension Panel Rail Clamps Ball Bungee Skirt Corner Panel...

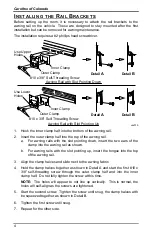
Page 4: ...awning rail 3 Align the clamp halves and slide next to the awning fabric 4 Hold the clamp halves together as shown in Detail A and start the first 10 x 3 8 self threading screw through the outer clamp...

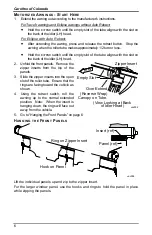
Page 5: ...START HERE Start here for Carefree manual awnings and A E awnings 1 Extend the awning out according to the manufacturer s instructions Ensure that the open roller tube slot and slot access is down and...

Page 6: ...d 2 Unfold the front panels Remove the zipper inserts from the top of the panels 3 Slide the zipper inserts into the open slot of the roller tube Ensure that the rings are facing toward the vehicle as...

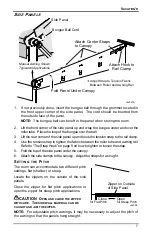
Page 7: ...p of the side panel under the canopy 6 Attach the side clamps to the canopy Adjust the straps for a snug fit SETTING THE PITCH The room can accommodate two different pitch settings flat shallow or ste...

Page 8: ...s into the corner of the folded fabric The velcro 1 of the seal will attach to the velcro on the room side wall Tip Fold the seal into thirds with the velcro out Place the top third on the room wall t...

Page 9: ...CLOSING THE CORNERS On the inside of the room use the supplied cover patches to close the spaces above the zippers in the corners and above where the panels come together Hook Strap to Rail Clamp Pul...

Page 10: ...he clip in the webbing to avoid openings and obstacles on the vehicle wall d As an alternate method of attaching the clips Hold the clip in position and attach using one 1 10 x pan head screw Screws a...

Page 11: ...ts This creates a flap in the fabric 6 Slide the skirting over the step and tuck the flap behind the stair tread Attach the skirting to the skirt clips 7 After hanging the skirting fold any excess mat...

Page 12: ...zipper insert out of the roller tube Position the awning pull strap in the center of the roller tube 5 For motorized awnings Unzip the front panel section from the zipper insert The zipper insert can...

Page 13: ...be needed every two to three years 2 When it is time for a thorough cleaning the fabric can be cleaned while still on the awning frame Use a soft brush and warm water with soap 3 When cleaning the fab...

Page 14: ...free s obligation under this warranty is limited to the repair or replacement at Carefree s option of any defective component with new or factory refurbished components OWNER MUST RETAIN THE ORIGINAL...

Page 15: ...VACATION R 15...
Page 16: ...070011 001r2 Printed in USA November 2018 Carefree of Colorado www carefreeofcolorado com a Scott Fetzer company...

Reviews: