background image


~ 13 ~ 


© 2013 VAN OS MEDICAL UK Ltd., Excel House, Escrick Business Park, 

Escrick, York,YO19 6FD  -   

Tel. +44-(0)1904-720170, Fax +44-(0)1904-720398,  

E-mail: sales@vanosmedical.com, 

www.vanosmedical.com

info@vanosmedical.nl

, www.vanosmedical.com 


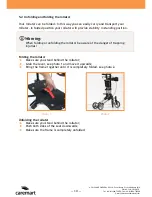
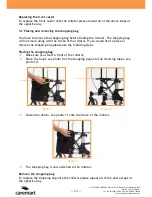
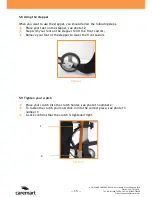
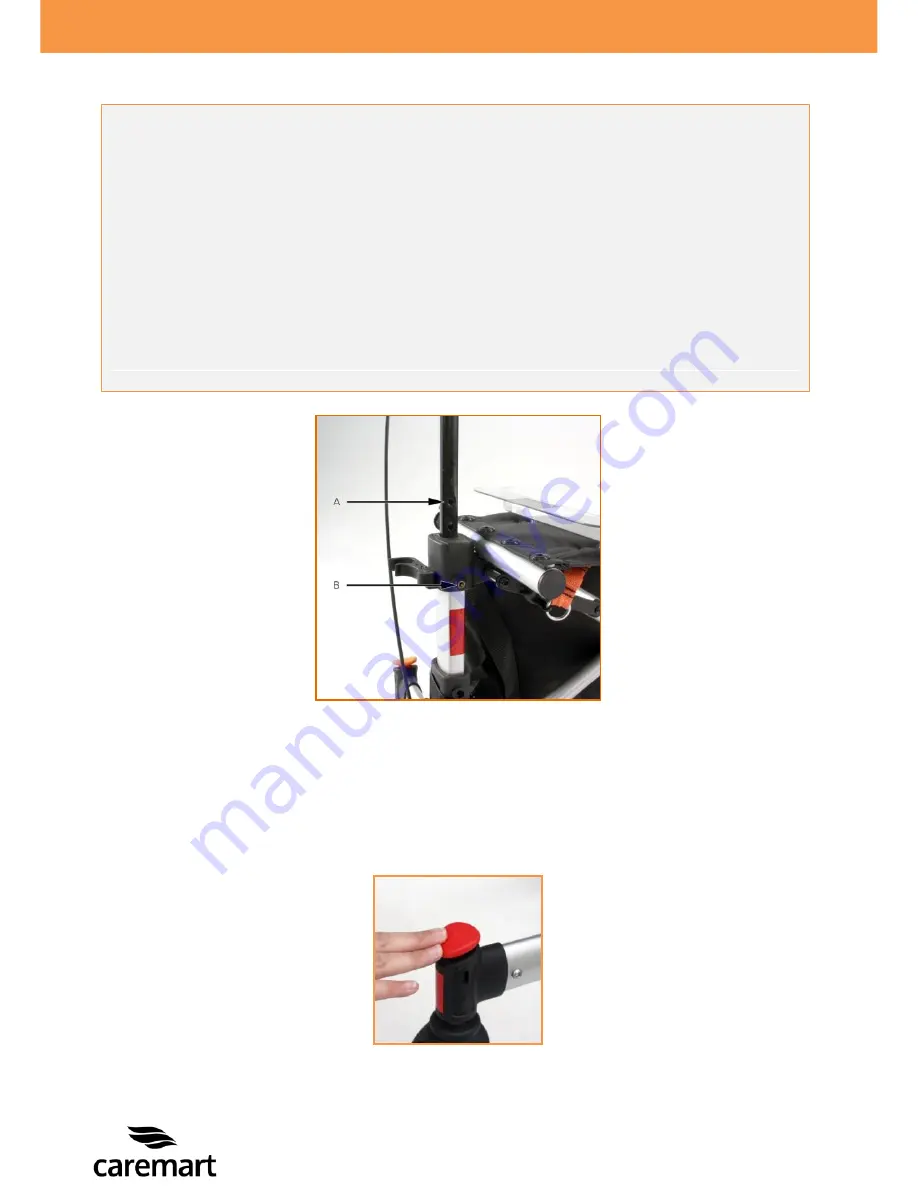
5.6 Removing and replacing the front castor 


Removing the front castor 


Make sure you stand in front of the rollator; 


Press the red button at top of the front fork, see photo 8; 


Move the front castor down wards of the receiving tube of the rollator; 


The front castor is now removed. 
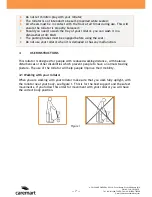
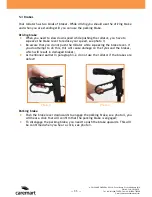
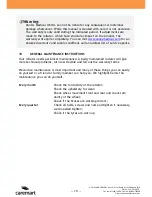


Warning:


Take care when adjusting the height of the handlebars. The handles of the Caremart 
Litetravel are height adjustable by using the star buttons on the handles (see 
picture 6 on the previous page). The height of the handlebars can be adjusted in 
different heights, which incrementally indicated (see photo 8, section A).  
 
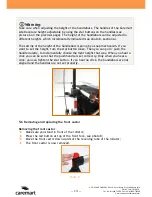
The setting of the height of the handlebars is going by a snap mechanism. If you 
want to set the height, turn the star button loose. Then you can pull / push the 
handle quietly, to incrementally choose the right height that way. When you hear a 
click you can be sure that the push handle is set correctly. Only when you hear a 
click, you can tighten the star button. If you hear no click, the handlebars are not 
aligned and the handles are not set properly. 

Photo 8 

Summary of Contents for Litetravel

Page 1: ...CAREMART CAREMART CAREMA CA AREMART CAREMART User Manual Caremart Litetravel...

Page 2: ...e the right therefore without proper notification to alter this guide It is important that you read this manual carefully The manual contains important information on the safe use and maintenance of y...

Page 3: ...ick York YO19 6FD Tel 44 0 1904 720170 Fax 44 0 1904 720398 E mail sales vanosmedical com www vanosmedical cominfo vanosmedical nl www vanosmedical com Enter the information from your authorized deale...

Page 4: ...6 3 2 WARNINGS FOR SAFE USE 6 4 USER INSTRUCTIONS 7 4 1 WALKING WITH YOUR ROLLATOR 7 4 2 CONFRONTING PAVEMENTS AND UNEQUAL SURFACES 8 5 INSTRUCTIONS FOR USE AND MOUNTING OPTIONS 9 5 1 TECHNICAL INFORM...

Page 5: ...nd the explanation of the various data stored on the frame label listed below 1 Model name The model name from your rollator 2 Definition Description of the design of your scooter 3 Warranty This is t...

Page 6: ...ar wheel 13 Front castor 7 Front fork Your rollator is equipped with a number of elements and parts You should know these before continue reading this manual Designs and specifications may change with...

Page 7: ...ements if possible Do not use your rollator in sand rough area wet and slippery surfaces or surfaces with little grip Do not drive into curbs Never attach anything to the wheels Engage the parking bra...

Page 8: ...a dishwasher at 40 MAX The parking brakes must be engaged before using the seat Do not use your rollator when it is damaged or has any malfunction 4 USER INSTRUCTIONS This rollator is designed for peo...

Page 9: ...the front castors Push your rollator forwards When the front castors are above the pavement you can let the rollator down Now you can push the rollator forwards and place the rear wheels on the paveme...

Page 10: ...5 INSTRUCTIONS FOR USE AND MOUNTING OPTIONS In this chapter we will explore all the possibilities that you have with your rollator All setting and user instructions such as the removal of the footres...

Page 11: ...ransport your rollator In folded position your rollator will provide stability in standing position Folding the rollator Make sure you stand behind the rollator Grab the lever see photo 1 and move it...

Page 12: ...tor you have to squeeze the brake lever to reduce your speed see photo 3 Be aware that you do not push the rollator while squeezing the brake lever If you do attempt to do this this will cause damage...

Page 13: ...our feet are between the rear wheels when you re seated and with your back towards the direction of travel see photo 5 5 5 Setting the height of the push handels You can adjust the height of the push...

Page 14: ...height of the handlebars The handles of the Caremart Litetravel are height adjustable by using the star buttons on the handles see picture 6 on the previous page The height of the handlebars can be ad...

Page 15: ...shopping bag before folding the rollator The shopping bag will not move along with the frame of the rollator If you would like to place or remove the shopping bag please use the following steps Placi...

Page 16: ...se the stepper you should follow the following steps Place your feet on the stepper see photo 12 Step with your foot on the stepper to lift the front castors Remove your foot of the stepper to lower t...

Page 17: ...les you can easily carry your rollator in or out of the vehicle see photo 14 7 MAINTAINANCE It is important to clean your rollator regularly Clean the frame We advise you to clean the frame regularly...

Page 18: ...Caremart Litetravel rollator is inspected and adjusted so that you can use it immediately The following troubleshooting guide lists several common problems that may occur and offers corrective actions...

Page 19: ...d or replaced However you do need to provide to Van Os Medical UK ltd a complete filled in warranty registration form a copy of the bill with the date of purchase and the original packaging This warra...

Page 20: ...com for an enlarged warranty and supply conditions and an address list of service agents 10 GENERAL MAINTENANCE INSTRUCTIONS Your rollator needs periodical maintenance A badly maintained rollator will...

Page 21: ...nbergen Country The Netherlands EU Representative Name W van Os Address Koperslagerij 3 4651 SK Steenbergen Country The Netherlands Function Director Technical constructed file Prepared by Name J M J...

Page 22: ...0 167 57 30 20 Fax 31 0 167 57 33 81 E mail info vanosmedical nl www vanosmedical nl Van Os Medical UK Ltd Excel House Ashbrooke Park Lincoln Way Sherburn in Elmet North Yorkshire LS25 6PJ Tel 44 0 1...

Reviews: