2012 Cargo Floor B.V. Coevorden, Holland
Versie 01/11-01-2012
www.cargofloor.com
info@cargofloor.com
Cargo Floor B.V.
P.O. Box 271
NL-7740 AG Coevorden
Phone: +31-(0)524-
593900
Fax: +31-(0)524-
593999
Blz. 52
NL
MONTEREN AFDICHTINGSPROFIEL (SEAL) & EINDKAPPEN
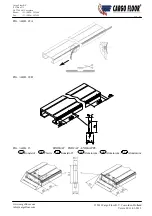
U legt alle vloerprofielen op de zijkant tegen elkaar, met de groef naar boven. Voordat het afdichtingsprofiel (seal)
gemonteerd kan worden dient de hiervoor bestemde groef in het vloerprofiel schoon te zijn (eventueel doorblazen met
lucht).
Omdat het afdichtingsprofiel (seal) op een rol aangeleverd wordt, dient men, om eenvoudig af te kunnen rollen, de
positie te bepalen vanaf welke zijde het afdichtingsprofiel (seal) in de groef dient te worden getrokken. De korte lip van
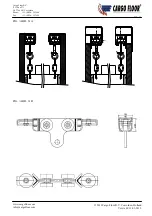
het afdichtingsprofiel (seal) dient altijd naar boven en de lange lip naar beneden te wijzen (zie figuur 22A). Om het
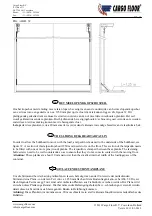
afdichtingsprofiel (seal) eenvoudig te monteren knipt / snijdt u, na circa 100 mm (wordt handvat), uit het T-stukje 10
mm materiaal (zie figuur 22A).
Vervolgens plaatst u het T-gedeelte van het afdichtingsprofiel (seal) in de groef en trekt
door middel van het handvat het afdichtingsprofiel (seal) in het vloerprofiel. U stopt 300 mm voor het einde van het
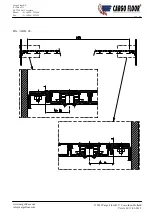
vloerprofiel en snijdt het afdichtingsprofiel (seal) vervolgens aan de beginzijde af. Vervolgens plaatst u, afhankelijk van
de beginzijde van het vloerprofiel en de plaats van de eindkap, de eerste popnagel (zie figuur 22B). Hierna spant u het
afdichtingsprofiel (seal) op door deze teminste 500 tot 1000 mm (afhankelijk begin verhoogd weerstandsgevoel en de
lengte van het voertuig) uit te trekken, dit houdt in circa 6 / 10 kg trekkracht. Na het spannen plaatst u conform figuur
22B
de overige popnagels.
Nu kunnen de eindkappen gemonteerd en vastgezet worden met twee stalen popnagels, (zie figuur 23).
Let op: indien u de eindkappen wenst vast te lassen dient dit voor de montage van het afdichtingsprofiel (seal)
gedaan te worden.
GB
MOUNTING THE SEAL AND END CAPS
Lay all of the floor profiles on their sides against one another, with the groove facing upwards. The groove in the floor
profile needs to be clean (if necessary blown through with compressed air) before the seal can be mounted.
The seal is supplied on a roll. In order to install it simply, one needs to determine from which side of the groove the seal
needs to be pulled. The short lip of the seal always needs to point upwards and the long lip needs to point downwards
See figure 22A). To aid the mounting of the seal, snip / cut about 10 mm out of the T-form at about 100 mm from the
start (this will form a handgrip, see figure 22A). Next, place the T section of the seal in the groove and, using the
handgrip, pull the seal into the groove in the floor profile. Stop 300 mm before the end of the floor profile, and cut off
the seal on the start end. Next, depending on the start end of the floor profile and the position of the end cap, place the
first pop-rivet. (See figure 22B.) Then tension the seal by stretching it by at least 500 to 1000 mm (until you start to feel
higher resistance and the length of the vehicule), this means about 6 to 10 kg. pulling force. After tensioning the seal
place the remaining pop-rivets according to figure 22B.
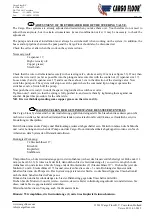
When this is done the end caps can be mounted and secured with two steel pop-rivets, (see figure 23).
Attention: If you want to secure the end caps by welding, then this needs to be done before mounting the seal.
D
DICHTUNGSPROFIL (SEAL) UND ENDKAPPEN MONTIEREN
Legen Sie alle Bodenprofile auf die Seite, gegeneinander, so dass die Nut nach oben weist. Bevor das Dichtungsprofil
(Seal) montiert werden kann, muss die hierfür bestimmte Nut im Bodenprofil gereinigt sein (ggf. mit Pressluft
durchblasen).
Da das Dichtungsprofil (Seal) auf einer Rolle geliefert wird, muss zur Erleichterung des Rollvorgangs die Position
bestimmt werden, von welcher Seite das Dichtungsprofil (Seal) in die Nut gezogen wird. Die kurze Lippe des
Dichtungsprofils (Seal) muss dabei immer nach oben und die lange Lippe nach unten zeigen (siehe Abb. 22A). Um das
Dichtungsprofil (Seal) leicht montieren zu können, kneifen bzw. schneiden Sie nach ca. 100 mm (wird ein Griff) aus
dem T-Stück 10 mm Material ab (siehe Abb. 22A). Anschließend setzen Sie das T-Stück des Dichtungsprofils (Seal) in
die Nut und ziehen mit dem Griff das Dichtungsprofil (Seal) in das Bodenprofil. Hören Sie damit 300 mm vor dem
Ende des Bodenprofils auf und schneiden Sie das Dichtungsprofil (Seal) anschließend an der Startseite ab. Danach
bringen Sie, abhängig von der Startseite des Bodenprofils und der Position der Endkappe, die erste Hohlniete an (siehe
Abb. 22B). Spannen Sie anschließend das Dichtungsprofil (Seal), indem Sie es auf mindestens 500 bis 1000 mm
ausziehen (bis zum Eintreten eines spürbaren Widerstands und die Länge des Fahrzeugs), dies bedeutet etwa 6 bis 10
kg. Ziehkraft. Nach dem Spannen bringen Sie gemäß Abb. 22b die anderen Hohlnieten an.
Jetzt können die Endkappen aufgesetzt werden. Befestigen Sie diese mit zwei Hohlnieten aus Stahl (siehe Abb. 23).
Achtung: Wenn Sie die Endkappen schweißen wollen, dann muss dies vor der Montage des Dichtungsprofils
(Seal) durchgeführt werden.


