26
BALANCING THE MODEL
PROPELLER AND SPINNER INSTALLATION
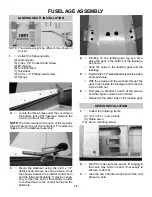
The propeller size must be matched to the engine. For
example, a .35 may use a 9" diameter prop while a .45
can use a 10" prop. Follow the engine manufacturer’s
recommendation for correct propeller sizes or speak to
a knowledgeable dealer. It's wise to buy a few spare
props, as everyone breaks them occasionally, and par-
ticularly often when learning to fly.
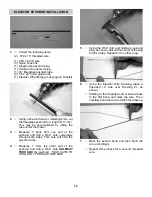
Balancing your propeller helps to protect your radio
from the damaging effects of vibration. There are good,
easy to use prop balancers on the market. We recom-
mend sanding the heavy blade on the curved face, out
near the tip, rather than on the flat face. Try to maintain
the normal airfoil curvature. Avoid scratches which
may cause the prop to break.
Never carve or cut a
prop near the hub for any reason
(such as to fit a
spinner).
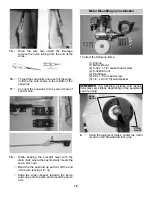
It is equally important to get a correctly sized spinner.
The CGP 4-pin spinner is a rugged precision-molded
spinner which does not require any special mounting
nuts or screws.
Although a spinner helps reduce the
chance of injury from a rotating prop, extreme cau-
tion always must be used when the engine is run-
ning.
IMPORTANT: NEVER NEGLECT THIS STEP WITH
ANY AIRPLANE.
If you try to fly a plane with the bal-
ance point behind the recommended range, you run
the risk of having an unstable aircraft and the
strong
likelihood of a crash. TAKE THE TIME TO PROP-
ERLY BALANCE YOUR MODEL!
Referring to the recommended balance range for
your model, move the position of the plane on the
balance stand until the model is level or the nose
slightly down.
If the is tail heavy, shift the R/C equipment away
from the heavy end of the model and recheck until
the model will balance within the acceptable range.
If shifting the R/C gear still doesn't balance the
model, add weight to the far end of the nose or tail,
respectively, until the model is correctly balanced.
The least weight is needed when added as far back
or forward as possible. Fasten the weight perma-
nently in place.
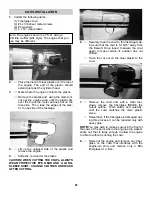
BALANCE RANGE
3-1/2 TO 4-1/4" BACK FROM LEADING
EDGE OF WING
CORRECT BALANCE
SLIGHT NOSE DOWN OR LEVEL
Place the fully assembled aircraft on a model balancing
stand, as shown above. You can make this simple set-
up with a couple of ¼" dowels with rounded tops,
spaced 5" apart. Alternatively, lift the model under the
wing near the fuse by your finger tips. (You may wish to
get help from a friend if using the latter method.
Summary of Contents for decathlon arf
Page 29: ......


