MN90300B 072016
Model 90300 Microprocessor Temperature Controls — Data sheet
Model 90300
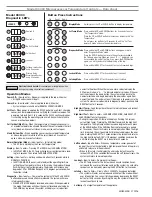
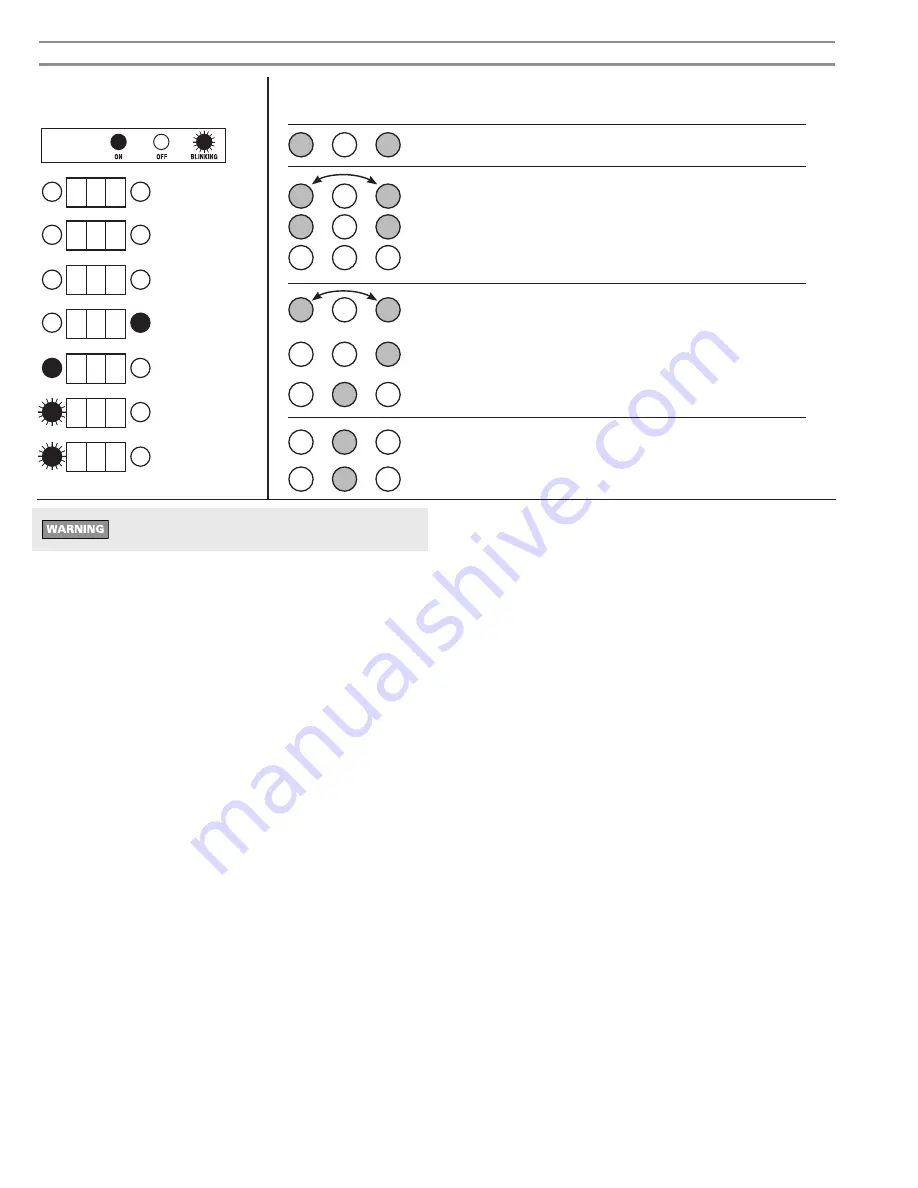
Diagnostic LED’s
R
A
R
A
1 2 5
A
1 2 5
R
R
A
1 2 5
1 2 5
R
A
E 0 1
R
A
E 0 1
R
A
Power Off
Power On
No Call for Heat
Call for Heat
Lockout
Latchup, red flashes
every 2 seconds
Primary Relay
Warning, red flashes
every 5 seconds
LEGEND
Electrical shock hazard:
Disconnect power to appliance when
wiring or servicing any electrical component.
Power, Off –
(How to enter = No power is applied to the red-white wire)
• All lights and screen will be off.
Power, On –
(How to enter = Power applied to red-white wire)
• System will power on and enter NORMAL OPERATION MODE
Self-test –
When power is applied, the 90300 performs a self-test, checking
sensor(s) and microprocessor and verifying limit contacts are open. The
power-up test lasts from 3 to 5 seconds. The 90300 continues diagnos-
tic checking during the operating cycle as well. Any self-check failure
causes a lockout (see below).
Call for Heat/High Fire –
When the temperature at the operating sensor is
at or below setpoint minus fixed differential, the control powers the limit
relay (break-on-rise contact closes; make-on-rise contact open).
Stand By/Low FIre –
When operating sensor reaches setpoint temperature
or above, temp control will turn off the relay (break-on rise contact
opens; make-on-rise contact closes).
Normal Operation (Mode) –
(How to enter = Initial starting mode)
• The EZ-Temp will display the User Set Temperature.
Display –
(How to enter = Pressing UP or DOWN key in NORMAL MODE)
• In DISPLAY MODE, the EZ-Temp will display current temperature read-
ing for 5 seconds, then return to NORMAL OPERATION
Setting –
(How to enter = Hold up and down buttons for 3 seconds while in
NORMAL OPERATION)
• In SETTING MODE, the user is able to adjust the operating limit (via
setting the set temperature). Once in this mode, the display will begin
flashing the current set temperature. The display will increase one
degree per UP or DOWN button push or 10 degrees per second when
the button is held.
Diagnostic –
(How to enter = Power up the system with the UP and DOWN
buttons depressed. Once buttons are released, the system will move
into diagnostic mode)
• DIAGNOSTIC MODE displays recorded error codes. When powered in
this mode, the display will show the newest recorded error code. As
the DOWN key is pressed, the system will display error codes from
newest to the oldest. When there are no more codes to display, the
EZ-Temp will show a “
E
_ _” to indicate end of error codes. If the user
continues to push the down button, the system will go back to the
newest error code and begin displaying the error codes again from
newest to oldest. The only way to exit this mode is to power cycle the
system. To clear error codes (while in diagnostic mode), push and hold
RESET button for 3 seconds.
High Limit Temp –
Fixed temp where the control will shut down and lockout
(model dependent).
High Limit Test –
(How to enter = In NORMAL OPERATION, hold RESET, UP
and DOWN buttons for 3 seconds)
• During this operation, EZ-Temp will display a flashing 180 (or your
current high temp). Pressing the DOWN button adjusts the high limit
temperature. The high temp will decrease one degree for each press
of the DOWN button. If the DOWN button is not pressed for a period
of 10 seconds, the unit will return to normal operation. When the high
limit is reached, the unit goes into hard lockout and displays the error
code. Holding the RESET for 3 seconds clears the lockout and returns
the high limit to default (180°). If the lockout condition has driven the
unit into latchup, the RESET must be held for 30 seconds.
Soft Lockout –
(How to Enter = When any temperature sensor goes out of
range or the system has detected a high temp condition and the primary
and safety relays are still operational)
• When in this state, it will display the error code but will leave the
lockout LED off. If the condition that caused the soft lockout clears, the
system will return to normal operation.
Lockout –
(How to Enter = Numerous Error Codes)
• The EZ-Temp will enter this state when an unsafe condition has oc-
curred and the user must intervene and put the system in a safe state.
Lockout can be cleared by pressing the RESET button for 3 seconds.
Latchup –
(How to Enter = Occurs after 3 LOCKOUTs have been detected)
• The system will enter a safe mode and will not exit the mode without
user intervention. You can exit latchup mode by depressing the RESET
button for thirty seconds. By exiting this way, the system will reset the
lockout count back to zero.
Set temp –
The target temperature of the appliance.
Operation Modes
Button Press Instructions
Quickly press the UP or DOWN button to display temperature.
Press and hold UP and DOWN buttons for 5 seconds to enter
“Set Temperature” mode.
Press the UP or DOWN button to increase or decrease the “Set
Temperature”.
Do not press any buttons for 5 seconds to exit the “Set Tem-
perature” mode and save the new temperature.
Press and holde UP and DOWN buttons during power up to
enter “Diagnostic Mode” mode.
Press the DOWN button to move to the next error recorded in
the 16 deep error log. When you see an “E – –” displayed, you
have reached the end of the log. If you press the DOWN button
again, you will cycle back to the beginning of the log.
Press and hold RESET for 3 seconds to clear all recorded logs.
Press and hold RESET for 5 seconds to exit Lockout.
Press and hold RESET for 30 seconds to exit Latchup.
Display Mode
Set Temp Mode
Diagnostic Mode
Lockout Mode
Latchup Mode
Up
Reset
Down

