Air Cap Test Kit for Spray Guns
The purpose of this test kit is to verify atomising air
pressure. This is important to demonstrate compliance to
air quality regulations, as well as to confirm operational
standards. Follow instructions below.
ASSEMBLY
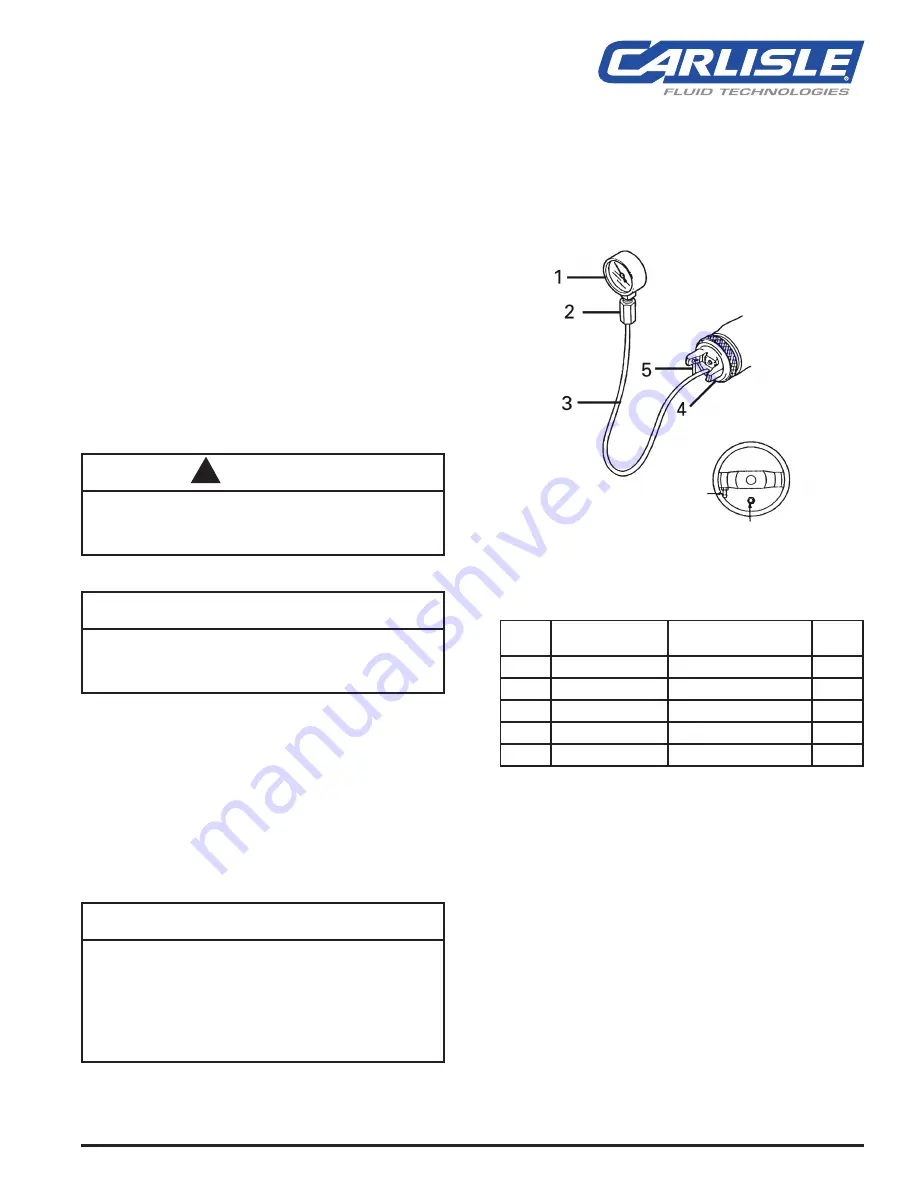
1. Install fitting (2) onto gauge (1) and tighten.
2. Remove air cap and retaining ring from spray gun.
3. Install test cap/ring (4) onto gun.
4. Push ends of tubing over barbed fittings on both the test
cap and gauge.
Care must be taken not to allow the test gauge to hang by
the tubing as damage to gauge could occur.
!
CAUTION
Fan air port fitting must be capped with black vinyl cap for
correct pressure measurement.
NOTE
TEST PROCEDURE
1. Position fan adjusting knob on the gun to the position
used for paint being sprayed.
2. Disconnect or empty paint supply. Turn air source on.
3. Hold gauge in up-right position, trigger gun and observe
reading on test gauge.
4. Adjust inlet pressure to obtain desired atomising air
pressure.
5. Remove test air cap/ring and replace with gun air cap
and ring before spraying paint.
In some areas, legislation exists prohibiting the use of
more than 10 PSIG air cap pressure. (There is no advantage
to spraying at more than 10 PSIG.) When atomising air
pressure is set at 10 PSIG or less, the fan air pressure will
always be less than 10 PSIG. This can be verified by
pushing the tubing over the fan air port, capping the center
air port and repeating Step 3. Always recheck pressures
after any adjustments to the fan knob.
NOTE
Center Air Port
(Atomising)
Fan Air Port
PARTS LIST
REF.
NO.
REPLACEMENT
PART NO.
DESCRIPTION
QTY.
1
GA-313
Gauge 0–15 PSI
1
2
—
Barbed Fitting
1
3
—
Tubing
1
4
—
Test Air Cap
1
5
—
Black Vinyl Cap
2
TI-1005-R1 (2/2019)
1 / 2
www.carlisleft.com
SERVICE MANUAL
EN


