background image

flashing

Y PRO MCU  UPGRADE

TOOL

STEPS DEMONSTRATION

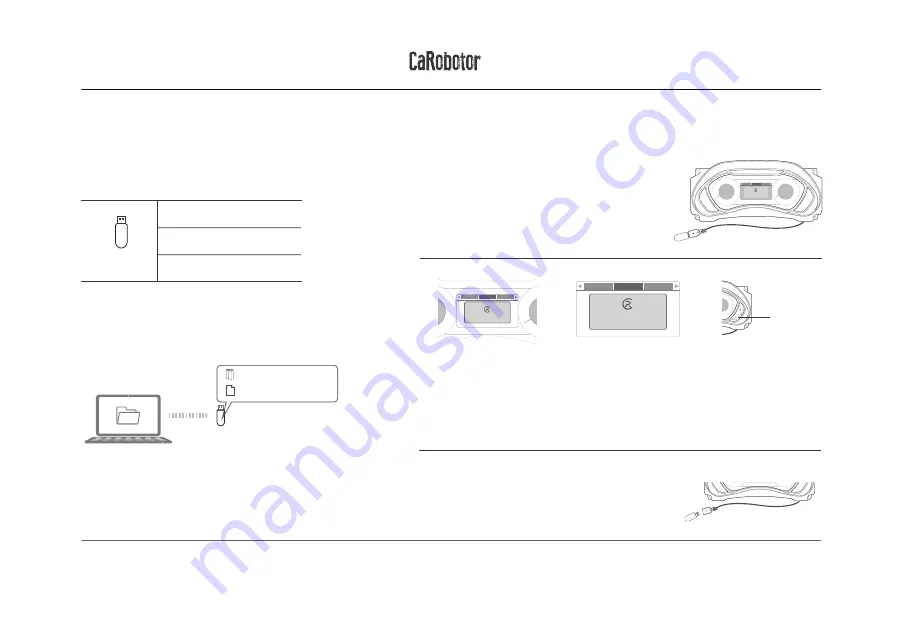
Please format the U disk as the formation below firstly.

Firstly, you have to unzip the Carobotor_dashboard.zip file, and 

then copy the update directory and PLATFORM_CARD.mxnmcu 

file to your disk that is in the directory you unziped. 

Please plug your U disk in the usb port of your dashboard, 

then long press the A key as the picture  shows , and 

short press the A key to switch  to UNIT upgrade window .

Long press B key to lock the current window until a red frame appears on the current window 

as picture 1, then release the B key and long press B key again until  you can see the two LED 

panles at the left and right side of dashboard flash.When the  LED panles stop to flash, it means

 you update the MCU successfully.  

When the upgrade is complete,please remove the 

U disk,lock the car for 5 minutes and then turn it 

off and restart.

U DISK

CAPACITY:

8/16G

FAT32

32KB

FILE FORMAT:

UNIT:

System upgrade

MCU upgrade

Device Info

CaRobotor UNIT

v4.3

Long press “B”to update MCU! 

System upgrade

MCU upgrade

Device Info

CaRobotor UNIT

v4.3

MCU updateing...

Long press “B”to update MCU! 

System upgrade

MCU upgrade

Device Info

CaRobotor UNIT

v4.3

Long press “B”to update MCU! 

<1>

<2>

<3>

<4>

System upgrade

MCU upgrade

Device Info

CaRobotor OS

v5.1

Long press “B”to update system! 

1

2

3

System upgrade

MCU upgrade

Device Info

CaRobotor UNIT

v4.3

Long press “B”to update MCU! 

update 
PLATFORM_CARD.mxnmcu

Summary of Contents for Y Pro

Page 1: ...INSTRUCTION MANUAL Y Pro CAR DASHBOARD FOR PATROL Y62 ...

Page 2: ...Welcome Thank you for purchasing this product please read the instructions carefully before use Let s see the wider world ...

Page 3: ...EW Display Trouble indicator light Coolant Battry Y Pro Sync cable USB upgrade line Oil meter Oil pressure USB software upgrade cable Power harness interface Video input interface Expand port Front view Rear view ...

Page 4: ...Operating Tips KEY OPERATION INTRODUCTION Redefining the keys you can use them to manipulate the Y PRO s features Long press the B key to reset the body state Press A key to switch the main interface Hold A key to pop up the setting window Press B key to switch widgets 0 0 ...

Page 5: ...gain until you can see the system will restart upgrade When the progress bar is full please remove the U disk and the system will restart automatically within two minutes U DISK CAPACITY 8 16G FAT32 32KB FILE FORMAT UNIT System upgrade MCU upgrade Device Info CaRobotor OS v5 1 Long press B to update system System upgrade MCU upgrade Device Info CaRobotor OS v5 1 System will restart to upgrade Long...

Page 6: ...il you can see the two LED panles at the left and right side of dashboard flash When the LED panles stop to flash it means you update the MCU successfully When the upgrade is complete please remove the U disk lock the car for 5 minutes and then turn it off and restart U DISK CAPACITY 8 16G FAT32 32KB FILE FORMAT UNIT System upgrade MCU upgrade Device Info CaRobotor UNIT v4 3 Long press B to update MC...

Page 7: ...the original car meter and remove the car meter REMOVE THE ORIGINAL CAR METER PART 1 Lower the steering wheel Pull out the instrument cover 2 4 Unplug the harness plug behind the cover plate 3 1 Y PRO INSTALLATION STEPS lower tool Phillips screwdriver ...

Page 8: ...And then it will start to synchronize When synchronization is complete be sure to turn off the engine and unplug the sync line as prompted Start syncing SYNCHRONOUS UPDATE PART 2 INSTRUCTIONS BEFORE OPERATION Stop engin and keep ACC off at least 25 seconds before you remove your meter include Y PRO and original car meter from your car Sychroninzing 66 Port A Car Y Pro Port B Synchronization line ORI...

Page 9: ...g to the origina procedure 1 2 3 Connect the USB interface cable to the Y Pro and plug the car plug to Y Pro INSTALL Y PRO PART 3 Car Y Pro After the Y PRO is installed please lock the car for 5 minutes And then turn it off and restart ...

Reviews: