background image

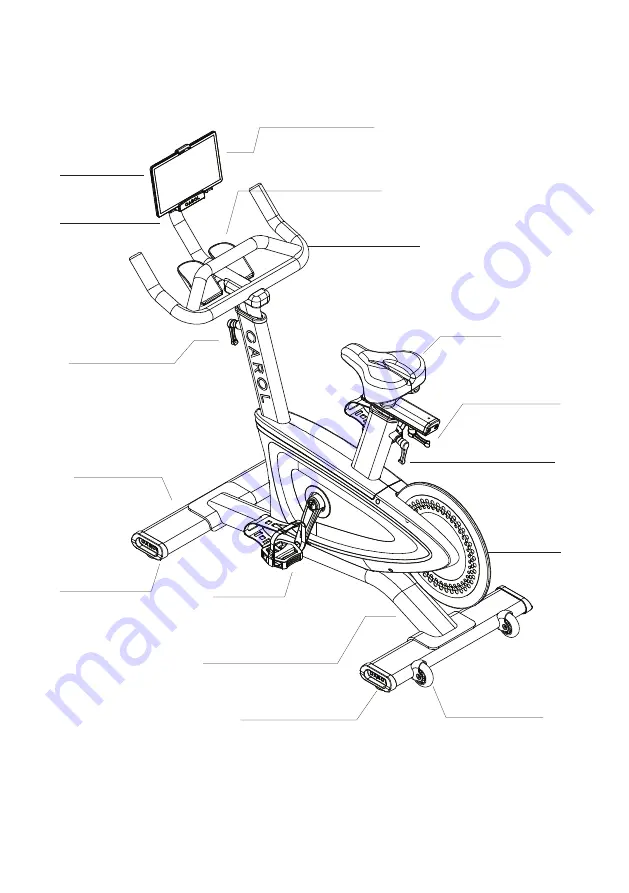
Touch screen tablet

Bottle holder

Handlebars

Saddle

Saddle horizontal

position lever

Seat height

adjustment lever

Flywheel

Pedals

Power supply connector

located under frame

Rear stabilizer

Transport

wheels

Power button

Charging dock

Handlebar height

adjustment lever

Front stabilizer

Levelling feet

under stabilizer

CAROL  |  9 

Summary of Contents for BIKE 2.0

Page 1: ...CAROL BIKE 2 0 SETUP AND USER GUIDE...

Page 2: ...blyvideo ALL ABOUT YOUR BIKE carolbike com userguide Ready for your first ride You ll find this setup and user guide with all latest information and updates also online CONTACT US If you need anything...

Page 3: ...e tablet 13 Step 7 Saddle adjustment 13 Step 8 Setting up the power supply 14 Cleats 14 The tablet console 15 Using the tablet power switch 15 Wi Fi and getting started 16 Troubleshooting 17 Positioni...

Page 4: ...4 CAROL...

Page 5: ...equipment Ergonomic handlebars with 5 different grip positions Designed for maximum comfort Optimal distance between pedals of 170 mm Dual sided toe cage and SPD click pedals to maximize rider effici...

Page 6: ...r mental capabilities or lack of experience and knowledge unless they have been given supervision or instruction concerning use of the equipment by a person responsible for their safety Ensure that ad...

Page 7: ...ED AND PROPER INSTRUCTIONS OBTAINED PRIOR TO USE WARNING Possibility of serious injuries or death if caution is not used All warnings and instructions must be read followed and proper instructions obt...

Page 8: ...bolts are in place and partially threaded before tightening firmly There are several steps during the assembly process to which special attention must be paid If the assembly instructions are not cor...

Page 9: ...izontal position lever Seat height adjustment lever Flywheel Pedals Power supply connector located under frame Rear stabilizer Transport wheels Power button Charging dock Handlebar height adjustment l...

Page 10: ...10 CAROL...

Page 11: ...0 assembly Tools needed for assembly The following are tools needed to assemble CAROL Bike 2 0 and come with the bike 4mm Allen key 5mm Allen key 13mm spanner wrench 15mm spanner wrench 17mm spanner w...

Page 12: ...rrectly Insert the 4 screws 104 into the handlebar gently rock the handlebars if needed to get the screws started turning with FINGERS FIRST to get the screws started Thread the screws in a few turns...

Page 13: ...is fitted with magnets in the base and back that attract it to the back plate When the tablet is located on the pins correctly it won t slide to the left or right Fit the tablet security bracket 128 w...

Page 14: ...and turn on The power supply is designed for 110 240V operation The bike motor will be heard running through a setup procedure for a second or two This means your bike is receiving power and is ready...

Page 15: ...itch Please press gently and hold for 5 seconds until tablet display turns on Then release the switch The tablet can be put to sleep with a short touch of the power button To shut down the tablet hold...

Page 16: ...CAROL app icon on the home screen and log in After logging into your bike for the first time the app will then remember you by default with our Remember Me feature Getting Started You can register for...

Page 17: ...n process ensuring the password is correct Exit Wi Fi settings by pressing the back arrow in the navigation bar If you have trouble connecting your bike to Wi Fi please contact Customer Support Loss o...

Page 18: ...shared by two adjacent bikes for getting on and off each bike 137cm Positioning your bike 18 CAROL 53cm 60cm 60cm Free area left clear for getting on and off the bike Free area can be shared by two a...

Page 19: ...nt pads located on either side underneath both the front and rear stabilizers Just turn the rubber pad anticlockwise to increase the height and clockwise to reduce the height Take a little time to adj...

Page 20: ...ing position and allows maximum power Although this is our recommendation do experiment with this position until you find what is most comfortable for you Step 3 Lock your chosen position by firmly tu...

Page 21: ...too far away Raising the handlebars will also move the handlebars further away Loosen the quick release lever by turning it anticlockwise to adjust the handlebar height Move the handlebar post to the...

Page 22: ...ake sure it is securely tightened and that there is no lateral movement of the slider Pedals and toe straps Your feet should be securely positioned on the pedals during exercise Put your foot as far f...

Page 23: ...ving the flywheel The free wheel allows you to stop pedaling at any time and safely disembark the bike even if the flywheel is turning The resistance is controlled by the tablet software and is engage...

Page 24: ...iber cleaning cloth Avoid liquids and wet cloths near the tablet display and charging dock Wipe down the unit using a microfiber cleaning cloth with CAROL approved solution cleaning agents should be a...

Page 25: ...ld be alcohol and ammonia free Pedals Check and tighten the pedals with a 15mm spanner Clockwise for the right hand side Anticlockwise for the left hand side Saddle Check the saddle is correctly align...

Page 26: ...the UK NI Turkey TR Norway NO Switzerland CH Iceland IS and Liechtenstein LI The WLAN function for this device is restricted to indoor use only when operating in the 5150 to 5350 MHz frequency range T...

Page 27: ...CAROL 27...

Page 28: ...CAROL BIKE 2 0 SETUP AND USER GUIDE...

Reviews: