background image

13

12

Model No. C1565 contact us 1-888-666-1887

 OPERATING INSTRUCTIONS

 OPERATING INSTRUCTIONS

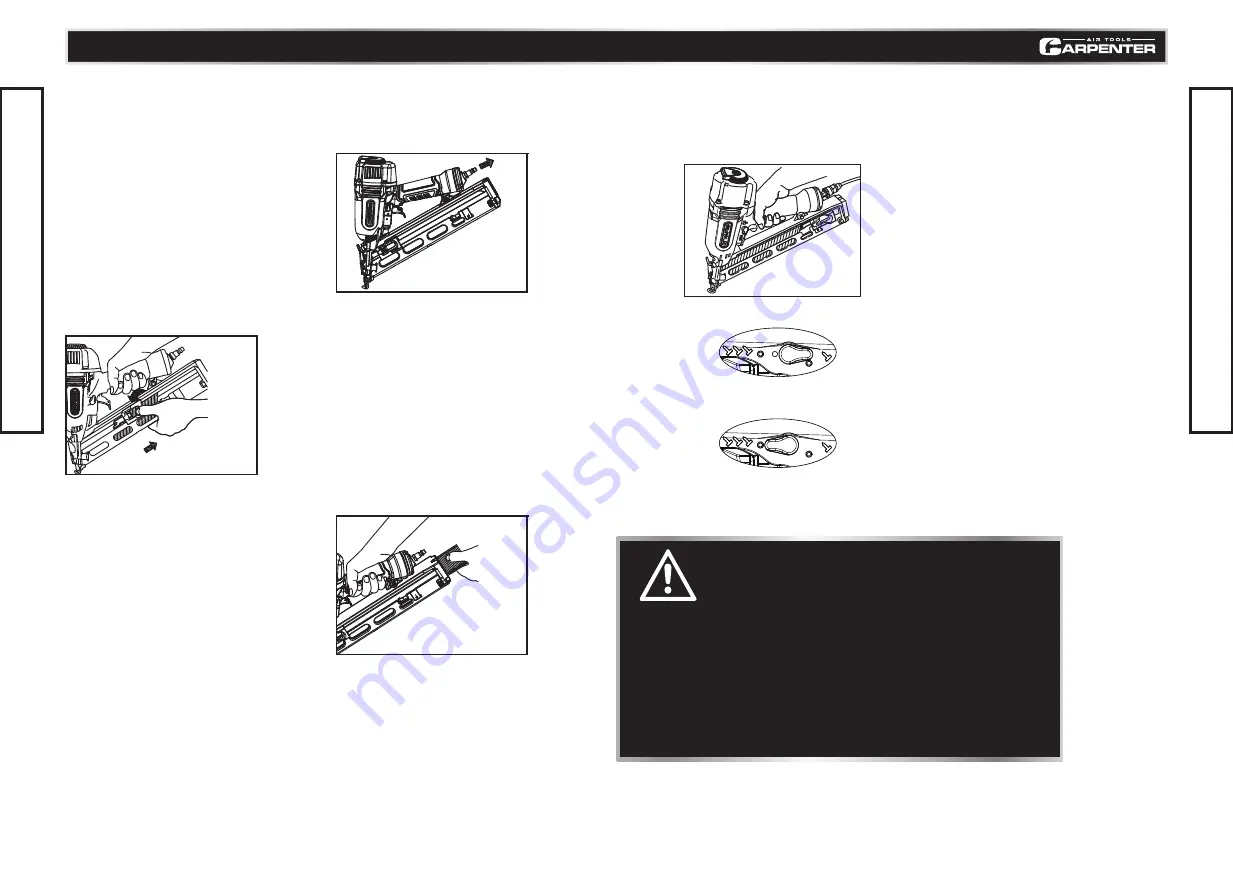
REMOVING NAILS

3.Remove the remainning nails from the 
   magazine (Fig.F).

1.Disconnect Air hose (Fig.D).

2.Depress the nail feeder and slowly slide 
   the nail feeder forward (Fig.E).

Fig. D

Fig. F

Fig. E

DANGER!

 Do not drive nails on top of other nails or with nailer at too steep an angle. 

    Nails can ricochet and seriously injure someone. 

 In order to avoid double firing or unwanted ejection of a nail due to 

    bouncing of the nailer, do not push nailer on workpiece to avoid recoil. 
    Recoil is necessary for proper operation of the nailer.

 Do not drive nails from both sides of a wall at the same time. Nails can 

    be driven into and through the wall and hit a person on the opposite side.

 Never drive nails into thin boards or near corners and edges of workpiece. 

    Nails can be driven through or away from workpiece resulting in serious or 
    life threatening injury.

 Never use a nailer which is defective or operating abnormally.

 Never use a nailer as hammer.

METHOD OF OPERATION

The Carpenter Air-powered Brad Nailer is equipped with a push lever at the nailing point and will not 
operate unless the push lever is depressed (pushed upwards)(Fig.G). 

Fig. G

 Single Actuation Mechanism

1.Set the switching device to the position as (Pic I);
2.Make sure the push lever position to the workpiece,Pull the 
   gunbody and keep the push lever connect to the workpiece and 
   then press the trigger,It start to work; 
3.After the first nails fire,loosen the trigger and raise up the 
   gunbody,Position the push lever to the workpiece and rework as 
   above steps.


 Contact Actuation Mechanism

1.Set the switching device to the position as (Pic II);
2.Press the trigger first and then postition the push lever to the 
   workpiece,Press the push lever and begin to fire;
3.After the first nails out, hold the trigger tight,and raise up the push 
   lever,Make sure the push lever postion to the workpiece,and then 
   press it and rework as above steps.

Pic I 

Pic II

Summary of Contents for C1565

Page 1: ...Model No C1565 http www carpenterpowertools com 15 GAUGE FINISH NAILER ...

Page 2: ... CONTENTS TECHNICAL SPECIFICATIONS SAFETY GUIDELINES KEY PARTS DIAGRAM TECHNICAL INFORMATION TYPES OF NAILS OPERATING INSTRUCTIONS TROUBLESHOOTING EXPLODED VIEW PARTS LIST 4 5 8 9 10 11 17 18 19 TABLE OF CONTENTS ...

Page 3: ... manual contains information that relates to PROTECTING PERSONAL SAFETY and PREVENTING EQUIPMENT PROBLEMS It is very important to read this manual carefully and understand it thoroughly before using the product The symbols listed below are used to indicate this information 70 120 psi 4 9 8 3 bar 5 8 5 kgf cm 13 1 2 L x12 H x3 1 4 W 344mmx304mmx82mm 4 41 lbs 2 0 kg 100 PCS 045 ft3 cycle at 100 psi ...

Page 4: ... Do not allow inexperienced or untrained individuals to operate any air powered tool Keep hands and other parts of the body away from the Outlet Firing Head during use Nails or objects in the workpiece can cause serious injury if they are deflected by the workpiece Keep children away from the work area Do not allow children to handle power tools Never point nailer toward yourself or anyone else Al...

Page 5: ...commended that a filter regulator lubricator be used and be located as close to the tool If a filter regulator lubricator is not installed place up to 6 drops of compressor oil into the air inlet plug before each use If a filter regulator lubricator is installed keep the air filter clean A dirty filter will reduce the air pressure to the tool which will cause a reduction in power efficiency and ge...

Page 6: ...1 1 Model No C1565 contact us 1 888 666 1887 TYPES OF NAILS OPERATING INSTRUCTIONS 15 Gauge finish nails Min Max 3 Pull the nail feeder B back to engage the nail feeder A to the nail strip Fig A 1 Insert nail strip into rear of magazine Fig A 2 Slide the nail strip forward in the magazine The nail strip should pass the nail stopper Fig B Magazine Nail Stopper Fig A Fig C Fig B Nail Feeder A Nail F...

Page 7: ...ing in serious or life threatening injury Never use a nailer which is defective or operating abnormally Never use a nailer as hammer METHOD OF OPERATION The Carpenter Air powered Brad Nailer is equipped with a push lever at the nailing point and will not operate unless the push lever is depressed pushed upwards Fig G Fig G Single Actuation Mechanism 1 Set the switching device to the position as Pi...

Page 8: ...w into the workpiece adjust the nailing depth using the following instructions 1 Disconnect air hose from nailer Fig H 2a If the nails are driven too deep pull the adjuster downward and turn counter clockwise Fig J 2b If nails are driven too shallow pull the adjuster downward and turn clockwise Fig K 3 Connect the air hose and perform a nailing test ALWAYS WEAR EYE PROTECTION 4 If additional adjus...

Page 9: ...t minor problems can be resolved quickly and easily using the table below If problems persist contact a Carpenter for assistance SYMPTOM PROBLEM SOLUTIONS Nailer operates but no nail is driven 1 Check for a jam 2 Nail feeder damaged 3 Ribbon spring weakend or damaged 4 Check for proper nails 1 Clear a jam per page 18 2 Replace nail feeder 3 Replace ribbon spring 4 Use only recommended nails Weak d...

Page 10: ...1 1 1 2 1 1 1 41 42 43 44 45 46 47 48 49 50 51 52 53 54 55 56 57 58 59 60 61 62 63 64 65 66 67 68 69 70 71 72 77 74 75 76 77 78 79 O ring 6 4X2 O ring 9X1 8 Sleeve Switch Spring O ring 2 4X1 6 Valve plunger Valve bushing Roll pin 3x22 Roll pin 3x20 Trigger Safety shield Roll pin 3x16 Guide seat Roll pin 3x35 Steelball Dw 4 Spring Shift knob Roll pin 3x10 Coil Spring Roll pin 2 5x20 Hex bolt M5X16 ...

Reviews: