CH 3 L+ = Pluspol
Lautsprecher links hinten
CH 3 L- = Minuspol Lautsprecher links hinten
CH 4 R+ = Pluspol
Lautsprecher rechts hinten
CH 4 R- = Minuspol Lautsprecher rechts hinten
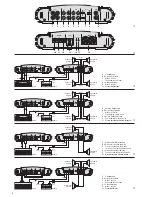
6.4.2 Aktiver 2-Wegebetrieb
Siehe auch Abb. 4.
CH 1 L+ = Pluspol
linker Basslautsprecher
CH 1 L- = Minuspol linker Basslautsprecher
CH 2 R+ = Pluspol
rechter Basslautsprecher
CH 2 R- = Minuspol rechter Basslautsprecher
CH 3 L+ = Pluspol
linker Mittelhochtöner
CH 3 L- = Minuspol linker Mittelhochtöner
CH 4 R+ = Pluspol
rechter Mittelhochtöner
CH 4 R- = Minuspol rechter Mittelhochtöner
6.4.3 Brückenbetrieb
Beim Anschluss die Beschriftung „BRIDGE“ beach-
ten, siehe auch Abb. 5.
CH 1 L+ = Pluspol
linker Lautsprecher
CH 1 L- = bleibt frei
CH 2 R+ = bleibt frei
CH 2 R- = Minuspol linker Lautsprecher
CH 3 L+ = Pluspol
rechter Lautsprecher
CH 3 L- = bleibt frei
CH 4 R+ = bleibt frei
CH 4 R- = Minuspol rechter Lautsprecher
6.4.4 3-Kanalbetrieb
Siehe auch Abb. 6.
CH 1 L+ = Pluspol
linker Lautsprecher
CH 1 L- = Minuspol linker Lautsprecher
CH 2 R+ = Pluspol
rechter Lautsprecher
CH 2 R- = Minuspol rechter Lautsprecher
CH 3 L+ = Pluspol
Subwoofer
CH 3 L- = bleibt frei
CH 4 R+ = bleibt frei
CH 4 R- = Minuspol Subwoofer
7
Inbetriebnahme
7.1 Filter auswählen und Trennfrequenzen
einstellen
Je nach angeschlossenen Lautsprechertypen mit den
Schaltern CROSSOVER (7) die Filter auswählen.
Der obere Schalter und die oberen Regler sind zum
Einstellen der Kanäle 1 und 2, der untere Schalter
und die unteren Regler für die Kanäle 3 und 4.
Für
Full-Range-Lautsprecher
den Schalter ganz
nach links in die Position FULL schieben. Die
zugehörigen Kanäle geben den gesamten Fre-
quenzbereich wieder.
Für
Basslautsprecher
oder einen
Subwoofer
den
Schalter in die Position LP schieben. In den zu ge -
hörigen Kanälen ist der Tiefpass eingeschaltet und
die mittleren sowie hohen Frequenzen werden
unterdrückt. Die Trennfrequenz mit dem Regler LP
(6) zu nächst grob einstellen.*
Für
Mittelhochtöner
den Schalter in die Position
HP schieben. In den zu ge hörigen Kanälen ist der
Hochpass eingeschaltet und die tiefen Frequenzen
werden damit unterdrückt. Die Trennfrequenz mit
dem Regler HP (5) zunächst grob einstellen.*
7.2 Pegel und Bassanhebung einstellen
1) Die beiden Regler LEVEL (3) ganz nach links in
die Position MIN drehen.
2) Die Car-HiFi-Anlage komplett einschalten. Die
grüne Betriebsanzeige POWER (14) leuchtet.
Die Endstufe bleibt jedoch noch für ca. 3 Sekun-
den stumm geschaltet (Einschaltverzögerung).
3) Die Signalquelle, z. B. das Autoradio, auf maxi-
male, nicht verzerrende Lautstärke einstellen.
4) Die Regler LEVEL maximal so weit aufdrehen,
dass keine Verzerrungen auftreten. (Die oberen
Regler sind zum Einstellen der Kanäle 1 und 2
und die unteren für die Kanäle 3 und 4.)
Beim 4-Kanalbetrieb lässt sich mit den Reg-
lern auch die Balance zwischen den vorderen
und hinteren Lautsprechern einstellen, falls am
Autoradio dafür kein Regler vorhanden ist.
Beim aktiven 2-Wegebetrieb und beim 3-Kanal -
betrieb mit den Reglern einen natürlichen Klang
einstellen: Sind die Bässe zu leise, die Kanäle für
die Mittelhochtöner im Pegel reduzieren. Bei
einem zu kräftigen Bass die Lautstärke der Bass -
kanäle bzw. des Subwoofer-Kanals verringern.
5) Bei Bedarf lassen sich die Bässe mit dem ent-
sprechenden Regler BASS EQ (4) anheben
(max. 12 dB/50 Hz).
6) Sind in der Car-HiFi-Anlage weitere Endstufen
eingesetzt, zur Anpassung der Lautstärke aller
Kanäle untereinander die jeweils zu lauten
Kanäle im Pegel reduzieren.
Tipp
Um Störeinstrahlungen durch die Autoelek-
trik so gering wie möglich zu halten, sollte
der Ausgangspegel der Signalquelle min.
1,5 V betragen.
Wichtig!
Vor dem ersten Einschalten die Filter mit den
Schaltern CROSSOVER (7) auswählen und die
Trennfrequenz grob einstellen (Kap. 7.1), da mit die
Lautsprecher nicht durch
einen eventuell zu
großen Frequenz bereich überlastet werden. Auch
sollte die komplette Verdrahtung der
Car-HiFi-
Endstufe noch einmal auf Richtigkeit überprüft
werden. Erst danach die Minusklemme der Auto-
batterie wieder an schließen.
6.4.2 Active 2-way operation
Also see fig. 4
CH 1 L+ = positive pole
left bass speaker
CH 1 L- = negative pole left bass speaker
CH 2 R+ = positive pole
right bass speaker
CH 2 R- = negative pole right bass speaker
CH 3 L+ = positive pole
left mid-high range
speaker
CH 3 L- = negative pole left mid-high range
speaker
CH 4 R+ = positive pole
right mid-high range
speaker
CH 4 R- = negative pole right mid-high range
speaker
6.4.3 Bridge operation
While connecting, pay attention to the lettering
“BRIDGE”, also see fig. 5.
CH 1 L+ = positive pole
left speaker
CH 1 L- = remains unconnected
CH 2 R+ = remains unconnected
CH 2 R- = negative pole left speaker
CH 3 L+ = positive pole
right speaker
CH 3 L- = remains unconnected
CH 4 R+ = remains unconnected
CH 4 R- = negative pole right speaker
6.4.4 3-channel operation
Also see fig. 6
CH 1 L+ = positive pole
left speaker
CH 1 L- = negative pole left speaker
CH 2 R+ = positive pole
right speaker
CH 2 R- = negative pole right speaker
CH 3 L+ = positive pole
subwoofer
CH 3 L- = remains unconnected
CH 4 R+ = remains unconnected
CH 4 R- = negative pole subwoofer
7
Setting into Operation
7.1 Selecting the filters and adjusting the
crossover frequencies
Depending on the speaker types connected, select
the filters with the switches CROSSOVER (7). The
upper switch and the upper controls are intended to
adjust the channels 1 and 2, the lower switch and
the lower controls for the channels 3 and 4.
For
full range speakers
set the switch to the left
stop to position FULL. The corresponding channels
reproduce the entire frequency range.
For
bass speakers
or a
subwoofer
set the switch
to position LP. The low pass is switched on in the
corresponding channels and the medium and high
frequencies are suppressed. For the time being,
coarsely adjust the crossover frequency with the
control LP (6).*
For
mid-high range speakers
set the switch to
position HP. The high pass is switched on in the cor-
responding channels and thus the low frequencies
are suppressed. For the time being, coarsely adjust
the crossover frequency with the control HP (5).*
7.2 Adjusting the level and the bass boosting
1) Turn both controls LEVEL (3) to the left stop to
position MIN.
2) Switch on the car HiFi system completely. The
green POWER LED (14) lights up. However, the
power amplifier is still muted for approx. 3 sec -
onds (switch-on delay).
3) Adjust the signal source, e. g. the car radio, to the
maximum, non-distorting volume.
4) Turn up the controls LEVEL so far as a maximum
that no distortions occur. (The upper controls are
intended to adjust the channels 1 and 2 and the
lower controls for the channels 3 and 4.)
For 4-channel operation it is also possible to
adjust the balance between the front and rear
speakers if the car radio is not equipped with a
corresponding control.
For active 2-way operation and 3-channel
operation adjust a natural sound with the con-
trols: if the volume of the low frequencies is too
low, reduce the levels of the channels for the mid-
high range speakers. If the volume of the bass
frequencies is too high, reduce the volume of the
bass channels or of the subwoofer channel.
5) If required, the bass frequencies can be boosted
with the corresponding control BASS EQ (4)
[max. 12 dB/50 Hz].
6) If further power amplifiers are used in the car HiFi
system, reduce in each case the levels of the
channels which are too high to match the vol-
umes of all channels with each other.
Hint
To keep the interference by the electric sys-
tem of the car as low as possible, the output
level of the signal source should be 1.5 V as a
minimum.
Important!
Prior to the first switching-on, select the filters with
the switches CROSSOVER (7) and coarsely adjust
the crossover frequency (chapter 7.1) so that the
speakers will not be overloaded by a frequency
range that might be too wide. It is also recommend -
ed to check the entire wiring of the car HiFi power
amplifier once again for correctness before con-
necting the negative terminal of the car battery
again.
7
GB
D
A
CH
* Zur Orientierung den Frequenzbereich der eingesetzten
Lautsprecher beachten. Die Feineinstellung erfolgt nach
der Pegeleinstellung mit entsprechenden Messgeräten.
* For a guidance, observe the frequency range of the
speakers used. The fine adjustment is made with corre-
sponding meters after the level adjustment.


