background image

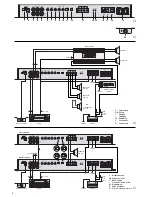
Bitte klappen Sie die Seite 3 heraus. Sie sehen
dann immer die beschriebenen Bedienelemente
und Anschlüsse.

1

Übersicht der Bedienelemente und
Anschlüsse

1

Ein-/Ausschalter für die beiliegende Fernbedie-
nung (20)

2

Anschluss LEVEL REMOTE für die Fernbedie-
nung

3

Cinch-Buchsen LINE IN für die Eingangssignale

4

Cinch-Buchsen LINE OUT zum Anschluss einer
weiteren Car-HiFi-Endstufe
Hier liegt das durchgeschleifte Eingangssignal
der Buchsen LINE IN (3) an.

5

Verbindungsbuchsen LINK IN und LINK OUT für
den Brückenbetrieb mit zwei Endstufen SYN-
TEX-1000D, siehe Abb. 4 und Kapitel 6.3.2

6

Regler LEVEL zur Eingangspegelanpassung

7

Regler SUBSONIC zum Einstellen der Trennfre-
quenz des Subsonic-Filters, das den Infraschall
unterdrückt (20 – 55 Hz)

8

Regler LP zum Einstellen der Trennfrequenz des
Tiefpasses (die Frequenz, die vom Subwoofer
nicht mehr wiedergegeben werden soll)

9

Regler BASS BOOST zur Anhebung bis 12 dB
der mit dem Regler BASS EQ (10) eingestellten
Frequenz

10

Regler BASS EQ zum Einstellen der Frequenz,
die mit dem Regler BASS BOOST (9) ange-
hoben werden soll (30 – 45 Hz)

11

Betriebsartenschalter CONFIG
MASTER für den Normalbetrieb (kein Brücken-

betrieb) oder 
für den Brückenbetrieb, wenn die End-
stufe als Hauptgerät arbeiten soll

SLAVE

für den Brückenbetrieb, wenn die End-
stufe als Nebengerät arbeiten soll

12

Schiebeschalter PHASE zum Ändern der Pha-
senlage

13

Lautsprecheranschlüsse

14

Betriebsanzeige POWER

15

Anzeige PROTECT leuchtet bei aktivierter
Schutzschaltung:
1. einige Sekunden nach dem Einschalten (Ein-

schaltverzögerung)

2. wenn am Lautsprecherausgang (13) ein Kurz-

schluss aufgetreten ist

3. wenn die Endstufe überhitzt ist

16

Steuereingang REM zum Einschalten der End-
stufe über eine 12-V-Spannung

17

Masseanschluss GND

18

Anschluss BATT für die Versorgungsspannung
+12 V

19

Sicherungen: 5 x 40 A
Eine durchgebrannte Sicherung nur durch eine
gleichen Typs ersetzen!

20

Fernbedienung für die Pegeleinstellung

2

Sicherheitshinweise

Die Endstufe entspricht der Kfz-Richtlinie. Die Prüf-
nummer ist auf dem Gerät angegeben.

Verwenden Sie für die Reinigung nur ein trocke-
nes, weiches Tuch, auf keinen Fall Chemikalien
oder Wasser.

Wird das Gerät zweckentfremdet, nicht richtig an-
geschlossen, falsch bedient oder nicht fachgerecht
repariert, kann keine Haftung für daraus resultie-
rende Sach- oder Personenschäden und keine
Garantie für das Gerät übernommen werden.

Soll das Gerät endgültig aus dem Betrieb
genommen werden, übergeben Sie es zur
umweltgerechten Entsorgung einem örtli-
chen Recyclingbetrieb.

WARNUNG

Beim Anschluss der Car-HiFi-End-
stufe an die Autobatterie ist beson-
dere Sorgfalt geboten. Bei Kurz-
schlüssen können sehr gefährlich
hohe Ströme fließen. Schrauben Sie
deshalb unbedingt vor dem Anschluss
die Minusklemme der Autobatterie ab.

Die Endstufe muss fest und fachgerecht an einer
mechanisch stabilen Stelle im Auto montiert wer-
den, damit sie sich nicht löst und zu einem gefähr-
lichen Geschoss wird.
Während des Betriebs kann das Gerät sehr heiß
werden. Platzieren Sie darum keine hitzeempfind-
lichen Gegenstände in der Nähe und berühren Sie
die Endstufe nicht während des Betriebs.

Please unfold page 3. Then you can always see the
operating elements and connections described.

1

Operating Elements and Connections

1

On/off switch for the supplied remote control (20)

2

Connection LEVEL REMOTE for the remote
control

3

Phono jacks LINE IN for the input signals

4

Phono jacks LINE OUT for connection of another
car HiFi power amplifier
Here the fed-through input signal of jacks LINE
IN (3) is present.

5

Connection jacks LINK IN and LINK OUT for
bridge operation with two power amplifiers
SYNTEX-1000D, see fig. 4 and chapter 6.3.2

6

Control LEVEL for input level matching

7

Control SUBSONIC for adjusting the crossover
frequency of the subsonic filter which sup-
presses the infrasound (20 – 55 Hz)

8

Control LP for adjusting the crossover frequency
of the low pass (the frequency not to be repro-
duced any more by the subwoofer)

9

Control BASS BOOST for boosting the fre-
quency up to 12 dB which has been adjusted
with the control BASS EQ (10)

10

Control BASS EQ for adjusting the frequency to
be boosted with the control BASS BOOST (9)
[30 – 45 Hz]

11

Operating mode switch CONFIG
MASTER for normal operation (no bridge opera-

tion ) or
for bridge operation if the power
amplifier is to work as a main unit

SLAVE

for bridge operation if the power
amplifier is to work as an auxiliary unit

12

Sliding switch PHASE for changing the phase

13

Speaker connections

14

POWER LED

15

LED PROTECT lights up with activated pro-
tective circuit:
1. a few seconds after switching-on (switch-on

delay)

2. if a short circuit has occurred at the speaker

output (13)

3. if the power amplifier is overheated

16

Control input REM for switching on the power
amplifier via a 12 V voltage

17

Ground connection GND

18

Connection BATT for the supply v12 V

19

Fuses: 5 x 40 A
Only replace a blown fuse by one of the same
type!

20

Remote control for the level adjustment

2

Safety Notes

The power amplifier corresponds to the directive for
automobiles. The test number is indicated on the
unit.

For cleaning only use a dry, soft cloth, by no
means chemicals or water.

No guarantee claims for the unit and no liability for
any resulting personal damage or material
damage will be accepted if the unit is used for
other purposes than originally intended, if it is not
correctly connected or operated, or not repaired in
an expert way.

If the unit is to be put out of operation de-
finitively, take it to a local recycling plant for
a disposal which is not harmful to the envi-
ronment.

WARNING

When connecting the car HiFi power
amplifier to the car battery, be espe-
cially careful. In case of short circuits
there may be dangerously high cur-
rents. Therefore, prior to the connec-
tion, it is indispensable to screw off the
negative terminal of the car battery.

The power amplifier must be mounted to a me-
chanically stable place in the car. It must be skilfully
fixed so that it does not get loose and turn into a
dangerous projectile.
During operation the unit may become very hot.
Therefore, do not place any objects sensitive to
heat close to it and do not touch the power ampli-
fier while in operation.

4

GB

D

A

CH

Summary of Contents for Syntex-1000D

Page 1: ...plificateur Subwoofer Hi Fi Embarquée Finale Di Potenza HiFi Per Subwoofer Per Auto Montageanleitung Mounting instructions Notice d utilisation Istruzioni per il montaggio Montage instructie Manual de instrucciones Instrukcja montazowa Sikkerhedsoplysninger Säkerhetsföreskrifter Turvallisuudesta ...

Page 2: ...nkcje tego urządze nia Dzięki tej instrukcji obsługi będą Państwo w stanie poznać wszystkie funkcje urządzenia Stosując się do instrukcji unikną państwo błędów i ewentualnego usz kodzenia urządzenia na skutek nieprawidłowego użytkowania Prosimy zachować instrukcję Tekst polski zaczyna się na stronie 16 Antes del montaje Tenemos de agradercerle el haber acquirido un equipo CARPOWER y le deseamos un...

Page 3: ...EMOTE OFF ON LINE LINK FUSE 1 5 PHASE CONFIG BASS EQ BASS BOOST LP SUBSONIC LEVEL 30 65 180 0 Hz 0 12 dB 40 300 Hz 20 55 Hz 7 0 3 V SLAVE MASTER BATT GND REM Radio or 1 x Subwoofer min 1Ω Battery Fuses Chassis L R On 12V Speaker L Speaker R Chassis R L Main amplifier max 20cm Remote Control Power capacitor optional 1 2 3 4 5 6 7 8 TP Bass Tre EJECT CD RADIO AM FM CD Menu Subwoofer min 2Ω Chassis P...

Page 4: ...e darum keine hitzeempfind lichen Gegenstände in der Nähe und berühren Sie die Endstufe nicht während des Betriebs Please unfold page3 Then you can always see the operating elements and connections described 1 Operating Elements and Connections 1 On off switch for the supplied remote control 20 2 Connection LEVEL REMOTE for the remote control 3 Phono jacks LINE IN for the input signals 4 Phono jac...

Page 5: ...s Autofahrens dürfen Signaltöne z B von einem Rettungswagen nicht durch eine zu hohe Lautstärke der Car HiFi Anlage übertönt werden 3 Caution in Case of High Volumes With the motor switched off the car HiFi system should not be in operation at high volume for a longer period of time The car battery will quickly be discharged and then it may not be capable any more of supplying sufficient energy fo...

Page 6: ...nutz ten Endstufenleistung berücksichtigen siehe auch technische Daten der Endstufe Seite 7 6 1 3 Control voltage for switching on The car HiFi power amplifier is switched on and off by a control voltage of 12 V at the terminal REM 16 Connect the terminal REM to the 12 V control output of the car radio connection for a motor antenna if necessary to be connected in parallel to the motor antenna 6 2...

Page 7: ...uchtet 1 Ist die Fernbedienung 20 nicht angeschlossen den Schalter LEVEL REMOTE 1 in die Position OFF stellen sonst ist die Endstufe stumm ge schaltet 2 Stehen die Schalter CONFIG 11 und PHASE 12 in der richtigen Position Für den Normalbe trieb kein Brückenbetrieb den Schalter CON FIG in die Position MASTER stellen Für den Brückenbetrieb siehe Abb 4 und Kapitel 6 3 2 3 Die Verbindungskabel von der...

Page 8: ...t il peut devenir très chaud ne placez pas à proximité d objets sensi bles à la chaleur et ne le touchez pas pendant son fonctionnement Vi preghiamo di aprire completamente la pagina 3 Così vedrete sempre gli elementi di comando e i collegamenti descritti 1 Elementi di comando e collegamenti 1 Interruttore ON OFF per il telecomando in dota zione 20 2 Contatto LEVEL REMOTE per il telecomando 3 Pres...

Page 9: ...plus de la même manière C est pourquoi vous ne devez pas augmenter le volume une fois que vous y êtes habitué Pendant la conduite les bruits extérieurs par exemple d une ambulance ne doivent pas être masqués par un volume trop fort de l installation de Hi Fi embarquée 3 Attenzione col volume alto Non fare funzionare l impianto hifi dell auto col volume alto mentre il motore è spento La batteria de...

Page 10: ...eurs selon la puissance appliquée de l amplificateur voir carac téristiques techniques de l amplificateur page 11 6 1 3 Tensione di comando per l accensione Il finale di potenza hifi per auto si accende e si spegne tramite una tensione di comando di 12 V al contatto REM 16 Collegare il contatto REM con l uscita di commutazione di 12 V dell autoradio p es collegamento di un antenna motorizzata even...

Page 11: ...8 Eliminazione di difetti Se dopo l accensione dell impianto audio dell auto mobile non si sente niente si può localizzare il difetto osservando i due LED POWER 14 e PRO TECT 15 Il LED POWER non si accende 1 Controllare i fusibili 19 del finale per car hifi 5 x 40 A e quello vicino alla batteria dell auto Sostituire i fusibili difettosi Usare solo fusibili con i valori indicati Non inserire in nes...

Page 12: ...nterruptor de encendido apagado para el con trol remoto entregado 20 2 Conexión LEVEL REMOTE para el control remoto 3 Jacks RCA LINE IN para las señales de entrada 4 Jacks RCA LINE OUT para la conexión de otro amplificador de potencia HiFi para coche Aquí está presente la señal de alimentación de entrada de los jacks LINE IN 3 5 Jacks de conexión LINK IN y LINK OUT para funcionamiento punteado con...

Page 13: ... zouden zijn Con el motor apagado el sistema HiFi para coche no debería estar en funcionamiento a un volumen alto durante mucho tiempo La batería del coche se descargará rápidamente y después no será capaz de proporcionar la energía suficiente para arrancar el coche 4 Aplicaciones El amplificador de potencia HiFi para coche SYN TEX 1000D ha sido especialmente diseñado para el funcionamiento de un ...

Page 14: ...n de uitgangs versterker zie ook technische gegevens van de uitgangsversterker pagina 15 6 2 Entradas y salidas de línea 1 Conecte los dos jacks de entrada LINE IN 3 mediante cables con conectores RCA a las sali das de línea de la fuente de señal p ej radio de coche o si está disponible a las salidas para un amplificador subwoofer Si la radio de coche no está equipada con salidas de línea las sali...

Page 15: ...l coche lo más baja posible el nivel de salida de la fuente de señal debería ser de 1 5 V como mínimo 7 Con el control LEVEL 6 adecue el volumen del subwoofer al de los altavoces principales Suba el control al máximo de manera que no haya distorsiones 8 Para aumentar una frecuencia determinada en la gama de frecuencia del subwoofer ajústelo con el control BASS EQ 10 y auméntelo con el con trol BAS...

Page 16: ...rojektowany do współpracy w systemach car audio z subwooferem o dużej mocy wyjściowej Cyfrowe sterowanie wzmacniacza klasa D umożliwia osiągnięcie wysokiej spra wność przy niewielkim stopniu nagrzewania Moc wyjściowa wynosi maksymalnie 1300 W przy użyciu 1 Ω subwoofera Podłączając drugi wzmacniacz SYNTEX 1000D można zwiększyć moc wyjściową do ponad 2 kW przy subwooferze 2 Ω w przypadku pracy w ukł...

Page 17: ...m car audio Przez kilka sekund wzmacniacz będzie wyciszony miękki start zaświeci się czerwona dioda LED PROTECT 15 następnie zgaśnie Zaświeci się niebieska dioda POWER 14 boczne panele wzmacniacza zostaną podświet lone na niebiesko Zanim wzmacniacz mocy zostanie podłą czony po raz pierwszy należy sprawdzić poprawność połączeń przed podłączeniem ujemnego złącza akumulatora Uwaga Przy wyborze głośni...

Page 18: ...h Czułość 0 3 7 V Filtr dolnoprzepustowy 40 300 Hz 18 dB okt Filtr subsoniczny 20 55 Hz 18 dB okt Wzmocnienie basu 0 12 dB 30 65 Hz Stosunek S N 75 dB ważony A THD 0 15 Zasilanie 11 16 V 200 A Temp otoczenia pracy 0 40 C Wymiary 230 60 470 mm Waga 6 kg Producent zastrzega sobie prawo do zmian techni cznych 18 PL Instrukcje obsługi są chronione prawem copyright for MONACOR INTERNATIONAL GmbH Co KG ...

Page 19: ...19 ...

Page 20: ...ter løs og ved for eksempel hård opbremsning bliver til et farligt projektil skal den fastspændes sikkert og solidt i bilen på et mekanisk stabilt sted Forstærkeren kan blive meget varm under drift Undlad derfor at placere varmefølsomme objekter i nærheden af den eller at røre ved den under drift Bilstereo Subbas effektförstärkare Innan enheten tas i bruk läs först igenom säkerhets föreskrifterna ...

Page 21: ...tävälle alustalle ettei vahvistin irtoa äkkijarrutuksessa Sulake ja hallintalaitteet asennetaan siten että ne ovat helposti saatavilla Vahvistin on asennettava siten että vahvistimen runko on eristetty auton korista Kiinnitä vahvistin sopivaan paikkaan kiinnityskorv akkeista tiukasti neljällä ruuvilla 4 Liitännät HiFi vahvistin täytyy aina asentaa auton sähköjär jestelmään valtuutetussa huollossa ...

Page 22: ...Copyright by MONACOR INTERNATIONAL GmbH Co KG Bremen Germany All rights reserved A 0732 99 01 05 2007 ...

Reviews: