background image

8

EN

G

LI

S

H

Guidelines and warnings for the use of LiPo recharge-

able batteries 

•  You have to charge the attached 3.7 V   140 mAh LiPo 

rechargeable battery in a safe place and at a safe distance 

to flammable material.

• Never leave the battery unattended while it is charging 

•  After a flight, the rechargeable battery has to cool down to 

the ambient air temperature before charging it.

•  You must always use the corresponding LiPo charging unit 

(USB cable / remote control). In case of non-compliance 

with these directions there is a danger of fire resulting in 

a health risk and/or damage to property. NEVER use any 

other battery charger.

•  Should  the  rechargeable  battery  swell  or  deform  while 

discharging  or  recharging,  you  have  to  immediately  stop 

charging or discharging the battery. Take the battery out 

as quickly and carefully as possible and place it in a safe 

and open area offside any inflammable material and watch 

it for at least 15 minutes. In case you continue charging or 

discharging  a  battery  which  has  already  started  to  swell 

or deform there is a danger of fire! Even in case of slight 

deforming or ballooning the rechargeable battery has to be 

taken out of operation.

•  Store the rechargeable battery at ambient temperature in a 

dry place.

•  Always recharge the battery immediately after use to 

prevent its becoming deep discharged. Please make 

sure to allow a pause of about 20 minutes between fin-

ishing the flight and recharging the battery. Recharge 

the battery occasionally (suggested every 2-3 months). 

Failure to treat the battery as described above can lead 

to its becoming defective.

•  When transporting or temporarily storing the rechargeable 

battery the temperature should be between 5-50°C. If pos-

sible, do not store the battery or the model in a car and do 

not expose it to direct sunlight. In case the battery is broiled 

it can be damaged or catch fire. 

Note:

 If the battery voltage/output is low you will recognise 

that a considerable trim and/or controlling is necessary to 

avoid  that  the  Quadrocopter  starts  trundling.  This  usually  

occurs before reaching a battery voltage of 3 V and it is a 

good moment to end the flight. 

Contents of package

1

  1 x Quadrocopter 


1 x Controller


1 x USB charging cable 


1 x Set of replacement parts


4 x  1.5 V Mignon AA batteries 


   (non-rechargeable)

Recharging the LiPo rechargeable 

battery

Make sure you only charge the LiPo rechargeable battery 

supplied with the LiPo charging unit also supplied (USB ca-

ble and remote control). If you try to charge the rechargeable 

battery with a different LiPo battery charger or any other bat-

tery charger, this might cause serious damage. Please care-

fully read the previous chapter with warnings and guidelines 

on the usage of rechargeable batteries before proceeding. 

Supply terminals are not to be short-circuited.

The rechargeable battery fitted in the Quadrocopter with its 

USB charging cable can be charged either from a USB port 

on a computer or directly from the remote control:

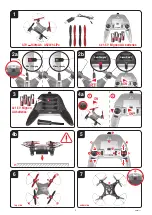
2

  •  Connect the USB charging cable with the USB 

port of a computer 

2a

 or of the controller 

2b

.  

The LED on the USB charger cable lights green 

indicating that the charger unit is correctly con-

nected to the computer or the controller. If you 

plug in a Quadrocopter with a discharged bat-

tery, the LED on the USB charging cable lights 

up red and shows that the Quadrocopter battery 

is being charged. The USB charging cable and 

the charging socket on the Quadrocopter are de-

signed to make incorrect connection impossible.


•  It  takes  about  30  minutes  to  recharge  a  dis-

charged  battery  (but  NOT  a  deep-discharged 

one).  When  the  battery  is  fully  charged,  the 

LED display on the USB charger cable lights up 

green again. 

Note: when supplied, the lipo-battery is already partially 

charged. So the first charging cycle may well take less 

time.

It is essential to follow the connection sequence given 

above! If you have the charger cable only connected to 

the quadrocopter, and not to a source of electricity, a 

green LED display indicates that there is still power in 

the battery. The green LED display does not necessarily 

indicate the battery is still adequately charged.

While charging, the power switch must be in the “OFF” 

position.

Inserting the batteries in the

remote control

3

  Open the battery compartment with a screwdriver 

and  insert  the  batteries  in  the  remote  control. 

Please  keep  in  mind  the  correct  polarity.  After 

having closed the compartment you can check all 

functions of the remote control with the help of the 

power-switch on the front.


With the power switch turned ON and functioning 

correctly, the top centre LED on the remote con-

trol will light up red. 


When the control LED flashes rapidly, the batter-

ies in the controller must be changed.

Frequency bind between model 

and remote control

The Carrera RC Quadrocopter and the remote control are 

frequency bound at purchase. If initially there are any prob-

lems  with  communication  between  the  Carrera  RC  Quad-

rocopter  and  the  remote  control,  please  carry  out  a  new 

frequency bind.

4a

  •  Switch the model ON at the ON/OFF switch.


•  The LEDs on the quadrocopter light up continu-

ously.


•  Switch on the controller at the power switch. 


•  Push the left-hand joystick, i.e. the throttle lever, 

right  to  the  top,  then  fully  downwards  into  the 

zero position.


•  The LEDs on the quadrocopter now flash rhyth-

mically.  The  binding  has  now  been  success-

fully established. The LED on the controller now 

lights continuously.

4b


•  

WARNING! Immediately after switching it on, 

place  the  Quadrocopter  on  a  flat  and  level 

surface. The gyro-system will then set itself 

automatically.

Range of functions of the 

remote control 

5

  1.  Aerial


2.  Power switch (ON/OFF)


3.   Control LED


4.  Gas


  Circling


5.  Forwards / backwards


  right / left banking


6.  Trimmer for right / left banking


7.  Trimmer for forwards / backwards 


8.  Trimmer for rotation


9.  Shoulder button for looping function 


10. Shoulder button for LED


11. Beginner/Advanced switch (to switch, press  

  the top of the right-hand joystick)

3

  12. Battery compartment 

Description of the Quadrocopter

6

  1.  Rotor system


2. Rotor protection cage


3. ON-/OFF switch


4. Red LED


5. Blue LED


7

  6. Charging socket for the Li-Po battery 

Choosing the flight area

8

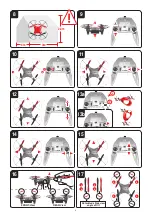
  When  being  prepared  for  the  first  flight  you 

should  choose  a  closed  room  which  is  as 

large  as  possible  without  any  persons  or 

 obstacles.  Due  to  its  size  and  controllabil-

ity, experienced pilots may be able to fly the 

Quadrocopter  in  relatively  small  rooms.  For 

your first flights we strongly recommend you 

choose a room with a minimum floor space of 

3 x 3 metres and 2.40 metres in height. After 

having trimmed your Quadrocopter for flight 

and  made  yourself  familiar  with  the  control-

ler  and  its  functions  you  may  start  flying  in 

smaller and less open environments. 

The Quadrocopter has been developed exclusively for 

use  in  enclosed  rooms  without  direct  sunlight  or  any 

strong spotlighting. 

There must be no persons or ob-

jects  such  as  pillars  between  the  controller  and  the 

Quadrocopter to obstruct direct connection.

Checklist for flight preparation

This checklist is not a substitute for the contents of the oper-

ating instructions. Although it can be used as a quick-start-

guide, we strongly recommend you first to read the operating 

instructions in detail before you proceed.

•  Check the contents of the package.

•  Connect the charging unit to the source of power.

•  Charge  the  lipo-battery  as  described  in  the  section  

“Recharging the LiPo rechargeable battery”.

•  Fit  four  AA  batteries  in  the  controller,  making  sure  their 

polarity is correct.

•  Look for a suitable environment for flying.

 •  Switch on the model at the ON/OFF switch.

•  

WARNING! Immediately after switching it on, place the 

Quadrocopter  on  a  flat  and  level  surface.  The  gyro-

system will then set itself automatically.

•  The LEDs on the Quadrocopter now light up continuously.

•  Switch on the controller at the power switch.

Push the left-

hand joystick, i.e. the throttle lever, right to the top, then 

fully downwards into the zero position.

•  Allow the Quadrocopter a few moments until the system is 

correctly initialised and is ready for operation. The LED in 

the Quadrocopter now lights continuously. The LED on the 

controller now lights continuously.

•  Repeat the above points as required, if you wish to fly more 

Quadrocopters at the same time.

•  For the “Advanced Mode” 

(WARNING! ONLY FOR EXPE-

RIENCED  PILOTS!)

  press  the  top  of  the  right-hand  joy-

stick. There will be a double signal tone (see  

13b

).

•  Check the control system.

•  Make yourself familiar with the control system.

•  Trim the Quadrocopter as necessary as described under 

14

15

, so that when hovering it no longer moves from 

the spot without a command from the controller.

•  The Quadrocopter is now ready to be flown.

•  If the Quadrocopter displays no functions, retry the above 

binding procedure.

•  Fly the model.

•  Land the model.

•  

Switch the model off at the power switch

•  Always switch off the remote control last.

Summary of Contents for 370503005

Page 1: ...struzioni per il montaggio e l uso Montage en gebruiksaanwijzing Instru es de montagem e modo de utiliza o Monterings och bruksanvisning Asennus ja k ytt ohje Instrukcja monta u i obs ugi Szerel si s...

Page 2: ...6 7 9 8 10 11 R L R L Red Charging Green Ready Red Charging Green Ready ON OFF 2a 2b 6 7 underside top side 6 4 4 5 5 1 1 1 2 2 3 2 2 1 12 4x 1 5 V Mignon AA batteries 0 1 2 ON 2 06 2015 1 5 4b 4a 3...

Page 3: ...3m 3m 2 4m 10 11 8 9 12 14 16 13a 15 17 R L R R L L R L 13b 1 2 3 B A B A A A B B Rotorblade Sideview angle of tilt REAR View FRONT View...

Page 4: ...ies unter direkter Be aufsichtigung durch einen Erwachsenen erlernen Lesen Sie vor dem ersten Gebrauch die Benutzerinformationen zusammen mit Ihrem Kind Bei unsachgem er Verwendung kann es zu schweren...

Page 5: ...oller sind werk seitig gebunden Sollte es am Anfang Probleme bei der Kommunikation zwischen dem Carrera RC Quadrocopter und dem Controller geben f hren Sie bitte eine neue Bindung durch 4a Schalten Si...

Page 6: ...t dr cken Sie den Trimmer f r Vor Zur ck schrittweise nach oben 16 Wenn sich der Quadrocopter im Schwebeflug ohne Bewegung des Hebels f r Kreisdrehung auf der Stelle nach links bzw rechts dreht gehen...

Page 7: ...for use by children without supervision of a parent Flying the Quadrocopter requires skill and children must be trained under the direct supervi sion of an adult Read the user s information together w...

Page 8: ...ntrol Please keep in mind the correct polarity After having closed the compartment you can check all functions of the remote control with the help of the power switch on the front With the power switc...

Page 9: ...If the Quadrocopter moves backwards press the trim mer for forwards backwards in steps upwards 16 When hovering and without you moving the lever for circling on the spot if the quadrocopter rotates to...

Page 10: ...em ploi contient des consignes de s curit et des prescriptions ainsi que des indications sur l entretien et l emploi du produit Il faut imp rativement avoir lu compl tement et compris ce mode d emplo...

Page 11: ...ente Allumez le contr leur via l interrupteur principal Poussez la manette de gauche levier des gaz fond vers le haut puis vers le bas en position z ro Les DEL du Quadrocopter clignotent d sormais r g...

Page 12: ...t vers l avant poussez le trim d avance retour situ en haut droite progres sivement vers le bas Si le Quadrocopter pivote vers l arri re poussez le trim d avance retour pro gressivement vers le haut 1...

Page 13: ...con precauci n y requiere ciertas habilida des mec nicas y mentales El manual incluye instrucciones de seguridad y normas as como indicaciones relativas al mantenimiento y el manejo del producto Es im...

Page 14: ...ontrolador en el interruptor de co rriente Empuje el joystick izquierdo es decir la palanca del acelerador totalmente hacia arriba y de nue vo hacia abajo a la posici n cero Los leds ahora parpadean r...

Page 15: ...so hacia abajo Si el Quadrocopter se mueve hacia detr s presione por pasos el ajusta dor para el avance retroceso hacia arriba 16 Cuando el Quadrocopter en vuelo estacionario sin mover la palanca para...

Page 16: ...e indispensabile che queste istruzioni vengano lette atten tamente e comprese Solo cos si possono evitare incidenti con lesioni e danni Far volare solo in ambienti chiusi che offrono sufficien te spaz...

Page 17: ...uovo collegamento 4a Accendere il modellino con l interruttore ON OFF I LED sul Quadrocopter si illuminano permanen temente Accendere il Controller con l interruttore di ali mentazione Spingere il joy...

Page 18: ...si sposta all indietro spingere gradualmen te verso l alto il trimmer per il movimento in avanti indietro 16 Se nel volo stazionario il Quadrocopter si gira verso sinistra o destra senza azionamento...

Page 19: ...yichtig en met bedacht te worden bestuurd en dit vergt enkele mechani sche en ook mentale vaardigheden De handleiding bevat veiligheidsinstructies en voorschriften alsook instructies voor het onderhou...

Page 20: ...uit te voeren 4a Schakel het model met de ON OFF schakelaar in De leds aan de Quadrocopter branden perma nent Schakel de controller met de powerschakelaar in Duw de linker joystick dus de gashendel he...

Page 21: ...r achteren beweegt drukt u de trimmer voor de beweging naar voren achteren stapsgewijze naar boven 16 Als de Quadrocopter in zweefvlucht zonder be diening van de hendel voor het uitvoeren van een cirk...

Page 22: ...ais necess rio comand lo com cuidado e prud ncia e o co mando requer algumas capacidades mec nicas e mentais O manual de instru es cont m indica es de seguran a e prescri es bem como dicas para a manu...

Page 23: ...atura com o interruptor ON OFF Os LEDs do Quadrocopter est o acesos perma nentemente Ligue o interruptor do comando Empurre o joystick esquerdo ou seja o man pulo de acelera o o m ximo para cima e nov...

Page 24: ...sa o para a frente para tr s progressivamente para baixo Se o Quadro copter se mover para tr s pressione o bot o de compensa o para a frente para tr s progressi vamente para cima 16 Quando o Quadrocop...

Page 25: ...h r och l st sittande kl desplagg inkl andra f rem l s som pennor och skruvmejslar m ste h llas borta fr n propellern rotorn Vidr r inte den roterande ro torn Var s rskilt noggrann med h nderna s att...

Page 26: ...ger joystick uppifr n f r att v xla om 3 12 Batterifack Beskrivning av Quadrocopter 6 1 Rotorsystem 2 Rotorskyddsbur 3 ON OFF knapp 4 R d LED 5 Bl LED 7 6 Laddningsuttag f r laddning av LiPo batteriet...

Page 27: ...klig tg rd Ladda batteriet se kapitel Laddning av batte riet Fel Under flygning tappar Quadrocopter hastighet och sjunker utan synbar anledning Orsak Batteriet r f r svagt tg rd Ladda batteriet se kap...

Page 28: ...liittyv t vaarat Lapset eiv t saa leikki laturin tai USB latausjohdon kanssa Lapset eiv t saa tehd laitteen puhdistusta eiv tk k ytt j lle kuuluvaa huoltoa ell eiv t he ole yli 8 vuotiaita ja aikuise...

Page 29: ...n Ohjaa radio ohjattava yl s ilmaan Ohjaa radio ohjattava j lleen alas maahan Kytke radio ohjattava virtakytkimest pois p lt Sammuta radio ohjaus aina viimeisen 4 kanavaisen Quadrocopterin lenn tt min...

Page 30: ...pienie od umowy obni enie ceny odszkodowanie powsta ych od momentu przej cia ryzyka na Kupuj cego je eli towar nie by wolny od wad Roszczenia z niniejszej osobnej udzielonej przez producen ta gwaranc...

Page 31: ...w celu unikni cia tzw g bokiego roz adowania akumulatora Prosimy Pa stwa o zwr cenie uwagi na zachowanie 20 minutowej przerwy mi dzy lotem i adowaniem Prosimy o adowanie akumulatora co pewien czas ra...

Page 32: ...wigni w lewo lub w prawo 11 Aby lata quadrokopterem w lewo lub w prawo ostro nie przesu cie Pa stwo praw d wigni w lewo lub w prawo 12 Aby lata quadrokopterem do przodu lub do ty u ostro nie przesu ci...

Page 33: ...z ly tsz ll sa id pontj ban nem volt hibamentes Jelen k l n gy rt i garanci b l ered ig nyek csak ak kor llnak fenn ha az rv nyes tett hiba nem olyan k rokra vezethet vissza amelyek a haszn lati utas...

Page 34: ...u sz ll t s hoz s tmeneti t rol s hoz a h m r s kletnek 5 50 C k z tt kell lennie Lehet s g szerint ne t rolja az akkut vagy a modellt aut ban vagy k zvetlen napsug rz snak kitett helyen Az aut ban ur...

Page 35: ...uadrocopter egy helyben balra vagy jobbra t r t n forgat s hoz mozgassa a bal kart vatosan balra ill jobbra 11 A quadrocopter balra vagy jobbra t rt n reptet s hez mozgassa a jobb oldali kart vatosan...

Page 36: ...odilih ozna ena kot nepravilna ali neustrezna ne gre za obrabo ki je pogojena z uporabo izdelek nima nobenih sledi na podlagi katerih bi bilo mo no sklepati da so bila na izdelku opravljena popravila...

Page 37: ...1x USB napajalni kabel 1x Set nadomestnih rotorjev 4x 1 5 V Micro AAA baterije nepolnilne Polnjenje baterije LiPo Pazite na to da prilo eno baterijo LiPo polnite le s prilo enim polnilnikom za LiPo ba...

Page 38: ...olj ob utljivo odziva na premike krmila kot v na inu Einsteiger Modus Ob preklopu se zvo ni signal spro i 2x Mo no je izvajanje lupingov in premetov tako kot je to opi sano pod 13a Nastavitev kvadroko...

Page 39: ...r jen v uzav en ch prostor ch kde je dost m sta a dodr ujte v echny pokyny doporu ovan v tomto n vodu Ruce vlasy a voln od v stejn jako jin p edm ty jako jsou epy a roubov ky nesm j b t v dosahu vrtul...

Page 40: ...Op rn tla tko pro funkci looping 10 Ramenn tla tko pro LED 11 P ep na re imu Beginner Advanced pro za te n ky pokro il Prav joystick stla te shora pro p epnut 3 12 P ihr dka na baterie Popis Quadroco...

Page 41: ...l tor viz kapitola Nabit akumul toru Probl m Quadrocopter bez zjevn ho d vodu b hem letu ztrat rychlost a klesne P ina Akumul tor je p li slab e en Nabijte akumul tor viz kapitola Nabit akumul toru Pr...

Page 42: ...boli pou en o bezpe nom pou van a pochopili mo n ne bezpe enstv Deti sa s nab ja kou resp nab jac m k blom USB nesm hra istenie a pou vate sk dr bu nesm vykon va deti s v nimkou det star ch ako 8 rok...

Page 43: ...ripraven na pou itie Pokia Quadrocopter neukazuje iadnu funkciu znovu sa pok ste o nadviazanie spojenia uveden vy ie Lietajte s modelom Prista te s modelom Vyp na om model vypnite Ako posledn v dy vyp...

Page 44: ...u ta kroz ovo jamstvo Prava iz ovog posebnog jamstva proizvo a a postoje samo ako uzrok reklamirane gre ke nije teta koja je prouzrokovana nenamjenskom uporabom ili nestru nom primjenom prema mjeri iz...

Page 45: ...vr etak leta Opseg isporuke 1 1x Quadrocopter 1x Upravlja 1x USB kabel za punjenje 1x Komplet zamjenskih rotora 4x 1 5 V Micro AAA baterije ne mogu se ponovno puniti Punjenje LiPo akumulatora Pazite n...

Page 46: ...ije reagira na pokrete upravljanja nego u Modusu za po etnike Prili kom uklapanja 2 x se uje signalni zvuk Mogu i su lopinzi okretanja kao to je opisano pod 13a Trimanje Quadracoptera 14 Ako Quadrocop...

Page 47: ...er som pen ner og skrutrekkere m holdes borte fra propellen rotor Den roterende rotoren m ikke ber res Pass spesielt godt p at IKKE hendene dine kommer i n rheten av rotorbla dene OBS Fare for yenskad...

Page 48: ...nksjon 10 Skuldertast for LED 11 Beginner Advanced bryter Trykk inn h yre joystick ovenfra for omkopling 3 12 Batterirom Beskrivelse av Quadrocopter 6 1 Rotorsystem 2 Rotor beskyttelsesbur 3 ON OFF br...

Page 49: ...copter mister hastighet under flygning uten synlig grunn og synker ned rsak Akkumulatoren er for svak L sning Akkumulatoren lades opp se kapittel Lade opp akkumulator Problem Quadrocopter dreier seg k...

Page 50: ...anvendes og har forst et de deraf resulterende farer B rn m ikke lege med opla deren hhv USB ladekablet Reng ring og brugervedligehol delse m ikke udf res af b rn undtagen hvis de over 8 r og under o...

Page 51: ...ke reagerer kan du pr ve at udf re den ovenn vnte synkronisering igen Flyv med modellen Land modellen Sluk modellen p Power kontakten Sluk altid for fjernbetjeningen til sidst Flyvning med 4 kanals qu...

Page 52: ...llanma talimat ndaki verilere g re amac na veya uygun olmayan kullanmadan kaynaklanan hasarlardan de ilse i letmeye dayal a nma belirtileri de ilse r nde imalat taraf ndan yetkilendirilmemi tamirhanel...

Page 53: ...ya do rudan g ne etkisi alt n da depolamay n z E er ak arabadaki s alt nda kalacak olursa hasar g rebilir veya alev alabilir Bilgi Pil geriliminin g c n n d k olmas durumunda Quadrocopter in sallanmam...

Page 54: ...rkaya itiniz 10 Quadrocopter i oldu u yerde sola veya sa a do ru d nd rmek i in sol pedal dikkatlice sola veya sa a hareket ettiriniz 11 Quadrocopter i sola veya sa a do ru u urmak i in sa pedal dikka...

Page 55: ...lama i lemini U u haz rl kontrol listesi alt nda a kland ekilde yap n z Sorun Quadrocopter y kselmiyor Sebep Rotor kanatlar ok yava hareket ediyor z m Gaz pedal n yukar ya ekiniz Sebep Ak g c yetmiyor...

Page 56: ...56 1 2 2b 2a 3 4a 4b 8 5 LED 3 6 7 LED...

Page 57: ...57 15 14 13b 16 15 14 9 10 11 12 18 17 13a 14 15 16 13b 13a 13a 17 18...

Page 58: ...58...

Page 59: ...59...

Page 60: ...203 China Phone 86 21 53821692 Mobile 86 15577449439 Email eddychan wowgame com cn Internet www wowgame net cn CZECH REPUBLIC ConQuest entertainment a s Hloubetinska 11 CZ 198 00 Praha 9 Hloubetin Pho...

Reviews: