10
of the contact brushes
2
and bend them towards the track as per
fi g.
3
. Only the end of the contact brush should have contact to the
track and may be cut off slightly in case of wear. Dust and abrasion
should be removed from track material and sliding contacts from
time to time.
Preparation of start and
points function
3
1
2
1
+
2
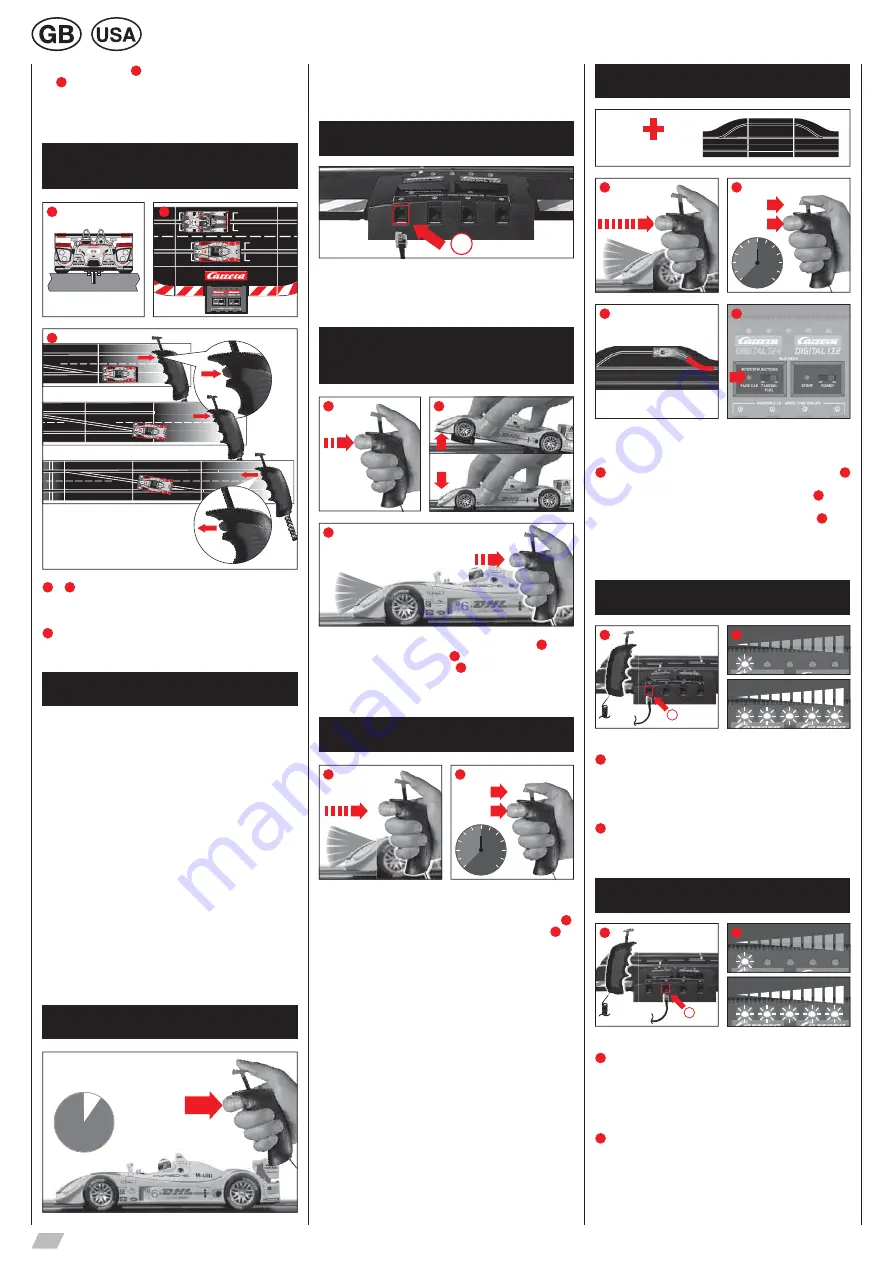
Make sure that the car’s guide keel is located inside the
track slot and that the double sliding contact is in contact with the
current carrying track.
Place the cars onto the connecting track.
3
When changing lanes, you must keep the button on the
speed controller depressed until the car has passed the point.
Race modes
Training mode
1. Switch on the Black Box (ON-OFF)
2. After approx. 1 second the central LED will illuminate perma-
nently and a brief acoustic signal will sound.
3. Position the car/s on the connecting track
4. In training mode, the track is released without signal from the
traffi c light; you can start immediately
Race mode
1. Switch on the Black Box (ON-OFF)
2. After approx. 1 second the central LED will illuminate perma-
nently and a brief acoustic signal will sound.
3. Afterwards, press the start button until all LEDs light up
4. Position the car/s on the connecting track
5. Press the start button again – the starting sequence will be initi-
ated, the LEDs will illuminate and acoustic signals will sound.
6. Once the traffi c light phase has expired (LEDs light up individu-
ally), the race is released
7. False start: If a car’s speed controller is actuated during the traffi c
light phase, this is rated as false start. The vehicle that has caused
the false start will travel a short distance and the LED on the rel-
evant vehicle or hand control will fl ash. The race is not released and
the start has to be repeated.
Light function on/off
3 sec.
STOP
The car programmed to the speed controller will have to come to a
stop for at least 3 seconds before the light can be switched on or off
by the push of the lane-change-button.
Operating 6 cars
1
Plug speed controller extension set (item no. 30348) in connector 1
of the Black Box. For next steps see section „Coding of cars to the
according speed controller“.
Coding/decoding of the cars to
the according speed controller
2x CLICK
1
2
2x CLICK
3
Place car on the track, push lane-change-button twice fi g.
1
, lift car
at the front, put car back again fi g.
2
, while car´s lights are fl ashing
push lane-change-button twice fi g.
3
. Programming is confi rmed
by a tone. All settings are saved until new programming is carried
out.
Autonomous Car function
300
150
250
200
0
100
50
4x CLICK
SPEED
+
CLICK
1
2
Place car on the track, push lane-change-button twice, lift car at the
front, put car back again (see coding/decoding fi g. 1 + 2). While
car´s lights are fl ashing push lane-change-button 4 times fi g.
1
.
Start car, push lane-change-button for requested speed fi g.
2
(ir-
respective of the car´s position). Autonomous car will drive at this
speed automatically and consistently until its decoding.
Decoding is eff ected by holding the car. For new coding see coding/
decoding.
Pace Car function
Pit Stop 30346
300
150
250
200
0
100
50
6x CLICK
SPEED
+
CLICK
1
2
3
4
Place car on the track, push lane-change-button twice, lift car at the
front, put car back again (see coding/decoding fi g. 1 + 2).
While car´s lights are fl ashing push lane-change-button 6 times fi g.
1
.
Start car, push lane-change-button for requested speed fi g.
2
(irrespective of the car´s position). Car will assume this speed con-
sistently and will enter the next Pit Stop automatically fi g.
3
.
Start Pace Car function:
Start Pace Car by pushing the button at the Black Box fi g.
4
. After
10 seconds each lane switch will change independently until the
Pace Car enters the Pit Stop. Carry out car decoding (see point
coding/decoding).
Setting basic speed
1
1
2
1 – 10
1 – 10
(individually for one and/or several cars)
1
Plug any speed controller in connector 1. Switch off Black Box,
place car/s on the track, push lane-change-button and keep it
pushed while Black Box is switched on again. Don´t release the
lane-change-button until the 1st LED lights red. Levels are set by
pushing lane-change-button. Confi rm speed by pressing the speed
controller´s tappet (thumb) (=> middle LED will light).
2
1 LED on = low speed
5 LEDs on = high speed
Setting braking effect
2
1
2
1 – 10
1 – 10
(individually for one and/or several cars)
1
Plug any speed controller in connector 2. Switch off Black Box,
place car/s on the track, push lane-change-button and keep it
pushed while Black Box is switched on again. Don´t release the
lane-change-button until the 1st LED lights red. Levels are set by
pushing lane-change-button. Confi rm braking eff ect by pressing
speed controller´s tappet (thumb) (=> middle LED will light). Before
the start return speed controller to the original connector!
2
1 LED on = low braking eff ect
5 LEDs on = high braking eff ec
Summary of Contents for DIGITAL 132 30139 NASCAR
Page 1: ...3 013 9 N A S C A R...


