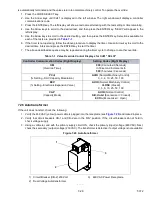
7–31
T-372
7.27.4
Uploading a Software Configuration from a USB Drive
1. Place the Start-Stop switch (ST) to “I” to turn the unit On. Wait for controller information to be displayed.
2. Insert the USB flash drive containing the software configuration files into the controller micro USB port. The
software multi-configuration files will have an extension of .ml5.
3. Press the ALT. MODE key on the keypad.
4. Use the Arrow keys until “USb” is displayed, then press the ENTER key.
NOTE
If “no USb” is displayed, wait up to 15 seconds for this message to be replaced with a different message. If “no
USb” continues to be displayed, remove and insert the USB flash drive and repeat steps 3 and 4.
5. Use the Arrow keys until “SEt UP” is displayed, then press the ENTER key.
6. Use the Arrow keys until “ruN COnFG” is displayed, then press the ENTER key.
NOTE
If more than one configuration database file is on the USB flash drive at the root level, then only the file with the
latest date will be considered.
7. The display module will go blank briefly and then display “551000”, based on the operational software
installed.
8. Use the Arrow keys to scroll through the list to obtain the proper model number, then press the ENTER key.
9. Once the model number is selected, the display will show the message “re Start” briefly, and then the
controller will restart.
10. Remove the USB flash drive from the USB port.
11. Use the Arrow keys to navigate to function code Cd20 and confirm that the correct model configuration is
displayed. The model displayed in Cd20 should match what is shown on the unit nameplate.
7.27.5
Downloading DataCORDER Data to a USB Drive
1. Place the Start-Stop switch (ST) to “I” to turn the unit On. Wait for controller information to be displayed.
2. Insert the designated USB flash drive into the controller micro USB port.
3. Press the ALT. MODE key on the keypad.
4. Use the Arrow keys until “USb” is displayed, then press the ENTER key.
NOTE
If “no USb” is displayed, wait up to 15 seconds for this message to be replaced with a different message. If “no
USb” continues to be displayed, remove and insert the USB flash drive and repeat steps 3 and 4.
5. Use the Arrow keys until “dn LoAd” is displayed, then press the ENTER key.
6. The Download Menu is now displayed. The amount of free space available on the drive is displayed first.
Use the Arrow keys to scroll down through the choices: ALL, trIP, 30dAy, 60dAy, and 90dAy.
7. Confirm the selection by pressing the ENTER key. The download starts.
8. While the download is in progress, the display will show “dLOAd” flashing.
9. When the download is complete, the display will show “dLOAd donE”.
10. Remove the USB flash drive from the USB port.
7.27.6
Setting the Date and Time
1. Place the Start-Stop switch (ST) to “I” to turn the unit On. Wait for controller information to be displayed.
2. Insert the designated USB flash drive into the controller micro USB port.
NOTE
The USB must have an ML5 software file or ML5 configuration file on the root level. If not, the “SEt UP” menu will
not be accessible from underneath the “USb” menu.


