8–15
62-11785
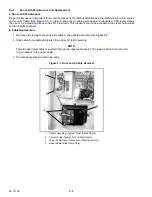
18. Using a backup wrench, torque the compressor connections as follows:
19. Connect the new compressor discharge temperature sensor (CDT) connector. Wire-tie any loose wiring as
appropriate.
20. Backseat the suction and discharge service valves.
21. Reconnect the battery. Place the unit back into “Service Mode”. Leak check and evacuate the unit and charge,
NOTICE
The scroll compressor achieves low suction pressure very quickly. Do not use the compressor
to evacuate the system below 0 psig. Never operate the compressor with the suction or
discharge service valves closed (frontseated). Internal damage will result from operating the
compressor in a deep vacuum.
a. Following installation of a replacement compressor, the oil level in the unit may be above the required level.
Adjust the oil level in accordance with the instructions packaged with the replacement compressor.
8.7
REFRIGERANT SYSTEM COMPONENT SERVICE
8.7.1
Evaporator Coil
The use of recycled cardboard cartons is increasing across the country. The recycled cardboard cartons create
much more fiber dust during transport than “new” cartons. The fiber dust and particles are drawn into the
evaporator where they lodge between the coil fins. If the coil is not cleaned on a regular basis, sometimes as often
as after each trip, the accumulation can be great enough to restrict air flow, cause coil icing, repetitive defrosts and
loss of unit capacity. Due to the “washing” action of normal defrost the fiber dust and particles may not be visible on
the face of the coil but may accumulate deep within.
Clean the evaporator coil on a regular basis, not only to remove cardboard dust, but to remove any grease or oil
film which sometimes coats the fins and prevents water from draining into the drain pan.
Cardboard fiber particles after being wetted and dried several times can be very hard to remove. Therefore, several
washings may be necessary.
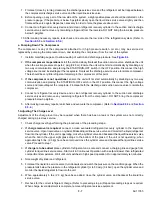
1. Ensure the unit will not start automatically by placing the START/RUN-OFF switch in the OFF position. Dis-
connect the high voltage source and lockout/tagout the receptacle.
2. Remove rubber check valves (Kazoo) from drain lines of the evaporator to be cleaned.
3. Spray coil with a mild detergent solution such as Oakite 164 or 202) or any good commercial grade automatic
dish washer detergent such as Electrosol or Cascade and let the solution stand for a few minutes and reverse
flush (opposite normal air flow) with clean water at mild pressure. A garden hose with spray nozzle is usually
sufficient. Make sure drain lines are clean.
4. Re-install rubber check valves and run unit until Defrost Mode can be initiated to check for proper draining from
drain pan.
Service Valve / Connection
Torque Value
Suction and Discharge Rotalocks
80 - 100 ft-lbs
(109 - 136 Nm)
Economizer Connection
38 - 42 ft-lbs
(51 - 57 Nm)
Summary of Contents for VECTOR 8100
Page 2: ......
Page 4: ......
Page 12: ...62 11785 viii ...
Page 16: ...62 11640 12 ...
Page 18: ...62 11785 ...
Page 24: ...62 11785 1 6 1 3 SAFETY DECALS ...
Page 25: ...1 7 62 11785 ...
Page 26: ...62 11785 1 8 ...
Page 27: ...1 9 62 11785 ...
Page 28: ...62 11785 1 10 ...
Page 30: ...62 11785 ...
Page 50: ...62 11785 ...
Page 82: ...62 11785 ...
Page 96: ...62 11785 4 14 ...
Page 98: ...62 11785 ...
Page 129: ...5 31 62 11785 ...
Page 130: ...62 11785 5 32 ...
Page 134: ...62 11785 6 4 ...
Page 138: ...62 11785 ...
Page 230: ...62 11785 ...
Page 271: ...8 41 62 11785 ...
Page 272: ...62 11785 8 42 ...
Page 274: ...62 11785 ...
Page 286: ......
Page 287: ......
Page 288: ...62 11785 10 8 ...
Page 292: ......
Page 293: ......


