background image

Do not connect aluminum wire between disconnect switch
and furnace. Use only copper wire.

The cabinet MUST have an uninterrupted or unbroken ground
according to National Electrical Code ANSI/NFPA 70-1993
and Canadian Electrical Code CSA C22.1 or local codes to
minimize personal injury if an electrical fault should occur.
This may consist of electrical wire or conduit approved for
electrical ground when installed in accordance with existing
electrical codes. Do not use gas piping as an electrical ground.

Make all electrical connections in accordance with the current
edition of the National Electrical Code ANSI/NFPA 70-1993 and
any local codes or ordinances that might apply. For Canadian
installations, all electrical connections must be made in accordance
with Canadian Electrical Code CSA C22.1 or authorities having
jurisdiction.

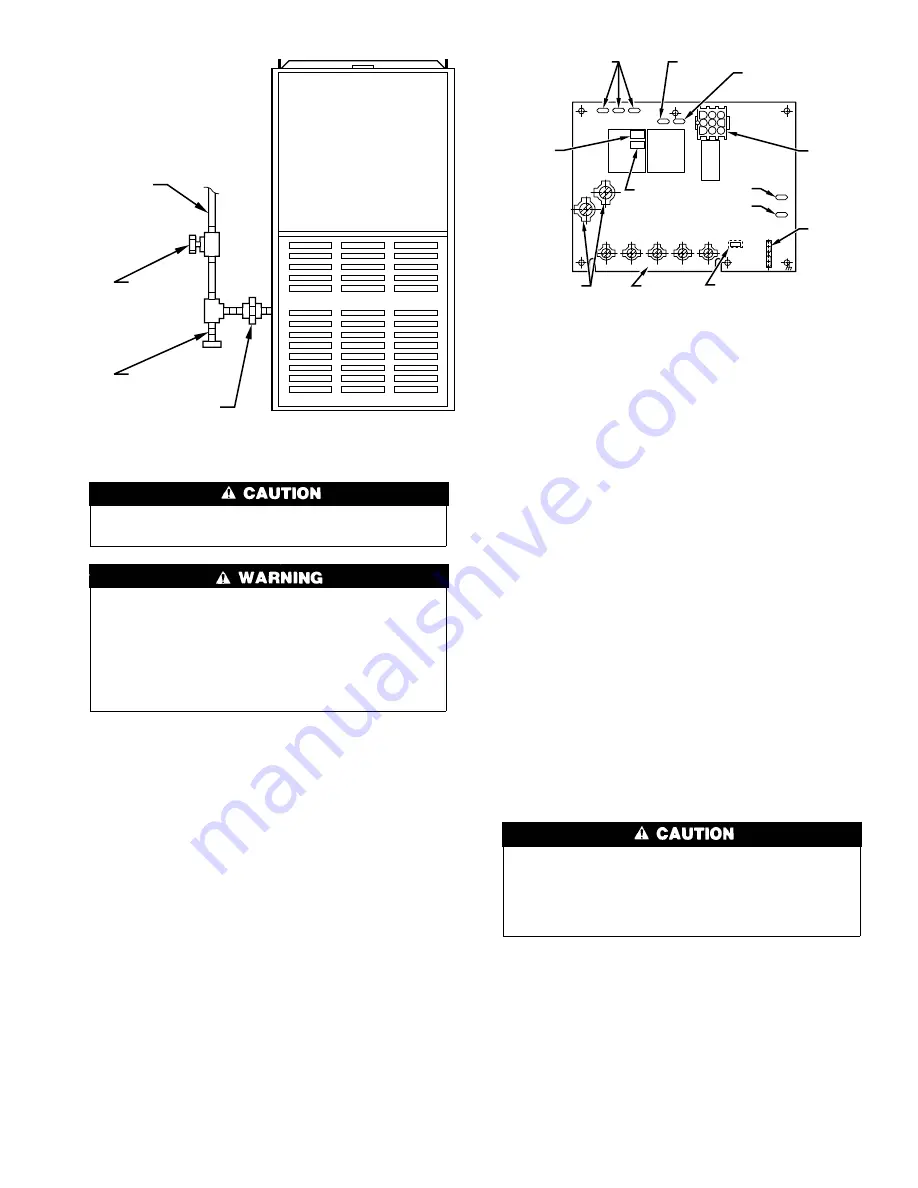
24-V WIRING — Make field 24-v connections at the 24-v termi-
nal strip. (See Fig. 9 and 10.) Connect terminal Y as shown for
proper operation in cooling mode. Use only AWG No. 18
color-coded wire.

The 24-v circuit contains an automotive-type, 3-amp fuse located
on the main control board. Any direct shorts during installation,
service, or maintenance could cause this fuse to blow. If fuse
replacement is required, use ONLY a 3-amp fuse of identical size.

ACCESSORY

Electronic air cleaner (EAC)

Two screw terminals (EAC-1 and EAC-2) are provided for
EAC connection. The terminals are energized with 115-v,
1-amp maximum during blower motor operation.

Step 7—Venting

Refer to the enclosed Installation Instructions, GAMA Venting
Tables for Category I Furnaces and QUIK•VENT™ Tables for
Category I Fan-Assisted Furnaces. The horizontal portion of the

venting system shall maintain a minimum of 1/4-in. upward slope
per linear ft and it shall be rigidly supported every 5 ft or less with
hangers or straps to ensure that there will be no movement after
installation.

Step 8—Start-up, Adjustment, and Safety Check

GENERAL — The furnace must have a 115-v power supply
properly connected and grounded. Thermostat wire connections at
R,W,C, and Y must be made at the 24-v terminal block on the
control board. The gas service pressure must not exceed 0.5 psig
(14-in. wc), but must be no less than 0.16 psig (4.5-in. wc).

Before operating the furnace, check each manual reset switch for
continuity. If necessary, press the button to reset the switch.

The blower compartment door must be in place to complete the
115-v circuit to the furnace.

This furnace is equipped with a fuse link in the gas control
area. The switch will open and shut off power to the gas valve
if a flame rollout or an overheating condition occurs in the gas
control area. DO NOT bypass the switch. Correct inadequate
combustion air supply problem and reset the switches.

SEQUENCE OF OPERATION — Using the schematic diagram,
follow the sequence of operation through the different modes. (See
Fig. 11.)

NOTE:

When the blower door is in place, 115v is supplied

through blower door switch ILK to heating fan relay HFR, and
transformer TRAN. Transformer TRAN energizes the safety
circuit containing auxiliary limit switch ALS, fuse link FL, and
limit switch LS to energize R.

With the furnace pilot lit, the thermocouple will energize the
thermal magnet circuit of gas valve GV, permitting gas flow to the
remaining portion of the gas valve.

Fig. 8—Typical Gas Pipe Arrangement

A89414

GAS

SUPPLY

MANUAL
SHUTOFF
VALVE

SEDIMENT
TRAP

UNION

Fig. 9—Control Center

A91226

MAX. 1.0 AMPS
115-VAC

SEC-2

SEC-1

GROUND
SCREW
REQUIRED

FU

3-AMP
FUSE

BLOWER
OFF-DELAY

24-VAC
COMMON

CES0110074-00

W

Y

R

C

G

EAC-2

EAC-1

COM

PR-2

L2

CFR

HI

HFR

L1

PR-1

PL-1

1

2

3

4

5

6

7

8

9

1

3

IDR

24-VAC COMMON

BLOWER
OFF-TIME
ADJUSTMENT

24-VAC
THERMOSTAT
TERMINALS

COOLING
SPEED TAP
TERMINAL

HEATING

SPEED TAP

TERMINAL

115-VAC

NEUTRAL

TERMINALS

115-VAC
LINE
VOLTAGE

115-VAC
TRANSFORMER

9-PIN
CONNECTOR

ELECTRONIC

AIR-CLEANER

TERMINALS

24-VAC POWER

LO

24-VAC FUSE
3-AMP ONLY

UNCUT: 120 SEC
CUT: 180 SEC

7

Summary of Contents for 58DFA

Page 1: ...lation Codes NSCNGPIC Wear safety glasses and work gloves Have fire extinguisher available during start up and adjustment procedures and service calls Understand the signal word DANGER WARNING or CAU TION These words are used with the safety alert symbol DAN GER identifies the most serious hazards which will result in severe personal injury or death WARNING signifies hazards that could result in p...

Page 2: ... further information the National Fuel Gas Code is available from National Fire Protection Association Inc Battery march Park Quincy MA 02269 American Gas Association 1515 Wilson Boulevard Arlington VA 22209 or from Literature Distribution Table 2 Dimensions In UNIT SIZE A D E VENT CONN SHIP WT 071 08 14 3 16 12 9 16 12 11 16 4 135 071 12 14 3 16 12 9 16 12 11 16 4 139 091 12 17 1 2 15 7 8 16 4 14...

Page 3: ... are manually operated they must be equipped with means to prevent operation of either unit unless the damper is in the full heat or full cool position HAZARDOUS LOCATIONS When the furnace is installed in a residential garage it must be installed so that the burners and ignition source are located at least 18 in above the floor The furnace should be protected from physical damage by vehicles When ...

Page 4: ... for all equipment within the confined space but not less than 100 sq in per opening See Fig 2 For Example 58DFA FURNACE IN PUT BTUH FREE AREA PER OPENING SQ IN 66 000 100 88 000 100 110 000 110 132 000 132 If the building is constructed unusually tight a permanent opening directly communicating with the outdoors should be provided This opening should have a minimum free area of 1 sq in per 5000 B...

Page 5: ... ON A CONCRETE SLAB 1 Construct hole in floor per dimensions in Fig 4 and Table 3 2 Install plenum and furnace as shown in Fig 5 INSTALLATION ON A COMBUSTIBLE FLOOR 1 Cut and frame hole in floor per dimensions in Installation Instructions packaged with downflow subbase 2 When completed downflow subbase plenum and furnace or coil casing when used should be installed as shown in Fig 6 Fig 4 Floor Op...

Page 6: ...has been attached If the pressure exceeds 0 5 psig 14 in wc the gas supply pipe must be disconnected from the furnace and capped before the pressure test If the test pressure is equal to or less than 0 5 psig 14 in wc close the manual shut off valve located on the gas valve before the test It is recommended that the ground joint union be loosened before pressure testing Never purge a line into a c...

Page 7: ...ment after installation Step 8 Start up Adjustment and Safety Check GENERAL The furnace must have a 115 v power supply properly connected and grounded Thermostat wire connections at R W C and Y must be made at the 24 v terminal block on the control board The gas service pressure must not exceed 0 5 psig 14 in wc but must be no less than 0 16 psig 4 5 in wc Before operating the furnace check each m...

Page 8: ... gas valve GV Gas flow to the pilot and main burners stops until the pilot is manually relit NOTE When gas valve GV is energized R W circuit is closed After a power interruption the gas valve closes within 7 sec and the furnace skips the blower on delay and immediately starts the blower 2 Cooling mode When the thermostat calls for cooling R G and Y circuits close Simultaneously the R Y circuit sta...

Page 9: ...TIVE BLADE TYPE FUSE FIELD INSTALLED FUSIBLE LINK GAS VALVE REDUNDANT HEATING FAN RELAY SPST N O INDUCED DRAFT MOTOR INDUCER DRAFT RELAY DPST N O BLOWER DOOR INTERLOCK SWITCH SPST N O JUNCTION BOX LIMIT SWITCH OVER TEMP SPST N C AUTO RESET PRINTED CIRCUIT BOARD FURNACE CONTROL 9 CIRCUIT CONNECTOR PCB1 2 CIRCUIT CONNECTOR L1 L2 5 CIRCUIT PLUG CONNECTOR BLWM PRESSURE SWITCH SPDT TRANSFORMER 115VAC 2...

Page 10: ...wc for natural gas When adjusting input rate do not set manifold pressure above 3 8 in wc or below 3 2 in wc a Check gas input rate using Table 6 1 Obtain average yearly heat value for local gas supply 1 Obtain average yearly specific gravity for local gas supply 1 Verify furnace model Table 6 can only be used for model 58DFA Furnaces 1 Check and verify orifice size in furnace NEVER ASSUME THE ORI...

Page 11: ...3 4 3 6 38 39 40 3 2 3 5 3 7 38 39 40 3 3 3 6 3 8 875 42 3 4 41 42 3 2 3 6 41 42 3 3 3 7 41 42 40 3 4 3 8 3 2 41 40 3 5 3 3 41 39 40 3 6 3 2 3 4 41 39 40 3 8 3 3 3 5 39 40 3 3 3 6 38 39 40 3 2 3 4 3 7 890 42 3 3 42 3 4 41 42 3 2 3 6 41 42 3 3 3 7 41 42 3 4 3 8 41 40 3 5 3 2 41 40 3 6 3 3 41 39 40 3 7 3 2 3 4 41 39 40 3 8 3 3 3 5 905 42 3 2 42 3 3 42 3 4 41 42 3 2 3 6 41 42 3 3 3 7 41 42 3 4 3 8 41...

Page 12: ...s per hr CHECK SAFETY CONTROLS 1 Check operation of gas shut off control for 100 percent shutoff NOTE The furnace pilot must be lit so the thermocouple energizes the thermal magnet circuit of gas valve GV which permits gas flow to the remaining portion of the valve If the pilot flame is extinguished the thermocouple will no longer energize the thermal magnet circuit of the gas valve Gas flow to th...

Page 13: ...n off 115 v power to furnace b Remove control door and disconnect inducer motor lead wires from wire harness c Turn on 115 v power to furnace d Close thermostat switch as if making normal furnace start If the burners do not light the pressure switch is function ing properly e Turn off 115 v power to furnace f Reconnect inducer motor wires replace control door and turn on 115 v power 5 Check auxili...

Page 14: ...46231 35006c Manufacturer reserves the right to discontinue or change at any time specifications or designs without notice and without incurring obligations Book 1 4 Tab 6a 8a PC 101 Catalog No 565 812 Printed in U S A Form 58DF 9SI Pg 14 11 93 Replaces 58DF 6SI ...

Reviews: