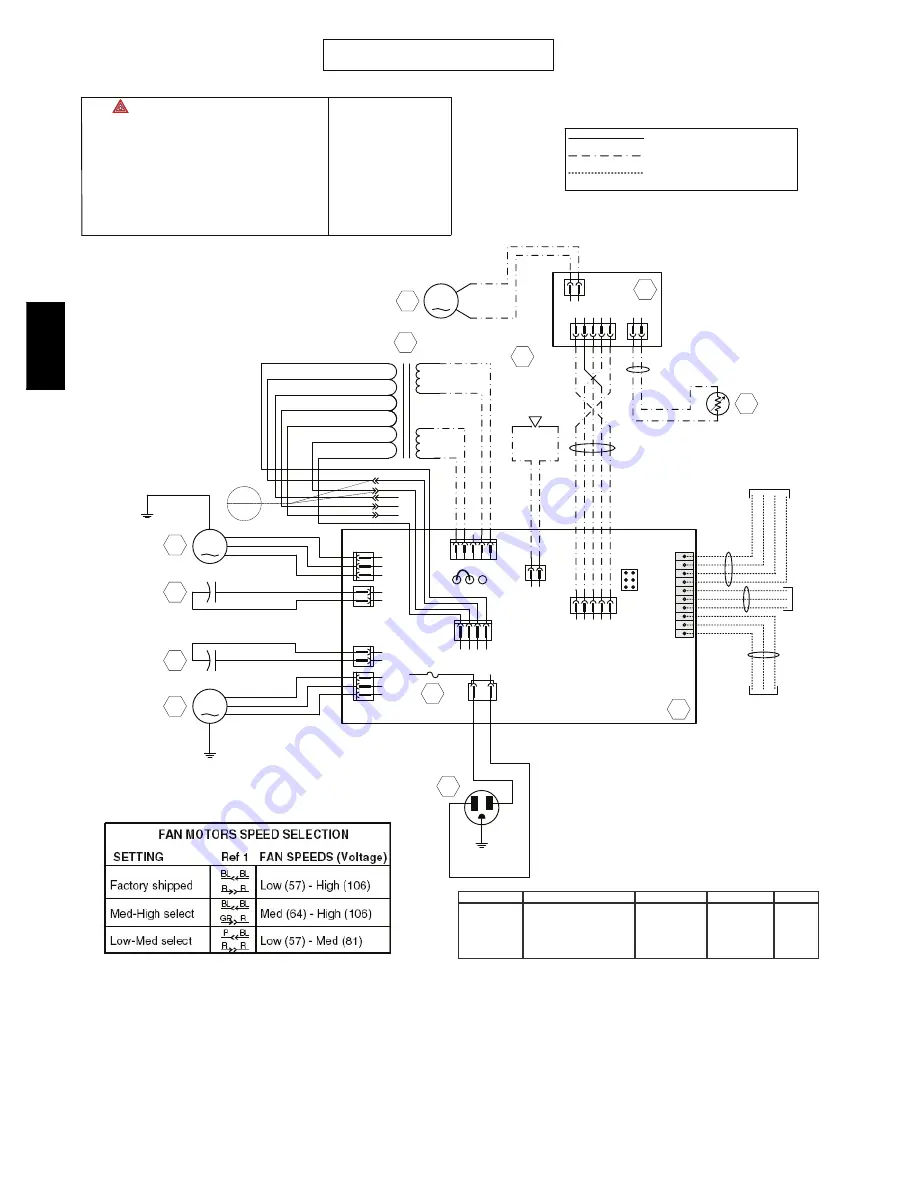
background image

12

CONNECTION DIAGRAM

Line voltage factory wiring

Class 2 low voltage factory wiring

Class 2 low voltage field wiring

M1

A1

T1

R1

Field wiring

remote control

(see notes 3, 4)

120V, 60Hz

W1

F1

J5

J7

J6

J4

ELECTRONIC ASSEMBLY

1
2
3

1

2

1

2

1
2
3

1

2

3

4

1 2

1 2 3 4 5

1

2

3

4

5

J8

J9

J11

J10

1

2

J12

J13

J14

10

9
8
7
6
5
4
3
2
1

M2

C1

C2

24V class 2

9.5V 
class 2

ORG

YEL

See note 1

120V

106V

81V

neutral

GRY

WHT

Door interlock 

switch

(magnetically 

actuated reed 

switch)

Exhaust fan motor

Exhaust fan motor 

capacitor

Supply fan motor 

capacitor

Supply fan motor

1

2

3

4

5

1

2

1 2

J3

J2

J1

t

o

M3

Damper motor

Furnace blower interlock

J14-1 : NO

J14-2 : COM

J14-3 : NC

(optional; see notes 3, 5)

A2

DAMPER ELECTRONIC 

ASSEMBLY

Defrost temperature 
sensor

S1

ICP

RED

BLK

1

2

3

HI

JU1

MED

Ref

1

ORG

YEL

ORG

PRP

BLU

71V

64V

57V

nc
nc
nc

RED

BLU

BLU

RED

ORG

PRP

GRY

BLK

BLK

WHT

WHT

BLK

BLU

BRN

BLK

BLK

BLK

BLU

BRN

BLK

BLK

GRN

WHT

BLK

GRN

BL

K

GRN

RED

YE

L

GRN

(6)

BLK

K5 K2 K3 K1

MODE

M1 "Supply"

M2 - "Exhaust"

DAMPER

0

0

0

0

OFF

OFF

OFF

Closed

1

0

1

1

Exchange low speed

LO

LO

Opened

1

1

1

1

Exchange high speed

HI

HI

Opened

1

1

1

0

Circulation high speed

HI

OFF

Closed

1

1

1

0

Defrost

HI

OFF

Closed

COLOR CODE

BLK

BLACK

BLU

BLUE

BRN

BROWN

GRN

GREEN

GRY

GRY

ORG

ORANGE

RED

RED

WHT

WHITE

YEL

YELLOW

1.           : USE SPECIFIED UL LISTED/CSA 
CERTIFIED LINE FUSE. Type 3AG, Littelfuse no 
312003. 

2. If any of the original wire, as supplied, must be 
replaced, use the same equivalent wire.

3. Field wiring must comply with applicable codes, 
ordinances and regulations.

4. Remote controls available. 

See instruction manual. (class 2 circuit)

5. Furnace fan circuit must be class 2 circuit only.

A10001

Fig. 17 -- ERV / HRV Wiring Diagram

ER

V

/HR

V

Summary of Contents for ERVCCSHB1100

Page 1: ...staller or agency must use factory authorized kits or accessories when modifying this product Refer to the individual instructions packaged with kits or accessories when installing Follow all safety codes Wear safety glasses protective clothing and work gloves Have a fire extinguisher available Read these instructions thoroughly and follow all warnings or cautions included in literature and attach...

Page 2: ...m unit should be located next to or close to the indoor equipment COMPONENT DESCRIPTION The following listed items are components of ERVCCSHA See Fig 4 1 Exhaust air connected to outdoor air exhaust hood 2 Fresh air intake connected to outdoor air inlet hood 3 Fresh air supply from ERV connected to return air duct of forced air system 4 Mechanical filters trap dust contained in the air 5 Energy re...

Page 3: ... heater WARNING Return air or stale air pickup registers are normally located to draw from kitchen bathroom basement or other rooms where stale air can exist Proper size and type of registers must be used to minimize pressure drop The velocity of airflow through register should not be above 400 ft 122m per minute Maximum length of duct for the system should be designed according to the highest spe...

Page 4: ... air pockets See Fig 7 Both intake and exhaust hoods must be 18 in 457mm from ground and at least 12 in 305mm above anticipated snow level After selecting proper hood locations make appropriate size hole through exterior wall pass flexible duct through hole and insert hood tube into duct Tape duct vapor barrier tightly around hood tube and insert assembly back into wall and fasten securely Condens...

Page 5: ...s to ensure highest degree of humidity control in cooling season the INTERMITTENT mode should be used Integrated Control All units are equipped with an integrated control located under the unit in front of the electrical compartment Use the push button 1 to control the unit The LED 2 will then shows on which mode the unit is in Integrated Control overrides Wall Control function When LED is off ven...

Page 6: ... electrical connections must comply with National and Local Electrical Codes or other ordinances that might apply ELECTRICAL SHOCK FIRE HAZARD Failure to follow this warning could result in personal injury death and or property damage Do not use an extension cord as a power source for operating the ERV HRV WARNING 12VDC Wiring The ERV HRV circuit board wall control and accessories operate on 12VDC...

Page 7: ...ve furnace air handler blower OFF If the outside temperature is below 32_F 0_C make sure the unit is not running in defrost while balancing By waiting 10 minutes after plugging the unit in you are assured that the unit is not in a defrost cycle Step 2 Magnehelic gauge placement Place the magnehelic gauge on a level surface and adjust it to zero Step 3 Connect tubing from gauge to EX HAUST air flow...

Page 8: ...opens contact on K5 relay which opens outside air damper Then 115VAC is applied between orange and gray wires on Molex plug pins 1 and 6 and blower motor runs in high speed operation Low Speed Air Exchange When low speed air exchange occurs K1 Relay is energized which closes the contacts K2 and K5 relays are de energized This keeps low speed contacts closed and high speed contacts open on K2 relay...

Page 9: ...all Control Board Operation and Care and Maintenance sections before continuing NOTE If there is a short circuit or an open circuit at thermistor CPU will go into a 5 minute defrost cycle every 20 minutes This feature is not there on older board versions with 3 pin jumpers Override Test To use override test function a thermistor must be connected to the control board Unit must not be in defrost mo...

Page 10: ...e dehumidistat does not work OR the 20 minute push button timer does not work OR its indicator light does not stay on S The wires may be in reverse position S Ensure that the color coded wires have been connected to their appropriate places S The dehumidified or push button may be defective S Jump the OL and OC terminals If the unit switch to high speed remove the dehumidistat or push button and t...

Page 11: ...12 16560 55 13 15900 57 14 15280 59 15 14690 61 16 14120 63 17 13580 64 18 13060 66 19 12560 68 20 12090 70 21 11630 72 22 11200 73 23 10780 75 24 10380 77 25 10000 79 26 9632 81 27 9281 82 28 8944 84 29 8622 86 30 8313 88 31 8014 90 32 7728 91 33 7454 93 34 7192 95 35 6940 97 36 6699 99 37 6467 100 38 6245 Table 7 Defrost Cycle HRV DEFROST CYCLES Outside Temp F C Defrosting minutes Operation time...

Page 12: ... ICP RED BLK 1 2 3 HI JU1 MED Ref 1 ORG YEL ORG PRP BLU 71V 64V 57V nc nc nc RED BLU BLU RED ORG PRP GRY BLK BLK WHT WHT BLK BLU BRN BLK BLK BLK BLU BRN BLK BLK GRN WHT BLK GRN BLK GRN RED YEL GRN 6 BLK K5 K2 K3 K1 MODE M1 Supply M2 Exhaust DAMPER 0 0 0 0 OFF OFF OFF Closed 1 0 1 1 Exchange low speed LO LO Opened 1 1 1 1 Exchange high speed HI HI Opened 1 1 1 0 Circulation high speed HI OFF Closed...

Page 13: ...12 4 J12 3 J2 3 J2 4 J2 5 Door interlock switch J11 2 J11 1 K1 K3 K5 J14 3 J14 1 J14 2 Furnace blower interlock optional see notes 3 5 J14 4 J14 5 J14 6 J14 7 J14 8 J14 9 J14 10 Override switch optional see notes 3 4 Field wiring remote control see notes 3 4 MED LO 1 2 3 HI MED JU1 Ref 1 9 5V class 2 YEL neutral YEL 24V class 2 ORG 120V 106V 81V GRY WHT RED BLK ORG ORG PRP BLU 71V 64V 57V 120V 106...

Page 14: ... when used in Canada S ERVCCSVB1100 S ERVCCSHB1100 S HRVCCSVB1100 S HRVCCSHB1100 Energy Star Canada Copyright 2010 Carrier Corp S 7310 W Morris St S Indianapolis IN 46231 Printed in U S A Edition Date 05 10 Manufacturer reserves the right to change at any time specifications and designs without notice and without obligations Catalog No ERVHRV 3SI Replaces ERVHRV 2SI ERV HRV ...

Reviews: