background image

Summary of Contents for KGAPN4401VSP

Page 1: ...lters Trained service personnel must perform all other operations When working on heating equipment observe precautions in the literature on tags and on labels attached to or shipped with the unit and other safety precautions that may apply Follow all safety codes In the United States follow all safety codes including the current edition of the National Fuel Gas Code NFGC NFPA No 54 ANSI Z223 1 In...

Page 2: ...SY 42 323267 702 1 PCS PARTS ASSY 43 323267 703 1 PCS PARTS ASSY 44 323267 704 1 PCS PARTS ASSY 45 338305 701 1 PCS LABEL KIT 338305 702 1 PCS LABEL KIT 338305 703 1 PCS LABEL KIT 338305 704 1 PCS LABEL KIT CA64ASO01 1 PCS PLUG PIPE AG KGAPNVSP 01 1 PCS INSTRUCTIONS EF39ZW037 2 PCS VALVE CVRSN KIT SECTION 1 Table 2 Condensing Furnaces MODEL NUMBERS BEGINNING WITH 59MN7A 987MA INSTALLATION 1 Set ro...

Page 3: ...oss threading is not acceptaMe Fig 2 Modulating Gas Valve with Orifices Al1486 BURNER SUPT ASSY BURNER_SY _ FLA M E SENSOR BELOW BURNER IGNITER TER _ F_IME2OLLOU T Al1403 Fig 3 Burner Assembly A96249 Fig 4 Burner Orifice Deternfine natural gas orifice size and manifold pressures for correct input at installed altitude by using Table 3 1 Obtain yearly heat value average at installed altitude for lo...

Page 4: ...3001 915 to 4000 800 43 3 8 0 60 42 3 2 0 50 42 3 3 0 55 42 3 4 0 55 825 43 3 6 0 55 43 3 7 0 60 43 3 8 0 60 42 3 2 0 50 850 44 3 8 0 60 43 3 5 0 55 43 3 6 0 55 43 3 7 0 60 875 44 3 6 0 60 44 3 7 0 60 43 3 4 0 55 43 3 5 0 55 900 44 3 4 0 55 44 3 5 0 55 44 3 7 0 60 44 3 8 0 60 1219 925 44 3 2 0 50 44 3 4 0 55 44 3 5 0 55 44 3 6 0 55 950 45 3 7 0 60 44 3 2 0 50 44 3 3 0 55 44 3 4 0 55 750 42 3 3 0 5...

Page 5: ... 700 72 5 44__ 3 2 0 50 Orifice numbers shown in BOLD are factory installed 43 3 7 0 60 42 3 2 0 50 42 3 3 0 55 42 3 4 0 55 43 3 5 0 55 43 3 6 0 55 43 3 7 0 60 43 3 8 0 60 44 3 7 0 60 44 3 8 0 60 43 3 4 0 55 43 3 5 0 55 44 3 4 0 55 44 3 5 0 55 44 3 7 0 60 44 3 8 0 60 44__ 3 3 0 5 44 3 4 0 5 44 3 5 0 55 Furnace gas input rate on furnace rating plate is for installations at altitudes up to 2000 ft I...

Page 6: ...servicing Fig 9 Removing Propane Jumper A11502 NOTE The Propane jumper for the modulating gas valve is very small Needle nose pliers are required to remove the jumper from the gas valve 1 Locate the round LP GAS sticker on the top of the gas valve 2 Peel the sticker off and discard 3 Note the small square opening in the top of the gas valve 4 Remove the small black plastic Propane jumper from the ...

Page 7: ...manifold mounting screws 4 Install the remaining manifold mounting screws 5 Connect the wires to the flame sensor and hot surface ig niter 6 Connect the connector harness to gas valve 7 Rewire unit low pressure switch LPS as follows a Trace one of the orange wires previously disconnected from the LGPS back to the NO terminals of the LPS b Trace the other orange wire previously disconnected from th...

Page 8: ...n the l 8 in tapped inlet pressure tap opening in the gas valve DO NOT over tighten Check for gas leaks after gas supply has been turned on CHECK FURNACE AND MAKE ADJUSTMENTS FIRE AND EXPLOSION HAZARD Failure to follow this warning could result in personal iniury and or death NEVER test for gas leaks with an open flame Use a commercially available soap solution made specifically for the detection ...

Page 9: ...ace and at the electric switch on the gas valve 2 Remove the 1 8 inch NPT plug from the outlet pressure tap on the gas valve 3 Connect a manometer to the outlet pressure tap on gas valve 4 Turn on furnace power supply 5 Turn gas supply manual shutoff valve to ON position 6 Turn furnace gas valve switch to ON position 7 Turn Setup switch SW 1 2 to ON 8 Verify Set up switch SW 4 2 is turned OFF 9 Ju...

Page 10: ...KGAPN4401VSP BY Name and address of organization making this conversion which accepts the responsibility that this conversion has been properly made CEG NERATEURD AIR CHAUDA I_TI_ CONVERTILE POUR JOUR bIOIS ANNI_E DE L ENSEIVlBLE N KGAPN4401VSP PAR Nora et adresse de I organisme qui a effectu6 la conversion qui accepte entri6re responsabilit6 de la conversion 338305 205 REV A Fig 15 Conversion Res...

Page 11: ...t LE FEU L EXPLOSION CHOC ELECTRIQUE ET MONOXYDE DE CARBONE EMPOISONNER Cette trousse de conversion doit _tre install_e par un servie d entretien qualifid selon les instructions du fabricant et selon toutes les exigences et tousles codes pertinents de l autorit_ comp_tente Assurezvous de bien suivre les instructions dans cette notice pour rdduire au minimum le risque d incendie d explosion ou la p...

Page 12: ... of burner box 6 Remove the flame sensor from the burner assembly 7 Remove the orifices from the manifold and discard Orifice Manifold Connect Green Yellow ground wire here D EQUIPMENT D OPERATION Lors des opdrations d entretien des commandes _tiqueter tousles ills avant de les d_connecter NOTE Use a back up wrench on the gas valve to prevent the valve from rotating on the manifold or damaging the...

Page 13: ... Burner Orifice Determine natural gas orifice size and manifold pressures for correct input at installed altitude by using Table 5 1 Obtain yearly heat value average at installed altitude for local gas supply 2 Obtain yearly specific gravity average for local gas sup ply 3 Find installation altitude in Table 5 NOTE For Canada altitudes of 2000 to 4500 ft use U S A Altitudes of 2001 to 3000 ft In T...

Page 14: ...775 43 3 4 1 4 43 3 5 1 5 c O 800 44 3 7 1 6 44 3 8 1 6 to 825 44 3 5 1 5 44 3 6 1 5 6000 850 44 3 3 1 4 44 3 4 1 4 1829 875 45 3 7 1 6 44 3 2 1 3 900 46 3 7 1 6 46 3 8 1 6 675 42 3 4 1 4 42 3 5 1 5 6001 700 42 3 2 1 3 42 3 3 1 4 _ 1830 725 43 3 6 1 5 43 3 7 1 6 c O 750 43 3 4 1 4 43 3 5 1 5 to 775 44 3 6 1 5 44 3 7 1 6 u 7000 800 44 3 4 1 4 44 3 5 1 5 2133 825 44 3 2 1 3 44 3 3 1 4 850 46 3 8 1 6...

Page 15: ...1 5 42 3 2 1 4 43 3 6 1 5 43 3 4 1 4 44 3 7 1 5 44 3 4 1 4 44 3 2 1 4 42 3 7 1 6 42 3 4 1 4 42 3 2 1 3 43 3 6 1 5 44 3 8 1 6 44 3 6 1 5 44 3 4 1 4 42 3 7 1 6 42 3 4 1 4 43 3 8 1 6 43 3 5 1 5 44 3 8 1 6 44 3 5 1 5 Furnace gas input rate on furnace rating plate is for installations at altitudes up to 2000 ft 610 M In the U S A the input rating for altitudes above 2000 ft 610 M must be reduced by 2 p...

Page 16: ...stage gas valve regulators See Fig 24 4 Remove the high heat and low heat regulator adjustment screws 5 Remove the high heat and low heat Propane gas regulat or springs white 6 Install the high heat and low heat natural gas regulator springs silver 7 Install the high heat and low heat regulator adjustment screws 8 Turn high heat stage adjusting screw clockwise in 12 full turns This will increase t...

Page 17: ...ck Iron Street 90 can be used at Valve Inlet instead of Brass Street 90 Brass Street Tee Inlet Pressure Tap with Plug i Low Gas Pressure Switch i_ Brass Nipple Brass Street A11366 Fig 26 LGPS for Casing Wider Than 14 3 16 and Vent Does Not Pass Between Inducer and Burner Assembly INSTALL MANIFOLD 1 Align the orifices in the manifold assembly with the sup port rings on the end of the burner 2 Inser...

Page 18: ... une flamme vive Utilisez plut6t un savon fair specifiquement pour la d_tection des fuites de gaz pour verifier tous les connections Un incendie ou une explosion peut entrainer des dommages materiels des blessures ou la mort FIRE EXPLOSION ELECTRICAL SHOCK HAZARD Failure to follow this warning could result in personal iniury death or property damage Gas supply MUST be shut off before disconnecting...

Page 19: ...8 Burner Flame _ _ Burner Manifold __ Al1461 Fig 28 Burner Flame 18 Remove jumper across R Wl and W2 after high heat ad justment to ternfinate call for heat 19 Turn setup switch SWI 2 on furnace control to OFF posi tion 20 Turn furnace gas valve switch to OFF position 21 Turn off furnace power supply 22 Remove manometer and re install manifold pressure tap plug 23 Turn furnace gas valve switch to ...

Page 20: ...NE USA CANADA APPLIANCE O o DERATE DERATE MODELS PER FOR 100O FT 2000 4500 FT 59TN6A 2 5 986TA FUEL USED NATURAL GAS NATURAL GAS PRESSURE IN W C PO C E P PA Max Inlet Gas Pressure Press Max D Admission De Gaz 13 6 Min Inlet Gas Pressure Press Min D Admission De Gaz 4 5 1 121 For Purpose of nput Adjustment Pour L Adjustment D Entree ALTITUDE High Heat 3 2 3 8 Manifold 0 2 000 ft 797 946 Pressure 0 ...

Page 21: ...ion ou la production de monoxyde de carbone pouvant causer des dommages matOriels de blessure ou la mort Le service d entretien qualifiO est responsable de l installation de cette trousse L installation n est pas adOquate ni complOte tant que le bon fonctionnement de l appereil converti n a pas OtO vOrfiO selon les instructions du fabricant fornies avec la trousse FIRE EXPLOSION ELECTRICAL SHOCK H...

Page 22: ...r correct input at installed altitude by using Table 7 or 8 NOTE All models in all positions except Low NOx models in downflow and horizontal positions use Table 7 22 000 Btuh per burner Low NOx models in downflow or horizontal positions must use Table 8 21 000 Btuh per burner See input listed on rating plate 1 Obtain yearly heat value average at installed altitude for local gas supply 2 Obtain ye...

Page 23: ...5 1 5 42 3 5 1 5 42 3 7 1 6 42 3 4 1 5 42 3 5 1 5 42 3 2 1 4 42 3 3 1 4 43 3 7 1 6 43 3 8 1 7 43 3 5 1 5 43 3 6 1 6 43 3 4 1 5 43 3 5 1 5 43 3 2 1 4 43 3 3 1 4 44 3 5 1 5 43 3 2 1 4 SPECIFIC GRAVITY OF NATURAL GAS 0 80 0 82 Manifold Orifice Manifold Orifice Pressure Orifice Pressure No High Low No High Low No 42 3 5 1 5 42 3 6 1 6 42 42 3 3 1 4 42 3 4 1 5 42 43 3 8 1 6 42 3 2 1 4 42 43 3 6 1 6 43 ...

Page 24: ...7 3 6 1 6 47 3 8 1 6 47 3 4 1 5 47 3 5 1 5 48 3 7 1 6 48 3 8 1 6 SPECIFIC GRAVITY OF 0 80 Manifold Orifice Pressure No High Low 0 58 Manifold Orifice Pressure No High Low 44 3 3 1 5 44 3 5 1 5 45 3 7 1 6 44 3 2 1 4 46 3 6 1 6 46 3 8 1 6 47 3 8 1 7 46 3 5 1 5 47 3 6 1 6 47 3 7 1 6 48 3 8 1 7 47 3 5 1 5 48 3 6 1 5 48 3 7 1 6 45 3 7 1 6 45 3 8 1 7 46 3 6 1 6 46 3 7 1 6 47 3 8 1 6 46 3 4 1 5 47 3 5 1 ...

Page 25: ...ifice Pressure Orifice Pressure Pressure Pressure No High Low No High Low No High Low No High Low 43 3 8 1 8 42 3 2 1 5 42 3 3 1 6 42 3 4 1 6 43 3 5 1 7 43 3 7 1 7 43 3 8 1 8 42 3 2 1 5 43 3 3 1 6 43 3 5 1 6 43 3 6 1 7 43 3 7 1 8 43 3 2 1 5 43 3 3 1 6 43 3 4 1 6 43 3 5 1 7 44 3 4 1 6 44 3 5 1 7 43 3 2 1 5 43 3 3 1 6 44 3 2 1 5 44 3 3 1 6 44 3 5 1 6 44 3 6 1 7 45 3 7 1 8 45 3 8 1 8 44 3 3 1 6 44 3 ...

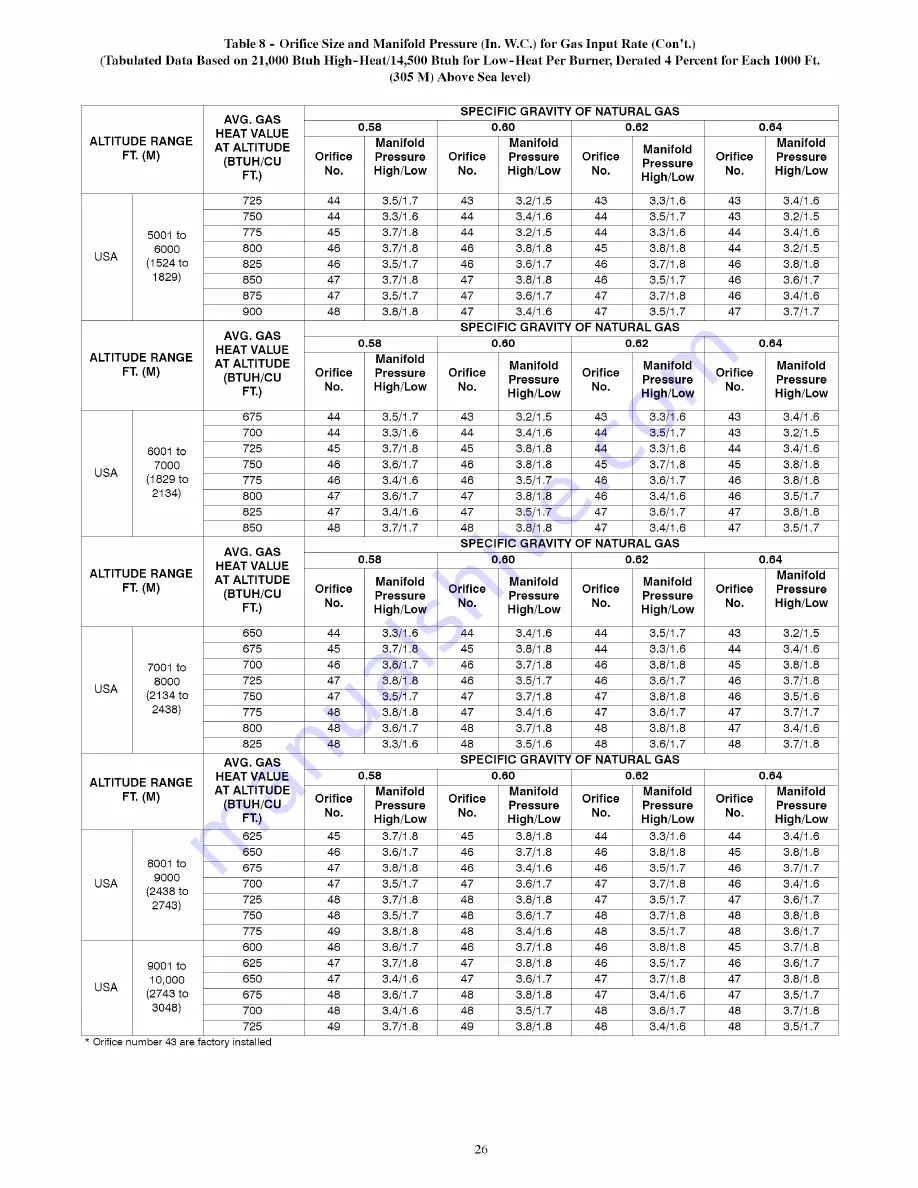
Page 26: ... 1 8 46 3 6 1 7 46 3 7 1 8 47 3 8 1 8 46 3 5 1 7 47 6 5 1 7 47 6 7 1 8 48 3 8 1 8 47 3 4 1 6 48 3 6 1 7 48 3 7 1 8 48 3 3 1 6 48 3 5 1 6 SPECIFIC GRAVITY OF 0 58 0 80 Manifold Manifold Orifice Orifice Pressure Pressure No No High Low High Low 45 6 7 1 8 45 6 8 1 8 46 3 6 1 7 46 3 7 1 8 47 3 8 1 8 46 3 4 1 6 47 3 5 1 7 47 3 6 1 7 48 3 7 1 8 48 3 8 1 8 48 3 5 1 7 48 3 6 1 7 49 3 8 1 8 48 3 4 1 6 46 ...

Page 27: ...ides of burner box and slide burner back in place 4 Reattach HSI wires to HSI 5 Verify igniter to burner alignment 6 For Silicon Nitride igniters see Fig 36 and 37 7 For Silicon Carbide igniters see Fig 38 8 Re attach Flame Sensor wire to Flame Sensor f 1 7 8 O 47 imm A05026 Fig 37 Igniter Position Top View _ _11 32 8 7 mm f CELL PANEL _HOT SURFACE IGNITER ASSEMBLY IGNITER 7 8 22 2 mm BURNER IGNIT...

Page 28: ...stage adjusting screw clockwise inwards 12 turns This will increase the manifold pressure closer to the high heat set point 9 DO NOT install regulator seal caps at this time For E valves see Fig 40 1 Be sure gas and electrical supplies to furnace are off 2 Remove caps that conceal adjustment screws for high and low heat stage gas valve regulators See Fig 40 3 Turn low heat stage adjusting screw 3 ...

Page 29: ...nifold and check burner positioning in the burner box assembly 3 Attach the green yellow wire and ground terminal to one of the manifold mounting screws 4 Install the remaining manifold mounting screws 5 Connect the wires to both rollout switches 6 Connect the wires to the flame sensor and hot surface ig niter 7 Connect the connector harness to gas valve 8 Rewire unit low pressure switch LPS as fo...

Page 30: ...e OFF position and install a lockout tag There may be more than one disconnect switch Lock out and tag switch with a suitaMe warning label Verify proper operation after servicing 1 2 3 4 5 6 7 GAS Be sure main gas and electric supplies to furnace are off Remove l 8 in NPT pipe plug from manifold pressure tap on downstream side of gas valve Attach manometer to manifold pressure tap on gas valve Tur...

Page 31: ...e gas valve switch to ON position 24 Turn on furnace power supply 25 Set room thermostat to call for heat 26 Check pressure tap plug for gas leaks when main burners ignite 27 Check for correct burner flame 28 After making the required manifold pressure adjustments check and adjust the furnace temperature rise per the fur nace installation instructions LABEL APPLICATION 1 Fill in Conversion Respons...

Page 32: ...P KGAPN2201ALL KGAPN330tALL KGAPN3901ALL FUEL USED NATURAL GAS USA CANADA APPLIANCE DERATE DERATE MODELS PER FOR 1000 FT 2000 4500 F_ 58OVA 580VX 4 10 315AAV 315JAV NATURAL GAS PRESSURE iN W C PO C E P PA Max Inlet Gas Pressure Press Max D Admission De Gaz 13 6 Min Inlet Gas Pressure Press Min D Admission De Gaz 4 5 1 121 For Purpose of input Adjustment Pour L Adjustment D Entree ALTITUDE Manifold...

Reviews: