6
Increasing fan speed increases load on the motor. Do not
exceed maximum speed specified in the Product Data or
motor amperage listed on the unit rating plate.
5. Set the movable flange at the nearest keyway or flat of the
pulley hub and tighten the setscrew to torque of 72 ± 5 in.-lb
(8.14 ± 0.56 Nm).
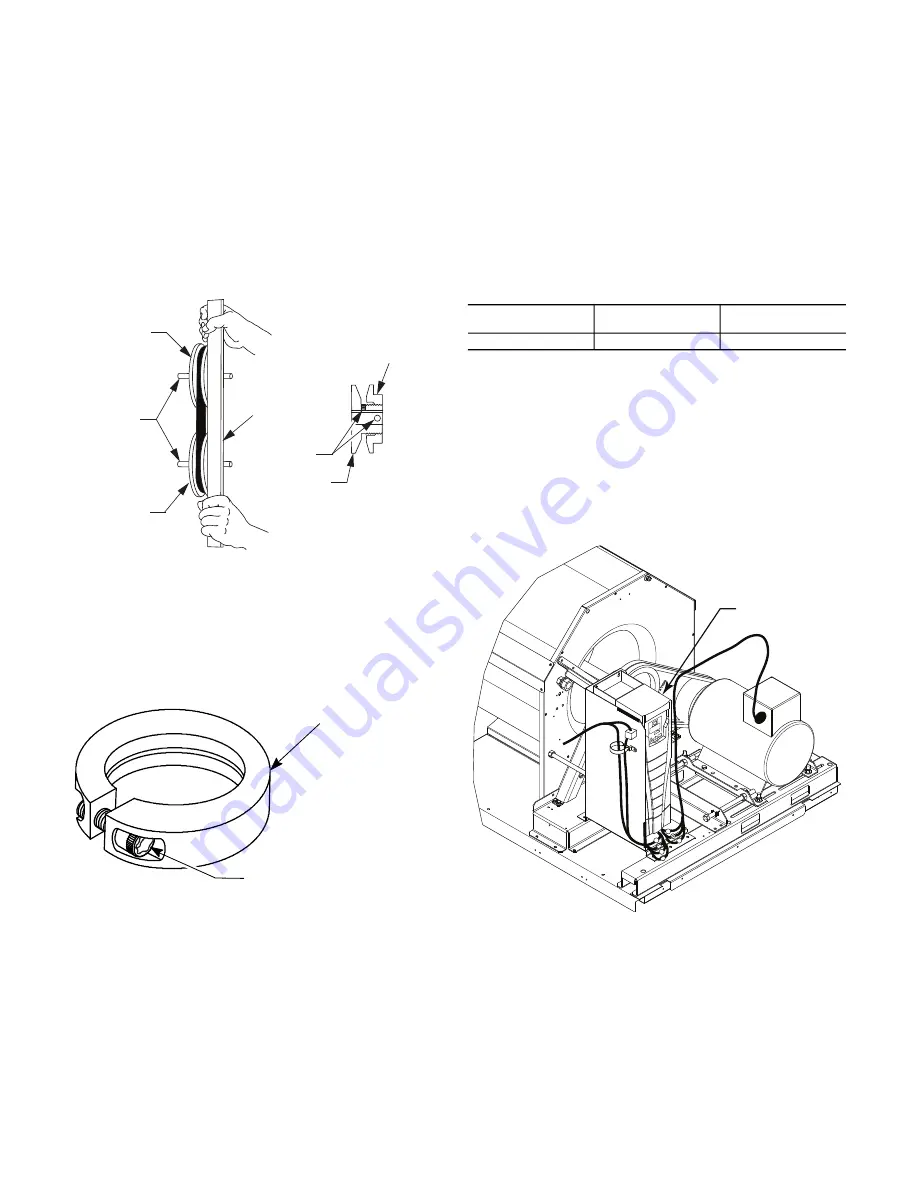
Aligning the Fan and Motor Pulleys
1. Loosen the fan pulley setscrews.
2. Slide the fan pulley along the fan shaft. Make angular align
-
ment by loosening the motor from its mounting. See Fig. 8.
3. Tighten the fan pulley setscrews and motor mounting bolts to
torque specifications.
4. Recheck the belt tension. See Fig. 6.
Fig. 8 —
Supply-Fan Pulley Adjustment
BEARINGS
This fan system uses bearings featuring concentric split locking
collars. The collars are tightened through a cap screw bridging the
split portion of the collar. The cap screw has a Torx T25 socket
head. To tighten the locking collar: Hold the locking collar tightly
against the inner race of the bearing and torque the cap screw to
65 to 70 in-lb. (7.4 to 7.9 Nm). See Fig. 9.
Fig. 9 —
Tightening Locking Collar
STAGED AIR VOLUME (SAV) CONTROL: 2-
SPEED FAN WITH VARIABLE FREQUENCY
DRIVE (VFD)
Staged Air Volume (SAV) Indoor Fan Speed
System
NOTE: The SAV option is not available on units with Humidi-
MiZer adaptive humidification system.
The SAV system utilizes a fan speed control board and Variable
Frequency Drive (VFD) to automatically adjust the indoor fan
motor speed in sequence with the unit’s ventilation, cooling and
heating operation. Conforming to ASHRAE 90.1 2010 Standard
Section 6.4.3.10.b, during the first stage of cooling operation the
SAV system will adjust the fan motor to provide 66% of the de
-
sign airflow rate for the unit. When the call for the second stage of
cooling is required, the SAV system will allow the design airflow
rate for the unit established (100%). During the heating mode, the
SAV system will allow total design airflow rate (100%) operation.
During ventilation mode, the SAV system will operate the fan mo
-
tor at 66% speed.
Identifying Factory Option
This section only applies to units that meet the criteria detailed in
Table 1. See Appendix A for the model number nomenclature
breakdown.
Unit Installation with SAV Option
50TC ROOFTOP
Refer to the base unit installation instructions for standard required
operating and service clearances.
NOTE: The Remote VFD Keypad is a field-installed option. It is
not included as part of the factory-installed VFD option. See
“Variable Frequency Drive (VFD) Installation, Setup and Trouble
-
shooting Supplement” for wiring schematics and performance
charts and configuration. See Fig. 10 for location of the VFD as
mounted on the various 50TC models.
Fig. 10 —
VFD Location for 50TC 15-27.5 Units
ADDITIONAL VFD INSTALLATION AND
TROUBLESHOOTING
Additional installation, wiring and troubleshooting information
for the VFD can be found in the following manuals: “Variable Fre
-
quency Drive (VFD) Installation, Setup and Troubleshooting Sup
-
plement.”
MOTOR
When replacing the motor, use the following steps. See Fig. 11.
STRAIGHT EDGE
MUST BE PARALLEL
WITH BELT
SETSCREWS
MOTOR AND
FANSHAFTS
MUST BE
PARALLEL
FIXED FLANGE
MOVABLE
FLANGE
SINGLE - GROOVE
FAN PULLEY
MOTOR PULLEY
T --- 25 TORX SOCKET
HEAD CAP SCREW
LOCKING COLLAR
Table 1 —
Model-Size / VFD Option Indicator
UNIT
POSITION
IN MODEL NUMBER
VDP FIOP
INDICATOR
50TC 17-30
17
G, J
VARIABLE
FREQUENCY
DRIVE (VFD)
Summary of Contents for WeatherMaker 50TC 17-30 Series
Page 34: ...34 Fig 48 RTU Open Overlay for Economizer Wiring ...
Page 35: ...35 Fig 49 VFD Overlay for W2770 Controller Wiring ...
Page 80: ...80 Fig C 50TC 17 28 Control Wiring Diagram APPENDIX D WIRING DIAGRAMS ...
Page 81: ...81 Fig D 50TC 30 Control Wiring Diagram 208 230 3 60 Units APPENDIX D WIRING DIAGRAMS ...
Page 82: ...82 Fig E 50TC 30 Control Wiring Diagram 460 3 60 575 3 60 Units APPENDIX D WIRING DIAGRAMS ...
Page 83: ...83 Fig F 50TC 17 30 Power Wiring Diagram 208 230 3 60 Units APPENDIX D WIRING DIAGRAMS ...
Page 84: ...84 Fig G 50TC 17 30 Power Wiring Diagram 460 3 60 575 3 60 Units APPENDIX D WIRING DIAGRAMS ...
Page 89: ...89 Fig L 50TC PremierLink System Wiring Diagram APPENDIX D WIRING DIAGRAMS ...
Page 90: ...90 Fig M 50TC RTU Open Wiring Diagram APPENDIX D WIRING DIAGRAMS ...
Page 91: ...91 Fig N 50TC SAV VFD System Wiring Diagram APPENDIX D WIRING DIAGRAMS ...
Page 93: ......


