background image

2

GB

CARSON Mini Bull Mini Devil 407022

Dear Customer

We congratulate you for buying the CARSON RC model car, 
which is designed using state of the art technology. 

According to our policy of steady development and improve-
ment of our products we reserve the right to make changes in 
specifications concerning equipment, material and design of 
this product at any time without notice.   

Specifications or designs of the actual product may vary from 
those shown in this manual or on the box.  

The manual forms part of this product. Should you ignore the 
operating and safety instructions, the warranty will be void. 
Keep this guide for future reference.

Limited Warranty

This product is warranted by CARSON against manufacturing 
defects in material and workmanship under normal use for 24 
months from the date of purchase from authorized franchisees 
and dealers.

In the event of a product defect during the warranty period, 
take the product and the CARSON sales receipt as proof of 
purchase date to any CARSON store. CARSON will, at its 
option, unless otherwise provided by law:

•  correct the defect by product repair without charge for parts 

and labor;

•  replace the product with one of the same or similar design; 

or

•  refund the purchase price.

All replaced parts and products, and products on which a 
refund is made, become the property of CARSON. New or 
reconditioned parts and products may be used in the 
performance of warranty service. Repaired or replaced parts 
and products are warranted for the remainder of the original 
warranty period. You will be charged for repair or replacement 
of the product made after the expiration of the warranty period.

This warranty does not cover:

•  damage or failure caused by or attributable to acts of God, 

abuse, accident, misuse, improper or abnormal usage, 
failure to follow instructions, improper installation or 
maintenance, alteration, lightning or other incidence of 
excess voltage or current;

•  any repairs other than those provided by a CARSON 

Authorized Service Facility;

•  consumables such as fuses or batteries;

• cosmetic 

damage;

•   transportation, shipping or insurance costs; or

•  costs of product removal, installation, set-up service 

adjustment or reinstallation. 

This warranty gives you specific legal rights, and you may also 
have other rights which vary from state to state.

Hereby, Dickie-Tamiya GmbH & Co. declares that this device 
is in compliance with the essential requirements and other 
relevant provisions of Directive 1999/5/EC.

Dickie-Tamiya GmbH&Co. KG • Werkstraße l • D-90765 Fürth • 
Germany
Tel.: +49/(0)911/9765-03

The meaning of the symbol on the product, packaging 
or instructions:
Electronic devices are valuable products and should 
not be disposed of with the household waste when 
they reach the end of their running time! Help us to 

protect the environment and respect our resources by handing 
this appliance over at the relevant recycling points.

A rechargeable battery is contained in the scope of 
supply. This Akku can be recycled. Defective / no 
longer rechargeable Akkus have to be supplied to the 
special refuse (collecting points). A disposal over the 
domestic refuse is forbidden! 

We wish you good luck and a lot of fun driving with your 
CARSON model car

Before driving your new model carefully read these instructions!

Summary of Contents for 407021

Page 1: ... Instruction Manual Page 2 11 Betriebsanleitung Seite 12 21 Mode d emploie Page 22 31 Instrucciones Página 32 41 CARSON Mini Bull 407021 Mini Devil 407022 ...

Page 2: ...anty period You will be charged for repair or replacement of the product made after the expiration of the warranty period This warranty does not cover damage or failure caused by or attributable to acts of God abuse accident misuse improper or abnormal usage failure to follow instructions improper installation or maintenance alteration lightning or other incidence of excess voltage or current any ...

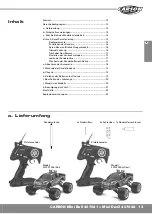
Page 3: ...ng trim 6 Throttle trim 7 Steering rate adjuster ST D R 7 Charging Jack 7 e To take off the body 8 f How to change frequencies 8 g Chassis 9 h Installing batteries in the chassis 9 i Turn the power switch on 10 j How to control your model 10 k When You Finish Driving 11 Spare parts 42 Exploded drawings 43 a Included items Sender antenna 4x Wheel nuts 4x Screws 1x Wheel nut spanner Transmitter Tran...

Page 4: ...ce must be able to deal with all received interferences even with interferences which result in undesired effects Note These devices have been tested and comply with CE regulations These limits have been determined to ensure adequate protection against dangerous interferences in residential areas If problems arise with your car or transmitter please contact your local specialist dealer and ask for...

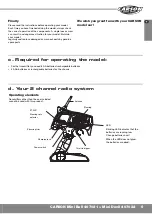
Page 5: ...product c Required for operating the model Finally Please read the instructions before operating your model Each time you have finished driving the model always check the correct operation of the components A single loose screw can result in a dangerous situation for your model Maintain your model regularly and replace damaged or worn out parts by genuine spare parts We wish you great fun with you...

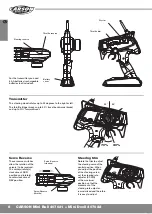
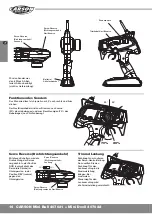
Page 6: ... forward travel 35 35 70 30 Servo Reverse steering Servo Reverse throttle Steering trim Rotate the trim to adjust the steering servo at the neutral position When you adjust the position of the steering servo set the steering rate adjuster ST D R at the maximum position so that the movement of the steering rate adjuster is maximized and therefore it is easy to adjust Servo Reverse These reverse swi...

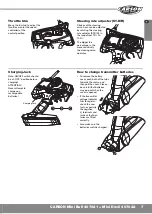
Page 7: ...ing servo operates Charging Jack Note ON OFF switch should be at OFF position before charging ATTENTION Never attempt to charge non rechargeable batteries Charging jack How to change transmitter batteries To remove the battery cover push both of the tabs towards the centre and then pull the cover Please be careful that batteries may pop out when the cover is opened If the transmitter voltage indic...

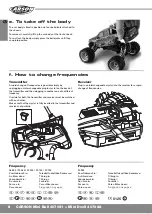
Page 8: ...ge of frequencies Crystal Frequency 26 995 27 045 27 095 27 145 27 195 Zum Gebrauch in Tarkoitettu käyttöön Soumessa A utiliser dans Til brug in Voor gebruik in Til brug i Da usare in For bruk i For use in Para utilização em Para uso en Για χρηση στις χωρες Frequency 27 255 Zum Gebrauch in Tarkoitettu käyttöön Soumessa A utiliser dans Til brug in Voor gebruik in Til brug i Da usare in For bruk i F...

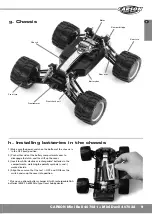
Page 9: ... the battery compartment cover to disengage the latch and then lift up the cover 3 Insert four AAA alkaline or rechargeable batteries in the compartments matching the polarity symbols and marked inside 4 Align the cover so that the text OFF and ON faces the switch and snap the cover into position Pick up an optional battery charger kit with rechargeable AAA batteries 54052 609005 at your local hob...

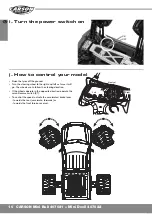
Page 10: ... and left as far as it will go The wheels are to follow the steering direction If the wheels operate in the opposite direction operate the servo Reverse switch ST To control the speed actuate the accelerator brake lever towards the rear accelerate forwards or towards the front brake reverse Left Right Neutral ON OFF i Turn the power switch on ...

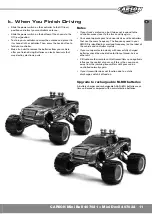
Page 11: ...k and try again You cannot operate your truck near devices with controllers that use the same frequency The frequency used in your XMODS is identified by color and frequency on the label of the vehicle and controller crystals If your car operates too slowly with new or fully charged batteries check the wheel drive for fibres thread hair or other dirt CB radio or other remote control transmitters c...

Page 12: ...rsprünglichen Garantiefrist Nach Ablauf der Garantiefrist vorgenommene Reparaturen oder gelieferte Ersatzteile werden in Rechnung gestellt Diese Garantie erstreckt sich nicht auf Beschädigung oder Ausfall durch höhere Gewalt Missbrauch Unfall fehlerhafte oder außergewöhnliche Beanspruchung Nichtbefolgen der Anleitung unrichtigen Zusammenbau oder Handhabung eigenmächtige Verände rungen Blitzschlag ...

Page 13: ...imhebel Gas Bremse 17 Einstellen des Lenkausschlages 17 Laden der Senderakkus 17 Wechseln der Senderbatterien Akkus 17 e Abnehmen der Karosserie 18 f Wechseln der Sendefrequenz 18 g Chassis 19 h Einlegen der Batterien ins Chassis 19 i Einschalten des Fahrzeugs 20 j Steuern des Modells 20 k Beendigung der Fahrt 21 Ersatzteile 42 Explosionszeichnungen 43 a Lieferumfang Senderantenne 4x Radmuttern 4x...

Page 14: ...f keine schädliche Interferenzen erzeugen und 2 muss dieses Gerät mit allen empfangenen Interferenzen umgehen können auch mit solchen die zu unerwünschten Reaktionen führen können Hinweis Diese Geräte wurden getestet und entsprechen den CE Richt linien Diese Grenzen wurden so gefasst dass ein angemes sener Schutz gegen schädliche Interferenz in einer Wohnanlage gewährleistet ist Falls Sie Probleme...

Page 15: ...teile gegen Original Ersatzteile aus Wir wünschen Ihnen viel Spaß mit Ihrem CARSON Modellauto und jederzeit gute Fahrt 8 AA Mignon Batterien oder Akkus für Sender 4 AAA Mikro Batterien oder Akkus für Chassis Lenkung Trimrad Lenkung LED Eine blinkende LED zeigt an dass die Batterien Akkus nicht mehr genug Spannung haben Tauschen Sie die Batte rien Akkus jetzt aus Leuchtet die LED bei einge schaltet...

Page 16: ...ebelweges und zum Beschleunigen 70 des Hebelweges nach hinten bewegt 35 35 70 30 Servo Reverse Richtungsumkehr Lenkung Servo Reverse Richtungsumkehr Gas Bremse Trimrad Lenkung Drehknopf zum Justieren der Servo Neutralstellung Dazu sollten Sie den Drehknopf für den Lenkausschlag in die Maximalstellung bringen Bei maximalem Steuerweg für den Lenkausschlag wird die Feineinstellung vereinfacht Servo R...

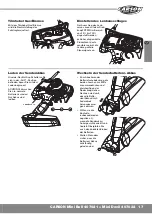
Page 17: ...e sich in der AUS Position befinden bevor Sie mit dem Laden beginnen ACHTUNG Versuchen Sie nie normale Batterien zu laden Nur Akkus sind ladbar Ladebuchse Wechseln der Senderbatterien Akkus Zum Abnehmen der Batteriefachabdeckung die beiden Laschen zur Mitte zusammendrücken und gleichzeitig an der Abdeckung ziehen Rechnen sie damit dass die Batte rien Akkus durch Federdruck herausgesprun gen kommen...

Page 18: ...Tarkoitettu käyttöön Soumessa A utiliser dans Til brug in Voor gebruik in Til brug i Da usare in For bruk i For use in Para utilização em Para uso en Για χρηση στις χωρες Frequenz 27 255 Zum Gebrauch in Tarkoitettu käyttöön Soumessa A utiliser dans Til brug in Voor gebruik in Til brug i Da usare in For bruk i For use in Para utilização em Para uso en Για χρηση στις χωρες 0125 FIN T FIN e Abnehmen ...

Page 19: ...kels um die Laschen zu lösen und heben Sie dann den Deckel ab 3 Legen Sie je zwei AAA Alkaline Batterien oder aufladbare Akkus links und rechts entsprechend den innen befindlichen Polaritäts Symbolen und in die Batteriefächer 4 Richten Sie den Deckel so aus dass der Text OFF und ON zum Schalter zeigt und lassen Sie den Deckel wieder an seinem Platz einschnappen In Ihrem Modellbaugeschäft ist ein L...

Page 20: ... Anschlag nach rechts und links Die Räder sollen dem Lenkausschlag folgen Schlagen die Räder entgegengesetzt ein betätigen sie den Servo Reverse Schalter ST in Position REV Zum Regeln der Fahrgeschwindigkeit betätigen Sie den Gas Bremshebel nach hinten Vorwärtsfahrt Gas geben bzw nach vorne Bremsen Rückwärtsfahrt Links Rechts Neutral ON OFF i Einschalten des Fahrzeugs ...

Page 21: ...rzeug wie Ihres besitzt können Sie durch Aus tausch der Quarze in Auto und Sender die Frequenz ändern Falls Ihr Auto mit neuen oder frisch aufgeladenen Batterien langsam fährt überprüfen Sie den Radantrieb auf Fasern Fäden Haare oder sonstige Verschmutzung CB Funk oder andere Fernsteuersender könnten einen Stör einfluss auf die Steuerbarkeit Ihres Autos ausüben Ist dies der Fall stellen Sie einen ...

Page 22: ...ifiques vous pouvez par ailleurs également prétendre à d autres droits en fonction du pays d acquisition Par la présente Dickie Tamiya GmbH Co déclare que cet appareil est conforme aux exigences essentielles et aux autres dispositions pertinentes de la directive1999 5 CE Lire attentivement ces instructions avant d utiliser ce nouveau modèle réduit Cher client Toutes nos félicitations pour l acquis...

Page 23: ...dells erforderlich 25 d Votre ensemble de radiocommande à 2 canaux 25 Eléments de commande 25 Émetteur 26 Inversion des servos 26 Réglage de la direction 26 Réglage des gaz 27 Réglage de la sensibilité de la direction ST D R 27 Prise de chargement 27 Remplacement des batteries de l émetteur 27 e Démontage de la carrosserie 28 f Changer les fréquences 28 g Châssis 29 h Installation des piles dans l...

Page 24: ...t 2 L appareil doit pouvoir surmonter toutes les interférences incidentes même en cas de réactions non désirées Indication Ces éléments ont été testé et sont conforme aux normes CE Ces limites ont été définies pour établir une protection adaptée contre les interférences nuisibles dans les bâtiments Tout problème constaté sur l auto ou l émetteur entraînera une visite au revendeur spécialisé local ...

Page 25: ... origine Nous vous souhaitons beaucoup de plaisir avec votre modèle réduit CARSON 8 piles ou batteries AA Mignon pour l émetteur 4 piles ou batteries AAA Mikro pour le châssis Direction Réglage de la direction LED Une LED clignotante indique que les batteries sont déchargées Changer les batteries sans tarder Si la LED s éteint les batteries sont irrécupérables Antenne Commande des gaz Prise de cha...

Page 26: ...ion de servo direction Inversion de servo gaz Réglage de la direction Tourner les palonniers pour ajuster le servo de direction en position neutre Pour cet ajustement mettre le réglage de la sensibilité de la direction ST D R au maximum de sorte que les mouvements de la direction soient maximaux et que la direction soit plus facile à ajuster Inversion des servos Ces commutateurs d inversion permet...

Page 27: ...e Prise de chargement Remarque Mettre l interrupteur ON OFF en position OFF avant de charger ATTENTION Ne jamais tenter de recharger des piles seules les batteries sont rechargeables Prise de chargement Remplacement des batteries de l émetteur Pour retirer le cache des batteries appuyer les deux languettes vers le centre puis tirer sur le cache Attention les batteries peuvent facile ment s échappe...

Page 28: ...s 26 995 27 045 27 095 27 145 27 195 Zum Gebrauch in Tarkoitettu käyttöön Soumessa A utiliser dans Til brug in Voor gebruik in Til brug i Da usare in For bruk i For use in Para utilização em Para uso en Για χρηση στις χωρες Fréquences 27 255 Zum Gebrauch in Tarkoitettu käyttöön Soumessa A utiliser dans Til brug in Voor gebruik in Til brug i Da usare in For bruk i For use in Para utilização em Para...

Page 29: ...à piles afin de désengager la fermeture ensuite soulevez le couvercle 3 Insérez deux piles alcalines AAA ou des piles rechargeab les dans les compartiments gauche et droit Respectez les polarités et qui sont indiquées 4 Positionner le couvercle de telle manière que le texte OFF et ON indique l interrupteur et laisser le couvercle se refermer à sa place Tel que le kit de chargeur de batteries optio...

Page 30: ...en butée Les roues doivent suivre le sens de rotation du volant Si les roues tournent dans l autre sens actionner le commutateur d inversion ST Actionner le levier des gaz pour réguler la vitesse de conduite vers l arrière marche avant accélérer etc vers l avant freiner marche arrière ON OFF i Mise en marche du véhicule Gauche Droite Au centre ...

Page 31: ...uvez pas utiliser le camion à proximité d émetteurs qui utilisent la même fréquence Si la voiture roule lentement avec des batteries neuves ou rechargées vérifier l entraînement et rechercher des fibres des fils des cheveux ou d autres encrassements Les émetteurs CB et les émetteurs de télécommande peuvent exercer une influence nuisible sur la commande de votre auto Dans ce cas prévoir une plus gr...

Page 32: ...contrario CARSON a su opción corregirá el defecto reparando el producto sin cargo alguno por componentes y mano de obra reemplazará el producto por otro igual o de características similares o reembolsará el precio de compra Todos los productos y componentes reemplazados así como los productos cuyo costo es reembolsado pasan a ser propiedad de CARSON Pueden utilizarse componentes y productos nuevos...

Page 33: ...lerador TH TRIM 37 Ajuste de recorrido en dirección ST D R 37 Instalación de la batería 37 Como cambiar las baterías de la emisora 37 e Desmontaje de la carrocería 38 f Cómo cambiar frecuencias 38 g Chasis 39 h Instalación de las pilas en el chasis 39 i Encendido del vehículo 40 j Volante de dirección Controles básicos 40 k Al terminar de jugar con el vehículo 41 Ersatzteile 42 Explosionszeichnung...

Page 34: ...uipo no debe generar interferencias nocivas y 2 el equipo debe poder evitar todas las interferencias recibidas incluso aquellas que puedan conllevar a reac ciones indeseadas Nota Estos sistemas han sido testados y cumplen con las normativas CE Estos límites han sido creados de tal manera que garanticen una adecuada protección ante interferencias nocivas en una vivienda En caso que detecte problema...

Page 35: ... uso todas las piezas importantes así como los conectores deberían ser comprobados Un simple tornillo suelto puede ser suficiente para dejar al modelo en situación peligrosa Verifique el coche periódicamente y cambie las pie zas defectuosas o gastadas por recambio original Le deseamos buena suerte y mucha diversión conduciendo su coche radio controlado CARSON 8 AA pilas o pilas recargables Mignon ...

Page 36: ...AA para la emisora no incluidas Inversion de dirección Inversion de acelerador Trim de dirección ST TRIM Gire el trim para ajustar el servo de dirección en posición neutra Cuando ajuste la posición del servo de dirección posicione el ajuste de recorrido de dirección ST D R en el punto máximo de modo que el movimiento del servo de dirección se maximiza y en consecuencia resulta más fácil de ajustar...

Page 37: ... del servo de dirección Instalación de la batería Nota El interruptor ON OFF debe estar en posición OFF antes de cargar ATENCIÓN Nunca intente recargar las baterías Jack de carga Como cambiar las baterías de la emisora Para quitar la tapa de las baterías empuje ambas lengüetas hacia el centro y tire de la tapa Por favor tenga cuidado pues las baterías podrían salirse con la tapa abierta Si el indi...

Page 38: ...ias 26 995 27 045 27 095 27 145 27 195 Zum Gebrauch in Tarkoitettu käyttöön Soumessa A utiliser dans Til brug in Voor gebruik in Til brug i Da usare in For bruk i For use in Para utilização em Para uso en Για χρηση στις χωρες Frecuencias 27 255 Zum Gebrauch in Tarkoitettu käyttöön Soumessa A utiliser dans Til brug in Voor gebruik in Til brug i Da usare in For bruk i For use in Para utilização em P...

Page 39: ...el compartimiento de las pilas para desenganchar el pestillo y luego levante la tapa 3 Introduzca cuatro pilas AAA alcalinas o recargables en los compartimientos correspondientes de la forma indicada por los signos de polaridad y marcados en el interior 4 Sitúe la cubierta de tal manera que el texto OFF y ON esté en dirección del interruptor y deje que la cubierta vuelva a engancharse en su lugar ...

Page 40: ...dirección a derecha e izquierda a su máxi mo recorrido Las ruedas deberían seguir el giro del volante Si las ruedas giran en sentido contrario utilice el interruptor inversor de servo ST en posición REV Para regular la velocidad presione el gatillo conduciendo hacia delante para ganar velocidad o empújelo frenos marcha atrás Izquierda Derecha Neutro ON OFF i Encendido del vehículo ...

Page 41: ...olador acér quese a la camioneta e intente de nuevo No puede accionarse la camioneta cerca de dispositivos con controladores que usan la misma frecuencia En caso que el coche marche con pilas nuevas o recientemente recargadas compruebe que en la transmisión de ruedas no haya fibras hilachas pelos u otro tipo de suciedad La radiocomunicación CB u otras emisoras teledirigidas podrían ejercer una inf...

Page 42: ... Getriebegehäuse hinten 405061 Battery cover Batterieabdeckung 405046 Rear nuckle right Achsschenkel hinten rechts 405054 Differential gear front rear Differenzial für vorne hinten 405062 Body Minibull Karosserie Minibull 405047 Rear nuckle left Achsschenkel hinten links 405055 Center gear Mitteldifferenzial 405063 Body Minidevil Karosserie Minidevil 405048 4x Universal joint 4x Antriebswellen 405...

Page 43: ...osionszeichnung Schéma d explosion Vista explosionada 405045 405062 405062 405064 405064 405063 405061 405057 405063 405060 405059 405058 405058 405057 405054 405053 405056 405053 405051 405052 405050 405050 405046 405056 Tuning XMODS Light Kit 408028 Beleuchtungssatz Tuning Tipp ...

Page 44: ...0 Uhr Fr 8 00 14 30 Uhr 01805 73 33 00 12 ct min CARSON Model Sport Werkstraße 1 D 90765 Fürth Germany www carson modelsport de CARSON Mini Bull Mini Devil manual Betriebsanleitung CARSON Model Sport Abt Service Mittlere Motsch 9 96515 Sonneberg ...

Reviews: