background image

Page   4   of   10   

QUICK   TIP   


BASIC   SET-­‐UP   


Remove   all   components   from   carton.   Note   any   damage   
with   carrier.   


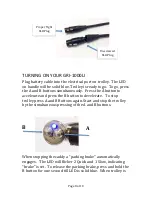
Install   the   two   large   drive   wheels.   The   arrow   design   on   
the   tire   should   face   forward.   Depress   knob   on   inside   
wheel   hub   to   fully   seat   wheel   onto   axle   drive   collars.      The   
metal   prongs   should   fully   insert   into   the   holes   on   the   
drive   collar.             


Trolley   connects   together   with   two   quick   release   buttons.      


Lift   lower   handle.      


Extend   upper   handle   into   desired   position   and   secure   by   
turning   black   locking   knob.         


Load   golf   bag   onto   trolley.      Balance   weight   of   golf   bag   
equally   “side   to   side”.      Secure   golf   bag   with   bungees.      


It   is   important   that   both   top   and   bottom   bag   straps   are   
tight   and   your   bag   is   firmly   secured   in   the   bag   rests.      


After   unpacking   the   trolley   and   while   reading   this   manual,   place   
the   battery   on   charge   while   you   assemble   the   unit.         Plug   battery   
into   charger   and   charger   into   power   source.   The   battery   may   be   
delivered   with   a   charge   but   you   should   verify   a   full   charge   before   

using   the   trolley   for   the   first   time.      

Summary of Contents for GRi-1000Li

Page 1: ...rt was thoroughly quality control checked and road tested before being shipped to your address We do everything possible to assure that your trolley is in perfect working order upon arrival Should you...

Page 2: ...Page 2 of 10 Table of Contents INTRODUCTION 3 BASIC SET UP 4 PRECAUTIONS 5 FREE WHEEL MODE 6 BATTERY MAINTENANCE 6 TURNING ON YOUR GRI 1000LI 8 FOR WARRANTY SPARE PARTS AND ACCESSORIES 10...

Page 3: ...and secure transit Check that all components are included in the package Main Trolley frame Drive wheels Battery complete with battery bag and extension cable Battery charger Accessories User Manual...

Page 4: ...r handle Extend upper handle into desired position and secure by turning black locking knob Load golf bag onto trolley Balance weight of golf bag equally side to side Secure golf bag with bungees It i...

Page 5: ...eight distribution may lead to tracking errors i e too much weight on the right side will cause trolley to veer to the left 3 During play minimize the drain on the battery by avoiding taking the GRi 1...

Page 6: ...s 3 4 hours after a full round of golf Always ensure battery is connected to charger when connecting AND disconnecting charger from power source Your battery charger should not be left plugged into th...

Page 7: ...your next golf game is within 3 weeks your battery is ready to go and there is no need to top off During periods of inactivity i e winter storage re charge your battery overnight every 12 weeks Batter...

Page 8: ...press the B button to decelerate To stop trolley press A and B Buttons again Start and stop the trolley by the simultaneous pressing of the A and B buttons When stopping the caddy a parking brake auto...

Page 9: ...ease the button the GRi 1000Li will move forward for 10 seconds at the currently set speed To move Trolley for 20 seconds When the trolley is stopped with or without the parking brake on press and hol...

Page 10: ...Page 10 of 10 FOR WARRANTY SPARE PARTS AND ACCESSORIES Contact Us 541 633 4308 http www carttek com Cart Tek Golf Carts 150 SE Logsden St Bend OR 97702 email sales carttek com...

Reviews: