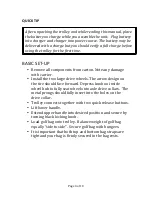
background image

Page   8   of   10   


TURNING   ON   YOUR   GRI-­‐1000LI      

Plug   battery   cable   into   the   electrical   port   on   trolley.      The   LED   
on   handle   will   be   solid   blue.   Trolley   is   ready   to   go.      To   go,   press   
the   A   and   B   buttons   simultaneously.      Press   the   A   button   to   
accelerate   and   press   the   B   button   to   decelerate.         To   stop   
trolley   press   A   and   B   Buttons   again.   Start   and   stop   the   trolley   

by   the   simultaneous   pressing   of   the   A   and   B   buttons.         


When   stopping   the   caddy   a   “parking   brake”   automatically   
engages.         The   LED   will   flicker   2   Quick   and   1   Slow,   indicating   
“brake”   is   set.      To   release   the   parking   brake,   press   and   hold   the   
B   button   for   one   second   till   LED   is   solid   blue.      When   trolley   is   
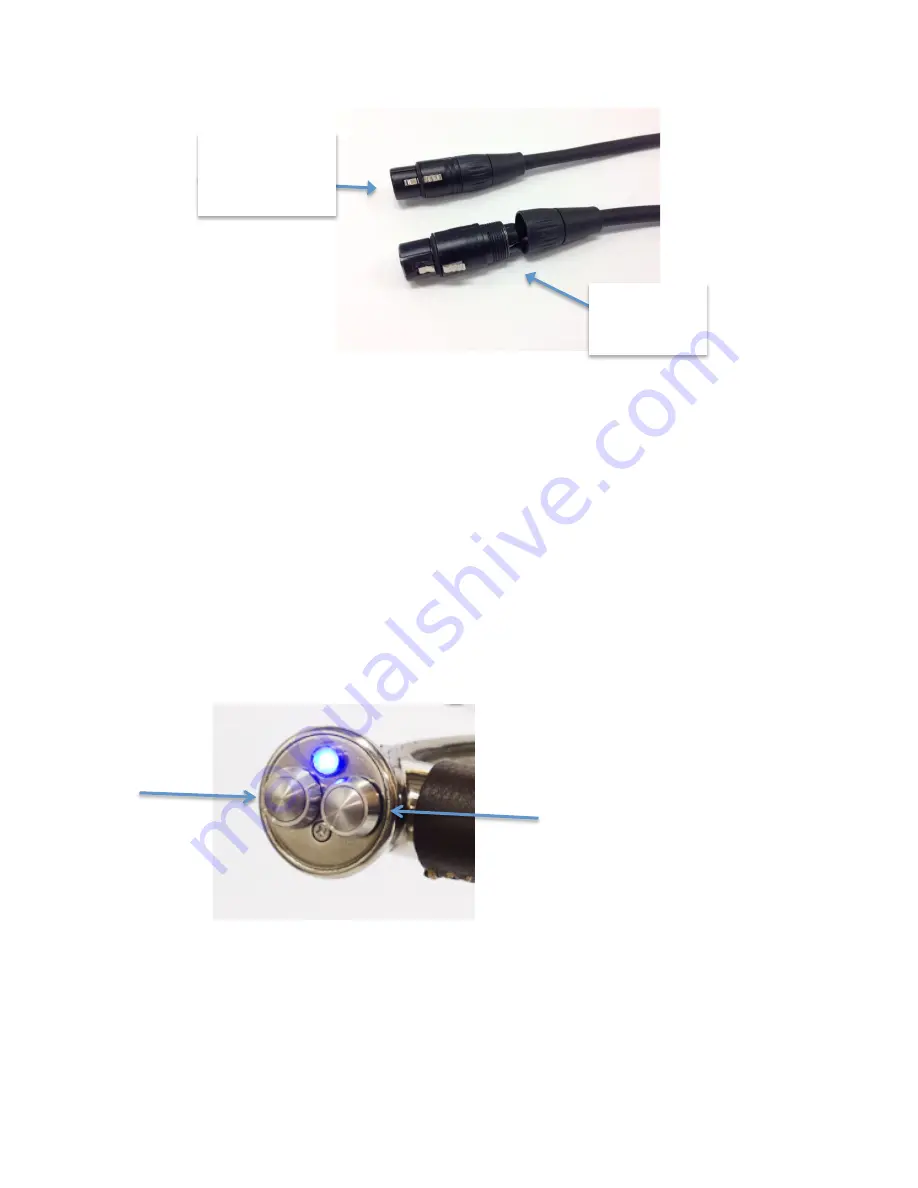
Proper   Tight   

XLR   Plug


Un

-­‐

screwed   

XLR   Plug


A   

B   

Summary of Contents for GRi-1000Li

Page 1: ...rt was thoroughly quality control checked and road tested before being shipped to your address We do everything possible to assure that your trolley is in perfect working order upon arrival Should you...

Page 2: ...Page 2 of 10 Table of Contents INTRODUCTION 3 BASIC SET UP 4 PRECAUTIONS 5 FREE WHEEL MODE 6 BATTERY MAINTENANCE 6 TURNING ON YOUR GRI 1000LI 8 FOR WARRANTY SPARE PARTS AND ACCESSORIES 10...

Page 3: ...and secure transit Check that all components are included in the package Main Trolley frame Drive wheels Battery complete with battery bag and extension cable Battery charger Accessories User Manual...

Page 4: ...r handle Extend upper handle into desired position and secure by turning black locking knob Load golf bag onto trolley Balance weight of golf bag equally side to side Secure golf bag with bungees It i...

Page 5: ...eight distribution may lead to tracking errors i e too much weight on the right side will cause trolley to veer to the left 3 During play minimize the drain on the battery by avoiding taking the GRi 1...

Page 6: ...s 3 4 hours after a full round of golf Always ensure battery is connected to charger when connecting AND disconnecting charger from power source Your battery charger should not be left plugged into th...

Page 7: ...your next golf game is within 3 weeks your battery is ready to go and there is no need to top off During periods of inactivity i e winter storage re charge your battery overnight every 12 weeks Batter...

Page 8: ...press the B button to decelerate To stop trolley press A and B Buttons again Start and stop the trolley by the simultaneous pressing of the A and B buttons When stopping the caddy a parking brake auto...

Page 9: ...ease the button the GRi 1000Li will move forward for 10 seconds at the currently set speed To move Trolley for 20 seconds When the trolley is stopped with or without the parking brake on press and hol...

Page 10: ...Page 10 of 10 FOR WARRANTY SPARE PARTS AND ACCESSORIES Contact Us 541 633 4308 http www carttek com Cart Tek Golf Carts 150 SE Logsden St Bend OR 97702 email sales carttek com...

Reviews: