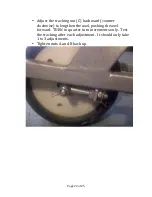
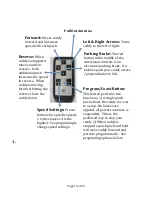
background image

Page   14   of   25   


1.


Forward:   

Moves   caddy   

forward   and   increases   


speed   with   each   push.   


Reverse:   

When   

caddy   is   stopped   it   

moves   caddy   in   

reverse.      Each   

additional   push   

increases   th

e   speed   

in   reverse.      When   

caddy   is   moving   

forward,   hitting   the   

reverse   slows   the   

caddy   down.   


Parking   Brake:   

The   red   

button   in   the   middle   of   the   

directional   controls   is   an   

electronic   parking   brake.      On   

inclines   park   your   caddy   across   

/   perpendicular   to   hi

ll.   


Left   &   Right   Arrows:


Turns   

caddy   to   the   left   or   right.


Program/Coast   Button:   


This   button   performs   two   

functions.   1)   A   single   quick   

push   allows   the   caddy   to   coast   

to   a   stop.      No   brakes   are   

applied,   all   power   to   motors   is   

suspended.         This   is   the   

pre

ferred   way   to   stop   your   

caddy.   2)   When   caddy   is   

stopped   a   quick   push   and   hold   

will   move   caddy   forward   and   

put   into   program   mode.         See   

programing   options   below.      


Speed   Settings:   

Preset   

buttons   for   specific   speeds.   

1   is   the   slowest,   4   is   the   

highest.      See


programing   to   

change   speed   settings.


Pull   Out   Antenna   

Summary of Contents for GRX-1250Li

Page 1: ...rol checked and road tested before being shipped to your address We do everything possible to assure that your caddy is in perfect working order upon arrival Should you have any issues or questions ab...

Page 2: ...RECAUTIONS 6 BATTERY MAINTENANCE 8 CADDY BALANCE FEATURE 9 TURNING ON YOUR GRX 1250 LI 11 MANUAL MODE 13 REMOTE TRANSMITTER 13 REMOTE CONTROL MODE 15 PROGRAMMING YOUR GRX 1250 LI CADDY CART 16 TROUBLE...

Page 3: ...r to ensure safe and secure transit Check that all components are included in the package Main Caddy frame Transmitter Drive wheels Anti tip wheel Battery complete with battery bag and battery cable B...

Page 4: ...andle and secure with lower locking knob Extend handle fully and secure in position by lowering the upper bag rest which is already attached to the handle Securely attach antenna to receiver dome on t...

Page 5: ...ag Insert two AAA batteries into the remote control Turn on the remote control The on off switch is on the backside of the remote control Notice the antenna on the remote It is optional to pull out Pu...

Page 6: ...oo much weight on the right side will cause caddy to veer to the left 3 The front wheel must stay grounded during play The only exception is on steep inclines Your GRX 1250 LI should only tip onto the...

Page 7: ...peed If you need to stop your caddy on the incline turn the caddy perpendicular across the hill and hit the coast button and then the parking brake button 8 Periodically spray the front wheel bearings...

Page 8: ...Orange when plugging in a discharged battery Plug battery into charger and then plug charger into power source Remove charger from power source when not charging the battery Not charging your battery...

Page 9: ...ss on steep inclines of 25 degrees or more where you should use manual control We recommend that you do not use a stand or carry bag as they do not provide enough weight over the front wheel Whenever...

Page 10: ...bag forward Make small adjustments only 4 Tighten the lock nut on the adjustment nut against the lower handle to secure the adjustment bolt in place Tighten the 2 inch locking knob 5 Test cart perform...

Page 11: ...moving battery cable from caddy If the round plug at the end of the cable becomes loose retighten When first connecting the battery to the caddy the green LED on the receiver dome will slowly flash Th...

Page 12: ...Page 12 of 25 Power standby Indicator LED Speed Dial On off button Antenna Receiver Dome on Cart Handle...

Page 13: ...n the receiver dome once Push the coast button on the remote control To resume use in manual mode turn the speed dial back to zero and then turn speed dial clockwise to the desired speed REMOTE TRANSM...

Page 14: ...rk your caddy across perpendicular to hill Left Right Arrows Turns caddy to the left or right Program Coast Button This button performs two functions 1 A single quick push allows the caddy to coast to...

Page 15: ...p the caddy on an incline turn caddy across the hill hit the coast button and then hit the parking brake The range of the transmitter is 50 100 yards depending on environmental conditions The caddy ca...

Page 16: ...ooting page 19 before using electronic tracking adjustment Reset Caddy back to original Factory Settings This is useful if your caddy accidently gets programed or you program it and you do not like th...

Page 17: ...ling at your new desired speed Button is now set to new speed 2 Adjust turning force You can increase or decrease the speed at which the caddy turns Go into Program Mode Press the reverse button to st...

Page 18: ...ogram Mode Press the reverse button to stop the caddy Press 1 3 4 2 then the parking brake button Your caddy should be at factory settings 5 Matching a New Remote Transmitter to your caddy Should you...

Page 19: ...Battery After 3 5 hours the battery charger LED will turn GREEN 3 If problem persists call Cart Tek for Technical Support My caddy will not show a solid green indicator LED on the caddy handle 1 Make...

Page 20: ...tery and wall charger are fully plugged in 3 If problems persist call Cart Tek for Technical Support My caddy will not make 18 holes 1 Verify that your charger is flipping over to green 2 If problem p...

Page 21: ...your caddy tracks without a bag Use this as a guide for testing with the bag If your caddy is going off track more than 3 feet within 20 yards the easiest first thing to do is to check the weight dist...

Page 22: ...king nut C backward counter clockwise to lengthen the axel pushing the axel forward TURN in quarter turn increments only Test the tracking after each adjustment It should only take 1 to 3 adjustments...

Page 23: ...High Temperature and you need to allow the caddy to cool down Rapid Flashing Red indicator LED means High Current Draw This can be caused by too much weight on your caddy or trying to climb too steep...

Page 24: ...ed working what was the situation 2 What color was the LED light on the receiver dome on the caddy In bright sunshine you may have to cup your hands over the done to see the light This is critical inf...

Page 25: ...ge 25 of 25 FOR WARRANTY SPARE PARTS AND ACCESSORIES Contact Us 541 633 4308 or toll free 1 866 356 2278 http www carttek com Cart Tek Golf Carts 150 SE Logsden St Bend OR 97702 email sales carttek co...

Reviews: