9
BATTERY REPLACEMENT
SAFETY EQUIP-
MENT REQUIRED
Gloves and safety glass-
es must be worn when
handling the batteries.
WARNING: RISK OF
PERSONAL INJURY
Batteries are
HEAVY
and weigh 100 lbs
(45kg) each. Use caution when
lifting. Use handles when lifting.
Use proper lifting technique and lift
with a straight back and knees.
Get assistance if needed.
WARNING:
ELECTRICAL SHOCK
HAZARD
Do not alter or change wiring or
Anderson connector configuration.
Do not remove terminal covers,
rings, terminal screws or wires from
battery terminals unless trained.
Remove one battery at a time.
Completely remove the first battery
from the cart and then the second
battery.
CAUTION: MAKE SURE CABINET IS TURNED OFF AND UN-
PLUGGED BEFORE PERFORMING THESE PROCEDURES.
CABINET MUST BE COOL AND ALL FOOD MUST BE RE-
MOVED.
REMOVAL
1) Make sure the casters are in the locked position prior to re-
moving the battery cover.
2) To remove batteries, first, remove the battery cover panel
by lifting up using the inset handle. Pull the handle out and
away from the cart and then down to completely remove the
cover.
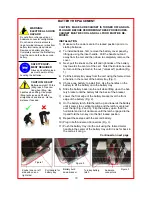
3) Next, pull the knobs (Fig 1) on the left and right sides of the
battery tray towards the center of the cart. Twist the knobs
one quarter turn until they remain in the out (“unlocked”)
position.
4) Pull the battery tray away from the cart using the formed
metal handle in the center of the battery tray (Fig. 1 and 2).
5) Unplug both Anderson Connectors (Fig. 3) before removing
the batteries. Do not pull wires. Pull down on the plastic
housing to disconnect the batteries.
6) Choose one battery to remove first. On the battery latch,
flip the turnkey up so that it is horizontal and turn it counter
clockwise until the latch released from the lip (Fig. 3). Let
the latch fold down and away from the battery.
7) Raise the front edge of the battery hold down bracket (Fig.
2) over the front edge of the battery while sliding the battery
out of the bracket.
8) Before the battery reaches the edge of the battery tray, stop
sliding the battery. Continue sliding the battery out while
holding both handles. Gently lower the battery to the
ground or to a transfer dolly. Make sure ground is level and
the dolly is locked in place.
9) Repeat battery removal steps for the second battery.
Knobs (one on left
side and one on
right side)
Figure 1
Figure 2
Figure 3
Pull handle for
battery tray
Anderson
connectors
Turnkey battery
latch
Battery hold
down bracket
Summary of Contents for GTH12
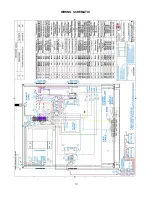
Page 13: ...WIRING SCHEMATIC 13...

