7
WATER PROBE ADJUSTMENT
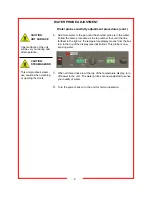
To adjust the water probe sensitivity, follow these steps:
1.
Turn off power to the unit.
2.
Completely empty the water pan and replace.
3.
Push in the humidity adjustment dial. While holding in the dial, turn
power back on. Only the cooling fan in the heater compartment
should turn on. The temperature display (see illustration below).
should show three lines across its bottom and the humidity display
should read ten.
4.
Slide out the water pan and add water ONLY until the longest
probe is in the water. Turn the humidity dial clockwise to increase
the sensitivity of the probe (number will increase) until the line far-
thest to the left on the temperature display moves from the bottom
to the top of the display (see illustration below). This probe is now
sensing the water.
5.
Add more water to the pan until the middle length probe is in the
water. Follow the same procedure as in step number four until the
middle line on the temperature display moves from the bottom to
the top of the display (see illustration below). This probe is now
sensing water.
Water probe sensitivity adjustment procedures
If, after you have filled the water pan, the “Low Water” alarm is activated, the sensitivity of the water
probes may need to be adjusted to detect your quality of water.
Inner surfaces of the unit
will be very hot during and
after operation.
CAUTION:
HOT SURFACE
This unit produces steam,
use caution when cleaning
or opening the doors.
CAUTION:
STEAM HAZARD
hot
LOGIX
hot
LOGIX
hot
LOGIX


