background image

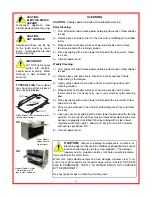
NORMAL OPERATION  

NOTE: 

Timer can be 

cancelled at any time 
during the cycle by 
pressing and holding the 


TIME KEY             for 2 
seconds. Digital readout 
will display currently 
selected timer (e.g “P 1”). 

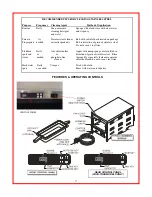
Tempera-
ture 

Typical 

Tempera-
ture 

Module is 
READY


Typical 

Time 

Remaining


Timed Cycle 

Completed


NOTE: 

Program timer 

defaults to “P1” each time 
the unit is turned 

OFF 

then 

back 

ON

NOTE: 

Timer can not be 

started until the cabinet is 
pre-heated.


DIGITAL READOUT 

INCREASE KEY 

DECREASE KEY 

TEMPERATURE KEY 

TIME KEY 

1.  Press the POWER switch, located on the front panel, to ON.  Illuminated 
 

portion of the switch will glow, indicating power is ON. Pre-heat the cabinet 


for 20 minutes. When first turned on, digital readout will display “LO” until the 


cabinet reaches 122

°

F (50

°

C). 

   Cavity temperature setpoint range is between 122

°

F (50

°

C) and 195

°

F (91

°

C). 


After the cabinet reaches 122

°

F (50

°

C), the digital readout will display the 


current temperature, until the temperature reaches the setpoint. Once the 


cabinet reaches the setpoint, the digital readout will display “P 1”. This    


indicates the cabinet is ready to hold product. 

NOTE: 

Press and release 


the TEMP           key to 
view of verify a cavity  
setpoint. Cavity setpoint 
will be displayed briefly. If 
the cavity setpoint needs 
to be changed, refer to 

Programming Instructions 

on page 9. 

2.  Select the desired timer program by pressing the INCREASE / DECREASE 
 

arrow keys. The cabinet has six programmable timers (“P 1”, “P 2”, “P 3”,  


“P 4”, “P 5”, and “P 6”) for each cavity. Different program timers can be used 


for different parts of the day (Breakfast, Lunch, Dinner) or alternate products. 

 NOTE: 

To select other time or temperature programs (“P 2” thru “P 6”), press  


INCREASE KEY            or DECREASE KEY           until the digital readout 


displays the desired program. 

3.  After pre-heat, load cooked product into pan(s) and place pan(s) in cavity.  


Press the TIME KEY          to start the timer. Refer to 

Programming    


 Instructions 

to change the programmed time 

4.  The digital readout will count down, displaying the remaining time. The digital 
 

readout is displayed in hours and minutes until the time remaining is less than 


one minute. Once the time remaining is less than one minute, the digital 


readout counts down in seconds. 

5.  At the end of the timed cycle, the digital readout will flash “000” and an alarm 
 

will sound until the TIME KEY is pressed. 

6.  The digital readout will display the currently selected timer (e.g. “P 1”),    
 

indicating that the cabinet is ready to hold product. 

7.  Remove product pan from cavity. 

8.  At the end of the day, press the POWER switch to OFF. 

POWER SWITCH 

Summary of Contents for MC112S-2T

Page 1: ...yed or the plug damaged DO NOT PLUG INTO THE ELECTRICAL POWER RECEPTACLE IF IT IS ALREADY PLUGGED IN SHUT OFF THE MAIN CIRCUIT BREAKER LOCATED IN THE BREAKER BOX THEN DISCONNECT THE PLUG 5 DISCONNECT...

Page 2: ...intended for use in commercial establishments only c This equipment is not designed for industrial or laboratory use 4 Cleanliness of this appliance and accessories is essential to good sanitation 5...

Page 3: ...on acceptance of this shipment the transportation company assumes full responsibility for its safe delivery IF SHIPMENT ARRIVES DAMAGED 1 VISIBLE LOSS OR DAMAGE Be certain that any visible loss or dam...

Page 4: ...exhaust fans where there are active air movements For safe operation locate the unit a reasonable distance from combustible walls and materials To prevent injury and damage locate the unit at a proper...

Page 5: ...ion to number of zones Ten foot 3 wire rubber cord with 3 prong ground ing plug NEMA 5 15P PERFORMANCE Capable of heating to 195 F 91 C Temperature default is 195 F Preheat to 180 F 82 C in less than...

Page 6: ...rings may be removed for cleaning be sure springs are properly reinstalled Rinse by wiping with a clean towel moistened with clean water Allow to air dry then reinstall in cabinet with springs positio...

Page 7: ...h as directed on package Fingerprints needed or similar products Rub in direction of grain of stainless steel Do not use on vinyl trim Stubborn Daily Any chloride free Apply with damp sponge or cloth...

Page 8: ...int Cavity setpoint will be displayed briefly If the cavity setpoint needs to be changed refer to Programming Instructions on page 9 2 Select the desired timer program by pressing the INCREASE DECREAS...

Page 9: ...pressed setpoint is changed by 1 3 Press TEMP KEY to save changes PROGRAM TIMERS P1 through P6 1 Press and hold TIME KEY until display flashes 2 Press INCREASE KEY or the DECREASE KEY to raise or lowe...

Page 10: ...180 82 30 Yes Nacho Cheese 165 74 240 No Cut Green Beans Mixed Vegetables 160 71 240 No Chops Sliced Meats 160 71 60 Yes Chicken Fried top bottom heat no lids 170 77 30 No Chicken Boneless Breasts 17...

Page 11: ...afe dry level surface for the equipment to be placed upon 4 The end user must provide the proper electrical supply All in wall electrical modifications are to be completed by a licensed electrician Al...

Page 12: ...All parts or components to be repaired or replaced under this warranty are to be shipped prepaid to CARTER HOFFMANN with reimbursement credit for such part or component to be given if found by CARTER...

Reviews: