background image

CARVIN

®

 GOLD SERIES OVAL POOL | USER MANUAL

12

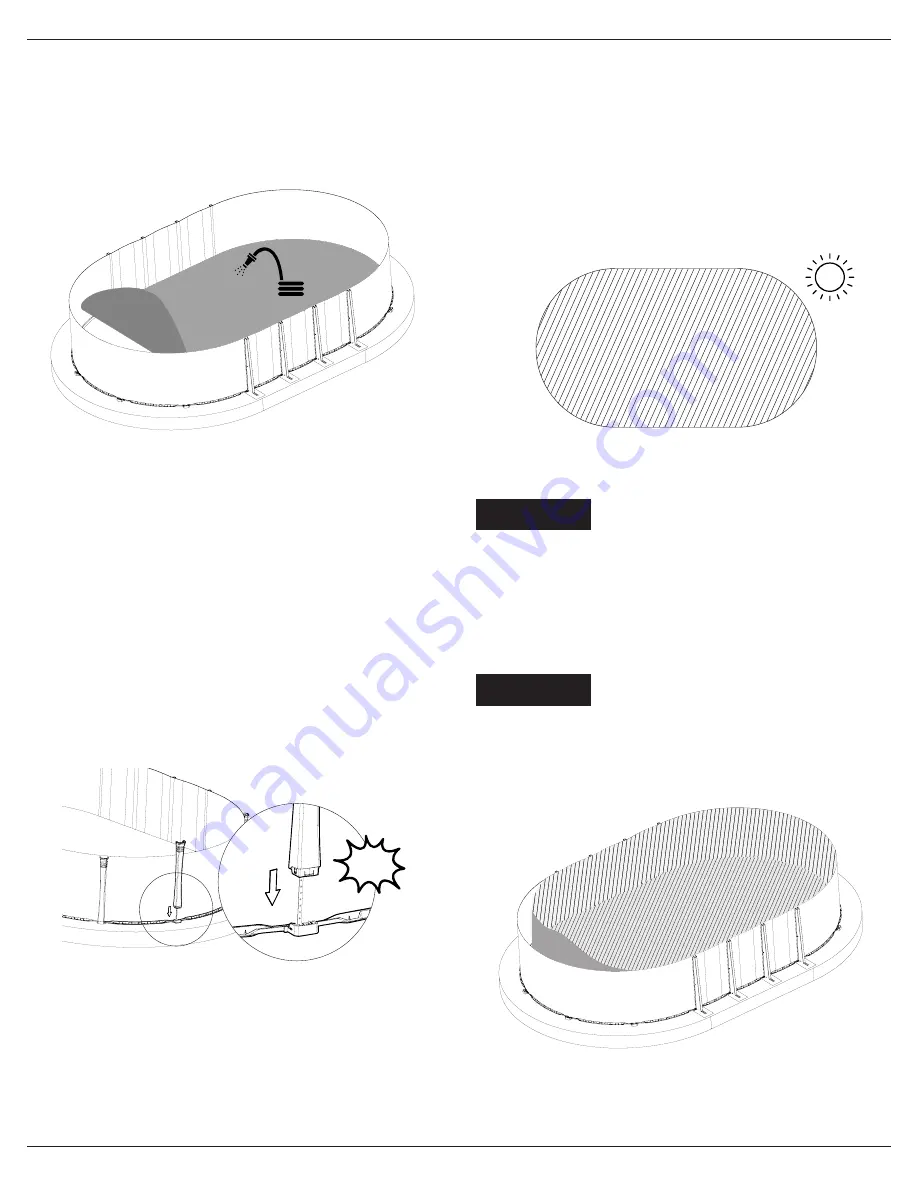
INSTALLING THE GEOTEXTILE LINER

There are already cut to pool size geotextiles liners sold at your pool stores. Those 

are thick and durable. Unpack and Unfold the liner inside the pool. Place it so it is 

equal all around the pool. When done soak with water hose the whole surface of the 

geotextile so it lays down well.

LINER INSTALLATION

The liner dimensions are usually a bit smaller than the pool frame. It is recom-

mended to spread the liner in the sun for an hour before starting the installation so 

that the liner can warm up. It will stretch better under these conditions and facilitate 

the installation. 

We do not recommend installing a vinyl liner below 13 °C (55°F) 

as it will be hard to install and not stretch enough when filled with water

Select a liner that meets APSP-4 liner performance requirements.

Do not attemp to install the liner on a cold day without sun.

Avoid to fill the swimming pool with very cold water.

INSTALLING THE ROUND 

SECTION UPRIGHTS

Before starting the installation of the uprights, check if the bottom plates are 

centered correctly into the rails of each plate. Adjust if necessary. 

STEP 1 

Insert uprights into each bottom plates. Push the upright down until you hear a click. 

STEP 2 

Holes are located on each side of each bottom plate to install screws. The installation 

of these screws is mandatory to make the assembly even more solid against ground 

movements due to freeze/thaw. 

Do not install these screws for now. Wait until the top seats are positioned in 

place to install the screws.

CLIC!

STEP 1

Open the liner box.

STEP 5

Make sure liner is free of wrinkles at the bottom of the pool.

Do not use sharp tools to open the box.

IMPORTANT

STEP 2

Take out and unfold the liner from the box and spread out in the sun so it can warm 

up and stretch.

STEP 3

Inspect the liner, the seams and the complete surface to make sure there are no 

holes.

STEP 4

Spread the liner inside the pool with design pattern up. The seam at the bottom of 

the liner should be placed in the center of the basin. All other seams must form par-

allel straight lines

Remove your shoes to prevent damaging the bottom of 

the liner.

IMPORTANT

Summary of Contents for 973224 Series

Page 1: ...CARVIN POOL EQUIPMENT 4000 boul Casavant Ouest Saint Hyacinthe Qu bec Canada J2S 9E3 M22905003 EN 2021 Le Groupe VIF Inc All rights reserved OVAL GOLD SERIES User Manual for Above Ground Pool...

Page 2: ...CAUTION SUPPORT To obtain support for this Product visit carvinpool com support and refer to Consumer Information section of this manual This Product is compliant with the following safety standard T...

Page 3: ...inexperienced swimmers should always use a life jacket Wait 1 hour before swimming after eating since cramps can occur land lead to risks of drowning No walking or sitting on top ledges since they ha...

Page 4: ...led if all instal lation requirements and guidelines are not respected IMPORTANT WARNING Be aware that the installation diagrams are based on a 15x24 oval pool if you have a different size pool you wi...

Page 5: ...depth STEP 2 Once your removed sod and cleared all debris from your installation site you can start the ground levelling This step is one of the most important the initial ground levelling will determ...

Page 6: ...Patio block 3 10 116 5 0 152 6 10 209 2 5 74 2 7 78 2 2 67 Equal 3 8 cm Deep 15x21 UNPACKING THE POOL PARTS Open all the boxes that were supplied with your pool Layout on the ground all the parts and...

Page 7: ...torque 8 5 N M 6 3 ft lbs P3 PHILLIPS DRIVE P N 14172209 Max torque 6 3 N M 6 3 ft lbs 7 16 11mm HEX SOCKET P N 14455075 Max torque 7 5 N M 5 5 ft lbs 7 16 11mm HEX SOCKET P N 14455085 Max torque 7 5...

Page 8: ...R 12 12x15 3 77 12 4 1 39 4 6 2 57 8 5 3 35 10 12 N A 3 64 12 0 4 58 15 0 1 82 6 0 12x18 4 710 13 5 5 50 18 0 12x21 4 58 15 0 6 64 21 0 12x24 5 19 17 0 7 34 24 0 15 15x21 4 9 16 2 1 40 4 7 2 67 8 9 3...

Page 9: ...n of the screws so that they are hidden behind an upright Be careful not to push any sand on or inside the rails which would make it difficult to insert the wall into it ATTENTION 1 2 13mm HEX SOCKET...

Page 10: ...unch or screwdrivers into holes to keep joint aligned Insert screws and nuts provided for the wall screw heads inside the pool and nuts outside do not tighten them for now Make sure all holes have scr...

Page 11: ...ated cove follow the instruction in the manual provided by the manufacturer STEP 5 Once the layer of sand is even across using sand or soil create a triangular shape ledge along the bottom of the wall...

Page 12: ...D SECTION UPRIGHTS Before starting the installation of the uprights check if the bottom plates are centered correctly into the rails of each plate Adjust if necessary STEP 1 Insert uprights into each...

Page 13: ...top rail Then lower the top plate to press down against the upright STEP 2 Make sure the holes on top plates are aligned with the holes on top of uprights Install the 4 auto tapping screws 14455032 t...

Page 14: ...N M 6 3 ft lbs 7 16 11mm HEX SOCKET P N 14455075 Max torque 7 5 N M 5 5 ft lbs 7 16 11mm HEX SOCKET P N 14455085 Max torque 7 5 N M 5 5 ft lbs P3 PHILLIPS DRIVE P N 14455025 Max torque 4 N M 3 ft lbs...

Page 15: ...r assembly downwards DETAIL D SCALE 1 5 DETAIL D SCALE 1 5 Make sure the round hole is in the screwing zone Screw top ledges with 2 screws 14455025 on each side Use the outermost holes to screw on the...

Page 16: ...of the pool wall with duct tape Make sure the return hole is blocked properly to keep air out The vacuum must be outside the pool ATTENTION ATTENTION ATTENTION ATTENTION STEP 2 Close skimmer opening o...

Page 17: ...s Your pool liner must be inspected regularly for leaks Also inspect your wall for corrosion and scratches If problems are detected action must be taken immedi ately Small leaks or holes in the liner...

Page 18: ...e the pipe is above water level to prevent the pool water from emptying through the hole Fill this pipe with antifreeze until you see antifreeze coming out of the main drain of the pool You will not b...

Page 19: ...f your cover Take off your winter cover from your pool STEP 2 Reposition your filtration system in place and reconnect the hoses to the skimmer and water return STEP 3 Fill the pool with water so that...

Page 20: ...tress post 1 3 14455045 20 2B 316 STNSTL Hex nut Ref McMaster 9489A149 3 4 14455095 STNSTL washer ID0 515 OD0875 THK0 0625 Ref MacMaster 91922A308 10 5 14455035 20 x 3 000 Het head 316 STNSTL screw pa...

Page 21: ...CARVIN GOLD SERIES OVAL POOL USER MANUAL 21 REMPLACEMENT PARTS Use the original CARVIN replacement parts only A B C D 28 29 31 4 27 26 27 7 5 2 8 30 1 3 8 27 6...

Page 22: ...L USER MANUAL 22 REMPLACEMENT PARTS Use the original CARVIN replacement parts only DETAIL G DETAIL I DETAIL J DETAIL STRAIGHT SECTION GOLD SERIES PLASTIC PART ASSEMBLY A B C D 18 27 27 27 15 16 16 25...

Page 23: ...POOL STRAIGHT RAIL 4 8 12 16 8 12 20 20 28 17 OPGU52 OVAL POOL POST COVER GOLD SERIES 4 6 8 10 6 8 12 12 16 18 OPGL OVAL POOL STRAIGHT MARGELLE GOLD SERIES 2 4 6 8 4 6 10 10 14 HARDWARE 19 14455045 1...

Page 24: ...ction please discuss it with the retailer s or distributor s management The Service Manager General Manager or Owner can help Almost all problems are solved in this way If you are dissatisfied with th...

Reviews: