background image

CARVIN

®

 GOLD SERIES OVAL POOL | USER MANUAL

13

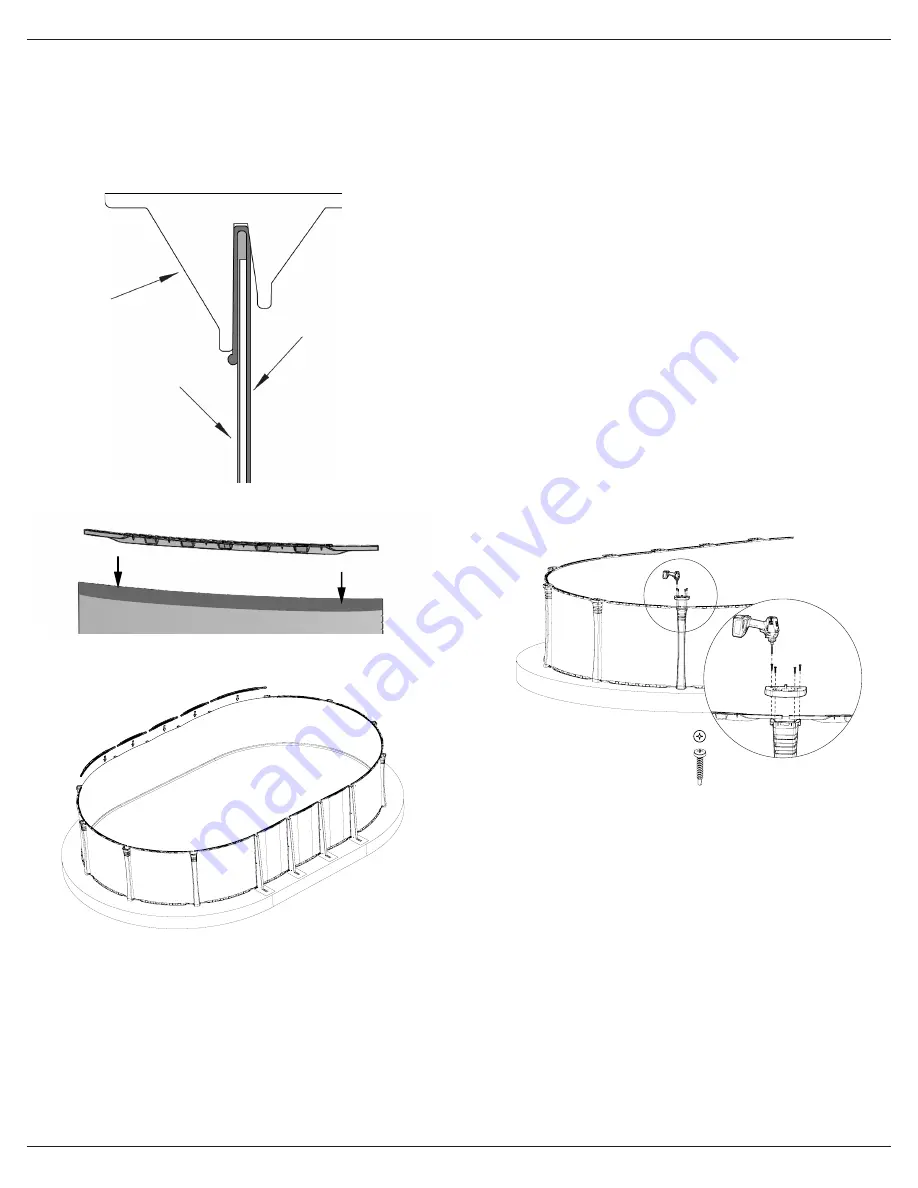
FASTENING THE LINER ON TO THE POOL WALL

FOR ASSEMBLY WITH A U/J TYPE POOL LINER

STEP 1

The top of the liner has a welded vinyl flange to hang the liner. It is called an overlap. 

Open it with your fingers and hang on the top of the wall.

Top rail

Pool wall

Liner

Exterior

Interior

STEP 3

As you install and hang the overlap liner, assemble the top rails to solidify the pool. 

Position these top rails to be aligned with the bottom rails because the uprights will 

have to be installed in top and bottom plates which are the junction between rails.

You might need a rubber mallet to place the upper rails in position and properly lock 

the liner in place.

Do not cut the excess liner on the outside of the wall of the pool. If disassembly 

or reassembly is necessary, a liner that has been cut will be much more 

difficult to position. If the excess liner is too long, simply fold it and fasten it 

with tape.

STRUCTURE ASSEMBLY

INSTALLING THE TOP PLATES - ROUND SECTIONS

STEP 1

Tilt the top plate so that the inside part hooks onto the top rail. Then, lower the top 

plate to press down against the upright. 

STEP 2

Make sure the holes on top plates are aligned with the holes on top of uprights. 

Install the 4 auto tapping screws (14455032) to assemble the top plates on the 

uprights.

STEP 2

Hang the liner on the wall all around the pool. The liner should be free of any wrin-

kles or creases on the vertical portion on the walls. If this is the case, adjust the liner 

by turning the bottom of the liner, or by adjusting the overlap on the wall contour.

flèches

DETAIL C

SCALE 1 : 10

DETAIL D

SCALE 1 : 10

flèches

DETAIL C

SCALE 1 : 10

DETAIL D

SCALE 1 : 10

1/2'' (13mm) HEX SOCKET

P/N 14072620

Max torque 8.5 N*M (6.3 ft-lbs) 

P3 - PHILLIPS DRIVE

P/N 14172209

Max torque 6.3 N*M (6.3 ft-lbs)

7/16''  (11mm) HEX SOCKET

P/N 14455075

Max torque 7.5 N*M (5.5 ft-lbs) 

7/16''  (11mm) HEX SOCKET

P/N 14455085

Max torque 7.5 N*M (5.5 ft-lbs) 

P3 - PHILLIPS DRIVE

P/N 14455025

Max torque 4 N*M (3 ft-lbs)

Drill at low speed

P3 - PHILLIPS DRIVE

P/N 14455032

Max torque 4 N*M (3 ft-lbs)

Drill at low speed

3/4'' (19mm) HEX SOCKET

P/N 94819A149

Max torque 66 N*M (49 ft-lbs)

3/4'' (19mm) HEX SOCKET

P/N 14455035

Max torque 66 N*M (49 ft-lbs)

P/N 91922A308

P3 - PHILLIPS DRIVE

P/N 14433700

Max torque 3 N*M (2 ft-lbs)

Drill at low speed

P/N 14073852

P3 - PHILLIPS DRIVE

P/N 14455032

Max torque 4 N*M (3 ft-lbs)

Screw at low speed

Summary of Contents for 973224 Series

Page 1: ...CARVIN POOL EQUIPMENT 4000 boul Casavant Ouest Saint Hyacinthe Qu bec Canada J2S 9E3 M22905003 EN 2021 Le Groupe VIF Inc All rights reserved OVAL GOLD SERIES User Manual for Above Ground Pool...

Page 2: ...CAUTION SUPPORT To obtain support for this Product visit carvinpool com support and refer to Consumer Information section of this manual This Product is compliant with the following safety standard T...

Page 3: ...inexperienced swimmers should always use a life jacket Wait 1 hour before swimming after eating since cramps can occur land lead to risks of drowning No walking or sitting on top ledges since they ha...

Page 4: ...led if all instal lation requirements and guidelines are not respected IMPORTANT WARNING Be aware that the installation diagrams are based on a 15x24 oval pool if you have a different size pool you wi...

Page 5: ...depth STEP 2 Once your removed sod and cleared all debris from your installation site you can start the ground levelling This step is one of the most important the initial ground levelling will determ...

Page 6: ...Patio block 3 10 116 5 0 152 6 10 209 2 5 74 2 7 78 2 2 67 Equal 3 8 cm Deep 15x21 UNPACKING THE POOL PARTS Open all the boxes that were supplied with your pool Layout on the ground all the parts and...

Page 7: ...torque 8 5 N M 6 3 ft lbs P3 PHILLIPS DRIVE P N 14172209 Max torque 6 3 N M 6 3 ft lbs 7 16 11mm HEX SOCKET P N 14455075 Max torque 7 5 N M 5 5 ft lbs 7 16 11mm HEX SOCKET P N 14455085 Max torque 7 5...

Page 8: ...R 12 12x15 3 77 12 4 1 39 4 6 2 57 8 5 3 35 10 12 N A 3 64 12 0 4 58 15 0 1 82 6 0 12x18 4 710 13 5 5 50 18 0 12x21 4 58 15 0 6 64 21 0 12x24 5 19 17 0 7 34 24 0 15 15x21 4 9 16 2 1 40 4 7 2 67 8 9 3...

Page 9: ...n of the screws so that they are hidden behind an upright Be careful not to push any sand on or inside the rails which would make it difficult to insert the wall into it ATTENTION 1 2 13mm HEX SOCKET...

Page 10: ...unch or screwdrivers into holes to keep joint aligned Insert screws and nuts provided for the wall screw heads inside the pool and nuts outside do not tighten them for now Make sure all holes have scr...

Page 11: ...ated cove follow the instruction in the manual provided by the manufacturer STEP 5 Once the layer of sand is even across using sand or soil create a triangular shape ledge along the bottom of the wall...

Page 12: ...D SECTION UPRIGHTS Before starting the installation of the uprights check if the bottom plates are centered correctly into the rails of each plate Adjust if necessary STEP 1 Insert uprights into each...

Page 13: ...top rail Then lower the top plate to press down against the upright STEP 2 Make sure the holes on top plates are aligned with the holes on top of uprights Install the 4 auto tapping screws 14455032 t...

Page 14: ...N M 6 3 ft lbs 7 16 11mm HEX SOCKET P N 14455075 Max torque 7 5 N M 5 5 ft lbs 7 16 11mm HEX SOCKET P N 14455085 Max torque 7 5 N M 5 5 ft lbs P3 PHILLIPS DRIVE P N 14455025 Max torque 4 N M 3 ft lbs...

Page 15: ...r assembly downwards DETAIL D SCALE 1 5 DETAIL D SCALE 1 5 Make sure the round hole is in the screwing zone Screw top ledges with 2 screws 14455025 on each side Use the outermost holes to screw on the...

Page 16: ...of the pool wall with duct tape Make sure the return hole is blocked properly to keep air out The vacuum must be outside the pool ATTENTION ATTENTION ATTENTION ATTENTION STEP 2 Close skimmer opening o...

Page 17: ...s Your pool liner must be inspected regularly for leaks Also inspect your wall for corrosion and scratches If problems are detected action must be taken immedi ately Small leaks or holes in the liner...

Page 18: ...e the pipe is above water level to prevent the pool water from emptying through the hole Fill this pipe with antifreeze until you see antifreeze coming out of the main drain of the pool You will not b...

Page 19: ...f your cover Take off your winter cover from your pool STEP 2 Reposition your filtration system in place and reconnect the hoses to the skimmer and water return STEP 3 Fill the pool with water so that...

Page 20: ...tress post 1 3 14455045 20 2B 316 STNSTL Hex nut Ref McMaster 9489A149 3 4 14455095 STNSTL washer ID0 515 OD0875 THK0 0625 Ref MacMaster 91922A308 10 5 14455035 20 x 3 000 Het head 316 STNSTL screw pa...

Page 21: ...CARVIN GOLD SERIES OVAL POOL USER MANUAL 21 REMPLACEMENT PARTS Use the original CARVIN replacement parts only A B C D 28 29 31 4 27 26 27 7 5 2 8 30 1 3 8 27 6...

Page 22: ...L USER MANUAL 22 REMPLACEMENT PARTS Use the original CARVIN replacement parts only DETAIL G DETAIL I DETAIL J DETAIL STRAIGHT SECTION GOLD SERIES PLASTIC PART ASSEMBLY A B C D 18 27 27 27 15 16 16 25...

Page 23: ...POOL STRAIGHT RAIL 4 8 12 16 8 12 20 20 28 17 OPGU52 OVAL POOL POST COVER GOLD SERIES 4 6 8 10 6 8 12 12 16 18 OPGL OVAL POOL STRAIGHT MARGELLE GOLD SERIES 2 4 6 8 4 6 10 10 14 HARDWARE 19 14455045 1...

Page 24: ...ction please discuss it with the retailer s or distributor s management The Service Manager General Manager or Owner can help Almost all problems are solved in this way If you are dissatisfied with th...

Reviews: