CARVIN
®
GOLD SERIES OVAL POOL | USER MANUAL
5
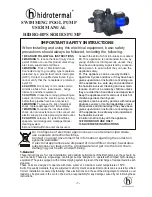
GROUND LEVELING
After the site is properly marked, remove the sod in the installation surface area.
You will need to remove any tree stumps growing in the installation area.
These could cause damage your pool.
STEP 1
The best way to level the ground is to start at the lowest point of the installation
surface. Dig everything down to that point, ensuring that the pool is installed on
hard soil. It is not recommended to add loose soil on top to level since that soil will
compact once the pool is full of water will destabilize the pool level and can cause
damage, which will not be covered by the pool warranty.
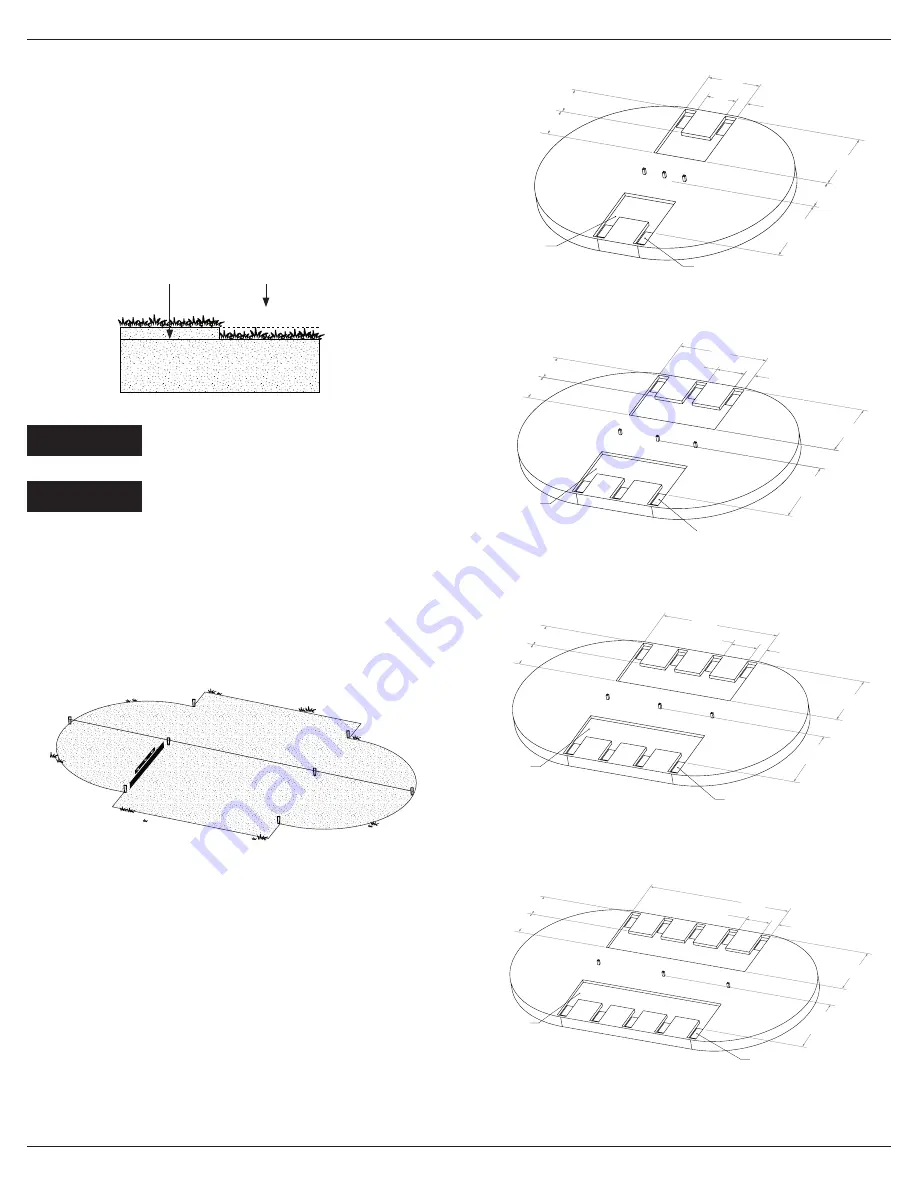
TRENCH DIGGING
STEP 1
You will need to dig up two trenches along the straight section of your pool in order
to insert the straight sections metal structure. You will need to dig up 3-
⅛
’’ (8 cm)
deep in order to insert the metal sections and pressure plates. Refer to the Trench
Digging Diagram.
STEP 2
You will have to locate the Patio Blocks as shown and dig the thickness of the block
(usually 2‘’ deep but may differ depending on the specs of the blocks). The result
must be that the top of the block will be flush with the 3
⅛
trench depth.
STEP 2
Once your removed sod and cleared all debris from your installation site you can
start the ground levelling. This step is one of the most important, the initial ground
levelling will determine the straightness and the longevity of your Oval Pool. The
Straighter the level is (max +/- 0.125’’ (3.18 mm)) the easier the following steps will
be. The best tool to level the ground will be a Transit level. If you do no have access
to a transit level, use a long plank (and make sure the plank is firm (2x4 or 2x6) and
perfectly straight) and a carpenter’s level.
Patio block
Patio block
Patio block
Patio block
10
′
(25)
Equal trench width
10
′
(25)
Equal trench width
10
′
(25)
Equal trench width
10
′
(25)
Equal trench width
5′7″ (171)
Patio block
5′7″ (171)
Patio block
5′7″ (171)
Patio block
5′7″ (171)
Patio block
2′4″ (71)
2′4″ (70)
2′4″ (70)
2′4″ (70)
5′0″ (152)
5′0″ (152)
5′0″ (152)
5′0″ (152)
3′10″
(117)
6′10″
(117)
9′11″
(301)
12′11″
(393)
2′5″ (74)
2′5″ (74)
2′5″ (74)
2′5″ (74)
2′7″ (78)
2′7″ (78)
2′7″ (78)
2′7″ (78)
2′2″
(67)
2′2″
(67)
2′2″ (67)
Equal
2′2″ (67)
Equal
3-⅛″ (8 cm)
Deep
3-⅛″ (8 cm)
Deep
3-⅛″ (8 cm)
Deep
3-⅛″ (8 cm)
Deep
12x15
12x18
12x21
12x24
Make sure that there are no electrical wires, sceptic
tanks, cesspool, wells, roots (stumps), buried debris, and
negative slopes 6’ from the pool. There should always be
a positive slope driving water away of your pool.
Do not add dirt to low areas.
IMPORTANT
IMPORTANT
Remove soil and
grass to this level.
Remove grass only
from low level.