


CARVIN
®
GOLD SERIES OVAL POOL | USER MANUAL
7
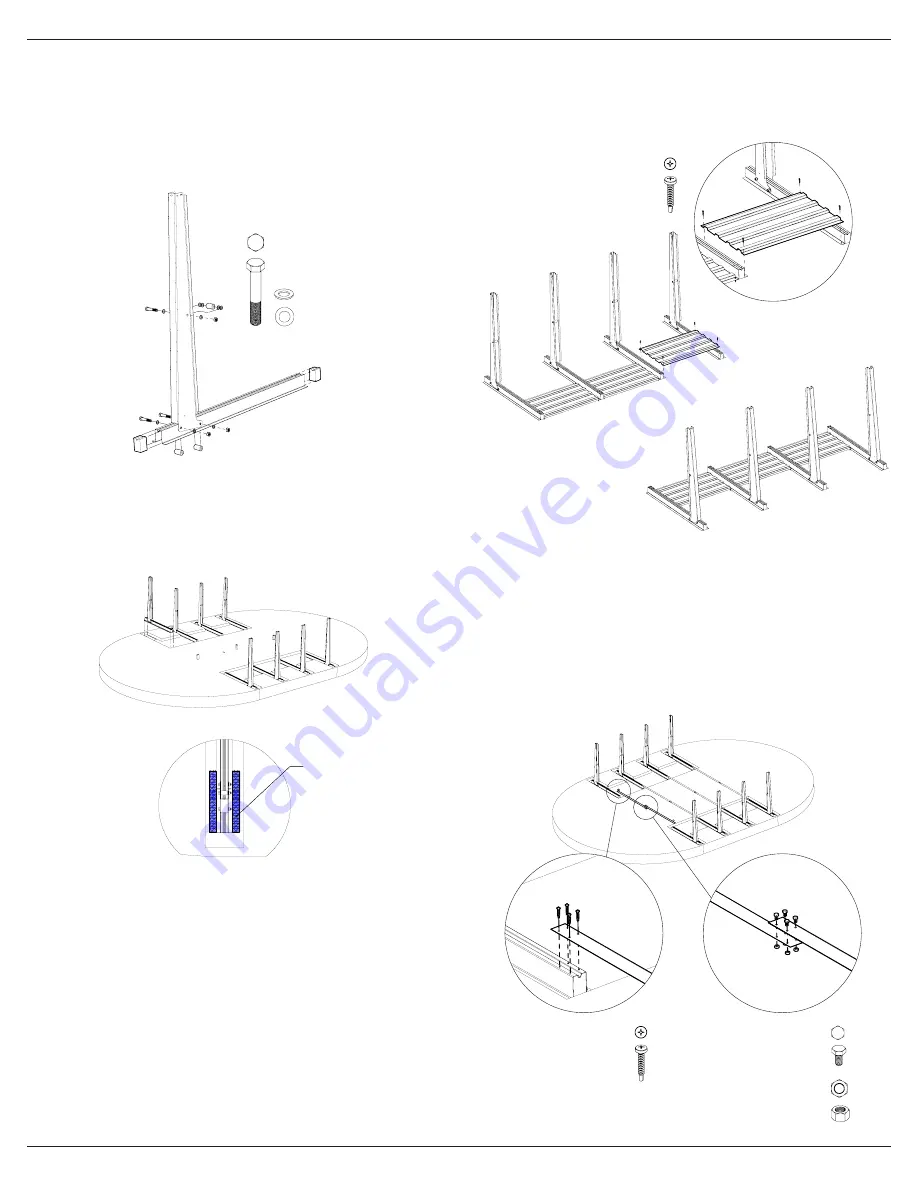
STEP 5.1
STEP 5.2
1/2'' (13mm) HEX SOCKET
P/N 14072620
Max torque 8.5 N*M (6.3 ft-lbs)
P3 - PHILLIPS DRIVE
P/N 14172209
Max torque 6.3 N*M (6.3 ft-lbs)
7/16'' (11mm) HEX SOCKET
P/N 14455075
Max torque 7.5 N*M (5.5 ft-lbs)
7/16'' (11mm) HEX SOCKET
P/N 14455085
Max torque 7.5 N*M (5.5 ft-lbs)
P3 - PHILLIPS DRIVE
P/N 14455025
Max torque 4 N*M (3 ft-lbs)
Drill at low speed
P3 - PHILLIPS DRIVE
P/N 14455032
Max torque 4 N*M (3 ft-lbs)
Drill at low speed
3/4'' (19mm) HEX SOCKET
P/N 94819A149
Max torque 66 N*M (49 ft-lbs)
3/4'' (19mm) HEX SOCKET
P/N 14455035
Max torque 66 N*M (49 ft-lbs)
P/N 91922A308
P3 - PHILLIPS DRIVE
P/N 14433700
Max torque 3 N*M (2 ft-lbs)
Drill at low speed
P/N 14073852
3/4’’ (19mm) HEX SOCKET
P/N 14455035
Max torque 66 N*M (49 ft-lbs)
P/N 91922A308
LAYING THE BUTTRESTS INSIDE THE TRENCHES
Lay in the buttrest posts assemblies in the trenches. Align the upright in the middle
of the patio block.
A
DETAIL A
SCALE 1 : 15
PATIO BLOCK
A
DETAIL A
SCALE 1 : 15
PATIO BLOCK
Patio block
ASSEMBLING PRESSURE PLATES
Assemble Pressure Plates (46025003) to the assembled footbeams with 4x screw
no.12 (14455032). Repeat until all plates are assembled
DETAIL B
DESCRIPTION
DATE
D
C
B
A
B
C
D
DWG NO.
DEC.
ALL INFORMATION CONTAINED OR PERTAINNING TO THIS
IS FORBIDDEN.
ANGLE
/ GENERAL TOLERENCE
PAGE / SHEET
ECHELLE / SCALE:
DESCRIPTION:
PROJET
/ PROJECT:
DATE:
APP. PAR
/ APP. BY:
DATE:
DESS. PAR
/ DRAW BY: BLAMBERT
DWG
B
/ PARTNO:
A
REF. SCALE
/ MATERIAL:
N/A
FINITION /
FINISH
SEE PAGE 2
POIDS
/ WEIGHT:
/COLOR
/ PARTNO
1/2'' (13mm) HEX SOCKET
P/N 14072620
Max torque 8.5 N*M (6.3 ft-lbs)
P3 - PHILLIPS DRIVE
P/N 14172209
Max torque 6.3 N*M (6.3 ft-lbs)
7/16'' (11mm) HEX SOCKET
P/N 14455075
Max torque 7.5 N*M (5.5 ft-lbs)
7/16'' (11mm) HEX SOCKET
P/N 14455085
Max torque 7.5 N*M (5.5 ft-lbs)
P3 - PHILLIPS DRIVE
P/N 14455025
Max torque 4 N*M (3 ft-lbs)
Drill at low speed
P3 - PHILLIPS DRIVE
P/N 14455032
Max torque 4 N*M (3 ft-lbs)
Drill at low speed
3/4'' (19mm) HEX SOCKET
P/N 94819A149
Max torque 66 N*M (49 ft-lbs)
3/4'' (19mm) HEX SOCKET
P/N 14455035
Max torque 66 N*M (49 ft-lbs)
P/N 91922A308
P3 - PHILLIPS DRIVE
P/N 14433700
Max torque 3 N*M (2 ft-lbs)
Drill at low speed
P/N 14073852
P3 - PHILLIPS DRIVE
P/N 14455032
Max torque 4 N*M (3 ft-lbs)
Drill at low speed
DETAIL B
DESCRIPTION
DATE
D
C
B
A
B
C
D
DWG NO.
DEC.
ALL INFORMATION CONTAINED OR PERTAINNING TO THIS
IS FORBIDDEN.
ANGLE
/ GENERAL TOLERENCE
PAGE / SHEET
ECHELLE / SCALE:
DESCRIPTION:
PROJET
/ PROJECT:
DATE:
APP. PAR
/ APP. BY:
DATE:
DESS. PAR
/ DRAW BY: BLAMBERT
DWG
B
/ PARTNO:
A
REF. SCALE
/ MATERIAL:
N/A
FINITION /
FINISH
SEE PAGE 2
POIDS
/ WEIGHT:
/COLOR
/ PARTNO
1/2'' (13mm) HEX SOCKET
P/N 14072620
Max torque 8.5 N*M (6.3 ft-lbs)
P3 - PHILLIPS DRIVE
P/N 14172209
Max torque 6.3 N*M (6.3 ft-lbs)
7/16'' (11mm) HEX SOCKET
P/N 14455075
Max torque 7.5 N*M (5.5 ft-lbs)
7/16'' (11mm) HEX SOCKET
P/N 14455085
Max torque 7.5 N*M (5.5 ft-lbs)
P3 - PHILLIPS DRIVE
P/N 14455025
Max torque 4 N*M (3 ft-lbs)
Drill at low speed
P3 - PHILLIPS DRIVE
P/N 14455032
Max torque 4 N*M (3 ft-lbs)
Drill at low speed
3/4'' (19mm) HEX SOCKET
P/N 94819A149
Max torque 66 N*M (49 ft-lbs)
3/4'' (19mm) HEX SOCKET
P/N 14455035
Max torque 66 N*M (49 ft-lbs)
P/N 91922A308
P3 - PHILLIPS DRIVE
P/N 14433700
Max torque 3 N*M (2 ft-lbs)
Drill at low speed
P/N 14073852
P3 - PHILLIPS DRIVE
P/N 14455032
Max torque 4 N*M (3 ft-lbs)
Drill at low speed
7/16’’ (11mm) HEX SOCKET
P/N 94819A149
Max torque 7.5 N*M (5.5 ft-lbs)
3/4’’ (19mm) HEX SOCKET
P/N 14455032
Max torque 66 N*M (49 ft-lbs)
STEP 2
Insert the sleeve (46025010) into the footbeam channel and then insert a ½ bolt
(14455035) with washer (91922A308) and then put a washer on the other side and
screw nut. Repeat for the other bottom bolt. For the upper sleeve of the buttrest
post you will require to assemble 2x2 washers on each sides of the sleeve, inside the
post. Insert the polystyrene block at each end. Tighten bolts at 49 ft-lbs (66 n*m)
ASSEMBLING THE TIE STRAPS
Look into the table for part number required of tie straps configuration and assem
-
ble with hex cap machine screw ¼-20 x 0.500’’ (14455075) and ¼-20 nuts (14455085).
Remove the ‘’radii stakes before screwing the tie straps at each end. Make sure to
identify your center on the tie strap with a sharpie Screw the assembled Tie straps
to the footbeam at each end with screw (14455032)
exploded view + Table with tie
straps size per pool size.


